Rice Mill ERP Master Management
MR Master Management is usually part of the technical or business requirements for the module. In other words, such data is often necessary for the module to work properly. This data will always be installed when installing the module.
MR Rice Mill Master Management process involves the following features
- User Management
- Manage Companies and Users
- Manage groups and access rights
- Manage warehouses and Locations
- Manage Charts of Accounts
- Manage Taxes
- Manage Bank Accounts
- Manage Payments
- Manage Agent and Vendor
- Manage Customer
- Manage Product and Product Variants
- Manage Lots and Serial numbers
- Manage Beat master setup
- Manage country master
- Manage Work center and Routing
1. User Login
A login is a set of credentials used to authenticate a user. Most often, these consist of a username and password. security measure designed to prevent unauthorized access to confidential data.
Enter the Application URL in the web browser and hit ‘Log in’ Button
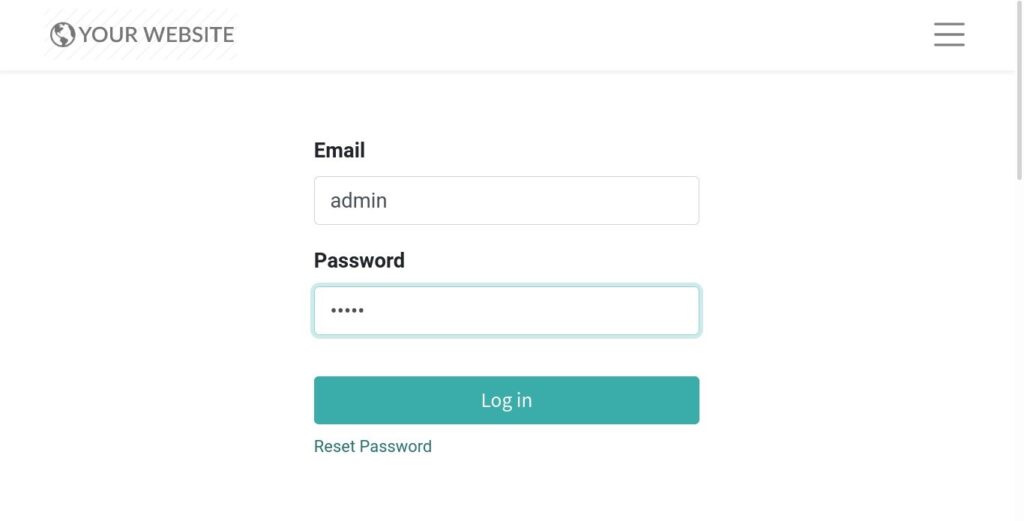
Field Description
- User – Enter the Login User ID
- Password – Enter the Login Password
2. Manage Companies
A centralized management environment allows you to select multiple companies simultaneously and set their specific warehouses, customers, equipment, and contacts. It provides you the ability to generate reports of aggregated figures without switching interfaces, which facilitates daily tasks and the overall management process.
Go to Settings → Click on Users & Companies → Select Companies
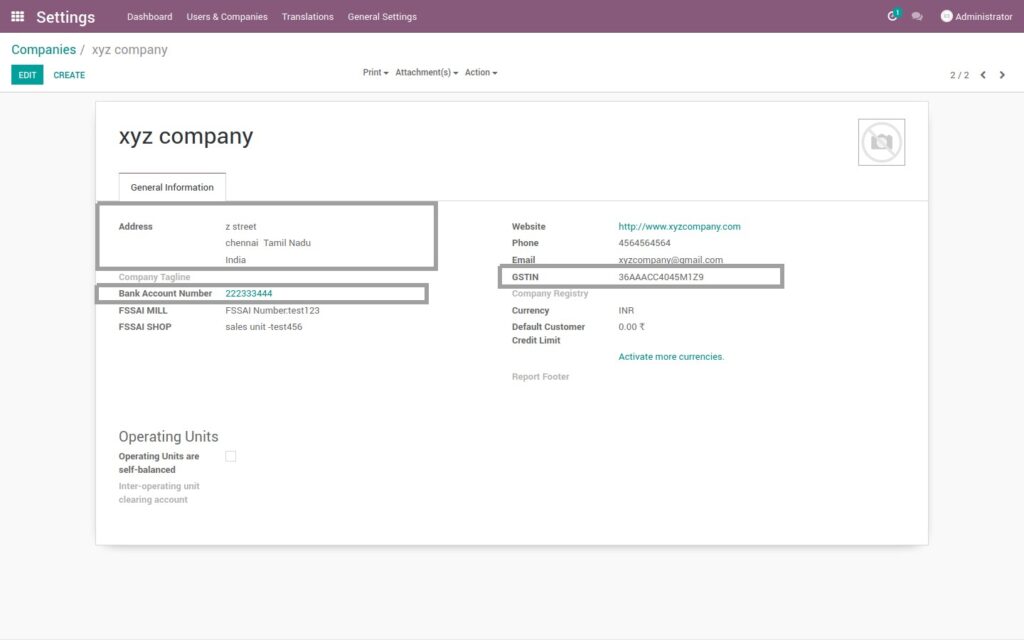
Field Description
- Create – Click on create button to create a company
- Address – Enter the address of the company
- Bank Account Number – Enter the bank account number of the respective company
- GSTIN – Enter the GST register number of the company
3. Manage Users – With Role Assignments
Define a user as someone who has access to a database to perform daily tasks. You can add as many users as you need.
Go to Settings → Click on Users & Companies → Select Users
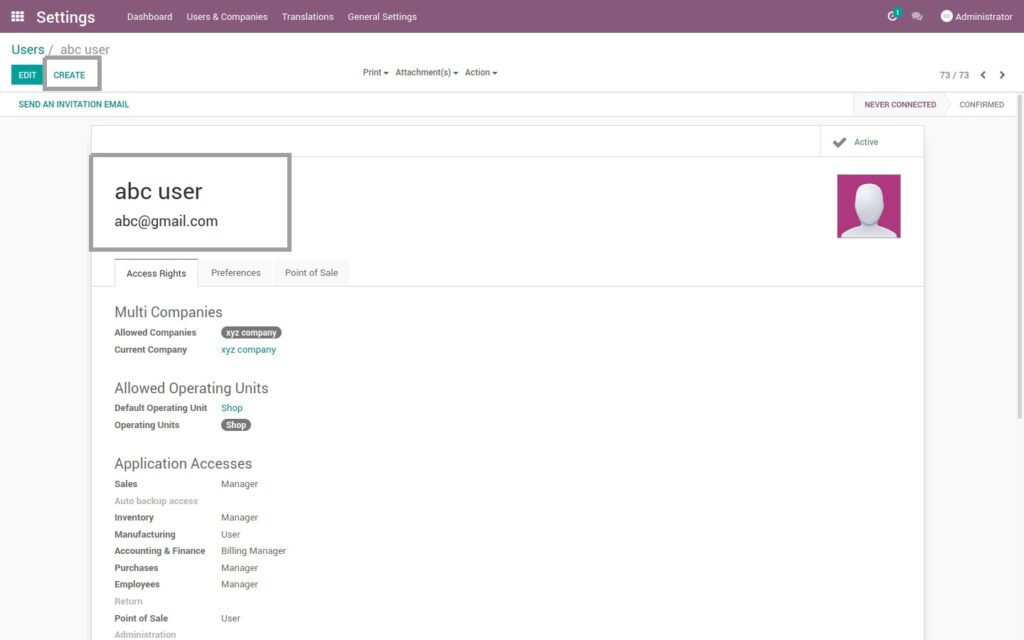
Field Description
- Create – Click on create button to create a user
- Name – Enter the name and e-mail ID of the user
- Access Rights – Set Access Rights to each application for the user from drop down
- Send Reset Password Instruction – ‘Change Password’ button can be used to set a password for the user
4. Manage Groups / Roles with Access Rights
In order to restrict the type of information each user can access, rules can be applied. Users and access rights can be added and changed at any point.
Go to Settings → Click on Users & Companies → Click on Groups
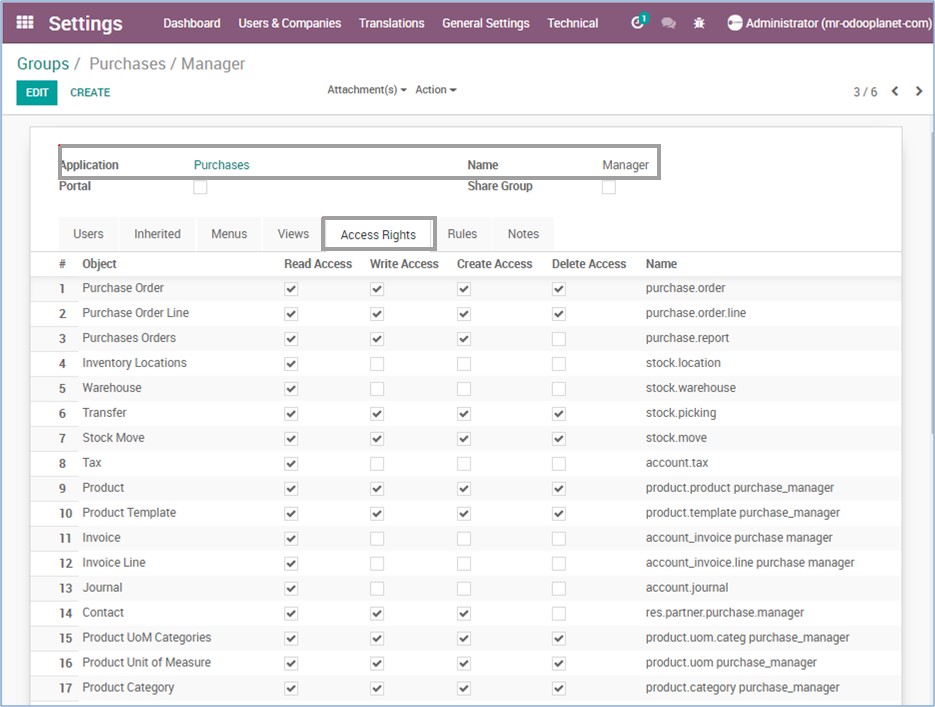
Field Description
- Create – Click on create button to create a group
- Application – Application defines the name of the application
- Name – Name defines the user level access
5. Manage Warehouses
A warehouse is the actual building/place in which your items are stocked. You can set up multiple warehouses and create moves between warehouses.
Go to Inventory → Click on Configuration → Under Warehouse Management, Select Warehouses
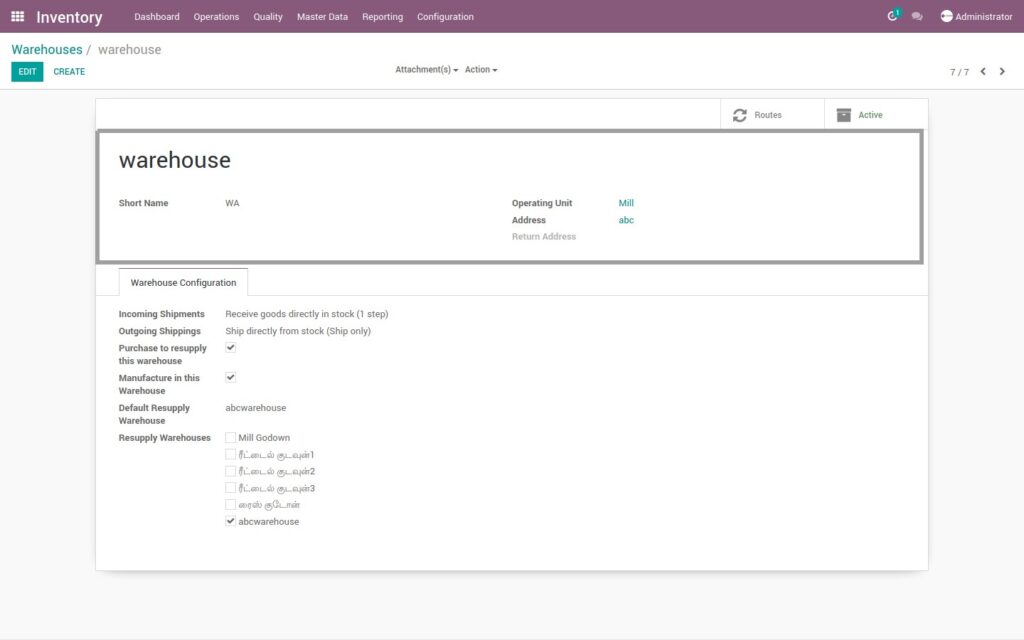
Field Description
- Create – Click on create button to create a warehouse
- Warehouse – Enter the name of the warehouse
- Short Name – Enter the embed, a 5-characters code for your distribution center. Remember that this code is the one that will show up in the rundowns, so ensure you pick a name that is straightforward and simple to enter
- Operating Units – Select the operating unit to which the warehouse belongs
- Address – Enter the warehouse address
6. Manage Locations
A Location, is a specific space within your warehouse. It can be considered as a sub-location of your warehouse, as a shelf, a floor, an aisle, etc. Therefore, a location is part of one warehouse only and it is not possible to link one location to multiple warehouses.
Go to Inventory → Click on Configuration → Under Warehouse Management, Select Locations
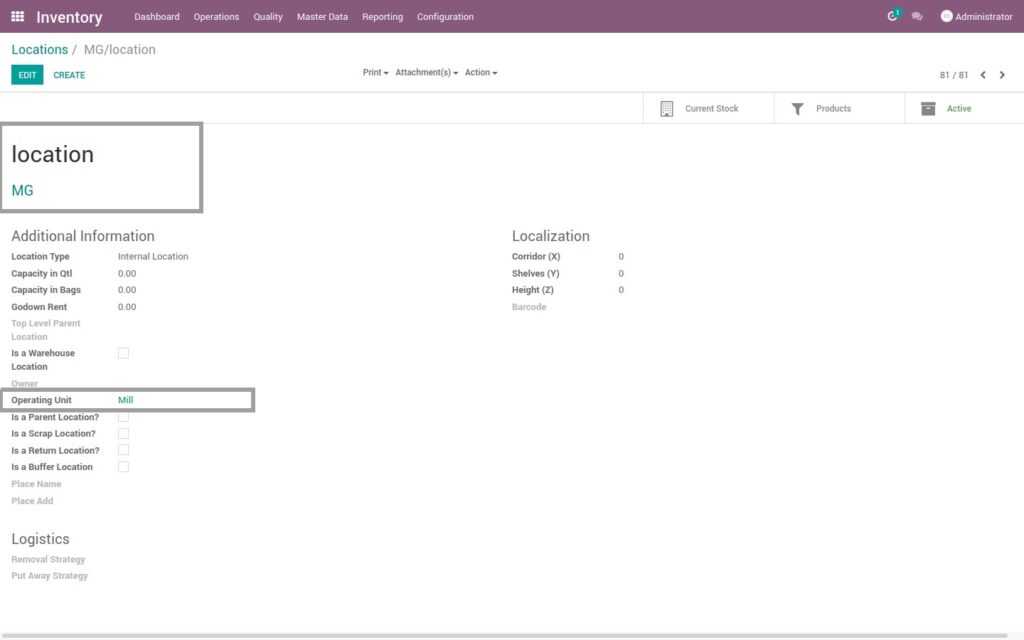
Field Description
- Create – Click on create button to create a Location
- Location – Enter the name of the location
- Parent Location – In case you are creating a location under another location (location hierarchy)
- Operating Units – Select the operating unit to which the location belongs
- Company – Let the field be empty if this location is shared between the companies
- Is a scrap location – Tick this box to allow using this location to put scrapped or damaged goods
- Is a return location –Tick this box to allow using this location as a return location
- Localization – Optimal localization details for information purpose only
7. Manage Chart of Accounts
The Chart of Accounts (COA) is the list of all the accounts used to record financial transactions in the general ledger of an organization. Every financial transaction (e.g. a payment, an invoice) impacts accounts by moving value from one account (credit) to another account (debit).
Go to Invoicing → Click on Configuration → Under Accounting, Select Chart of Accounts
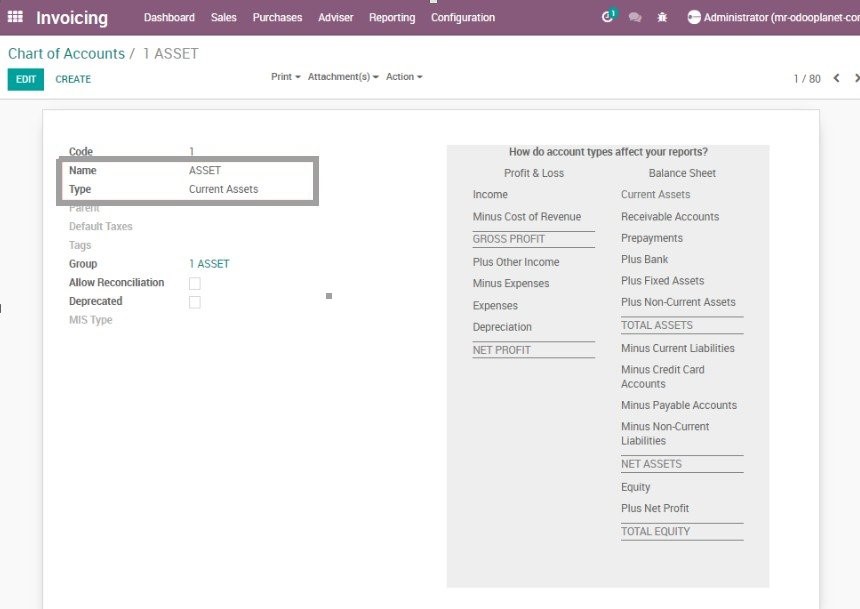
Field Description
- Create – Click on create button to create a new Chart of Accounts
- Name – Enter the name to indicate the account purpose
- Type – Select the account type from the list. You can use the details provided on the right side of the window to select the correct type
- Allow Reconciliation – If checked, this account is used for Invoice and payment matching and reconciliation
8. Manage Taxes
As part of your Fiscal Localization Package, most of your country’s sales taxes are already configured on your database. However, only a few of them are activated by default, so that you can activate only the ones relevant for your business.
Go to Invoicing → Click on Configuration → Under Accounting, Select Taxes
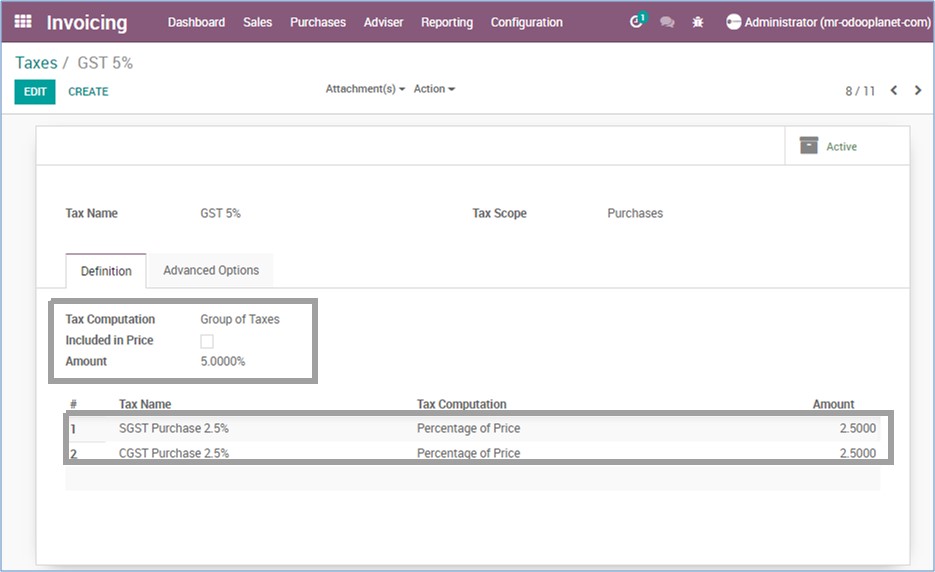
Field Description
- Create – Click on create button to create Taxes
- Tax Name – Enter tax name as you want to display it for backend users
- Tax Scope – Where to use this tax. If you select ‘None’, you can only use this tax with other tax group
- Tax Computation – Select a tax computation method. Example-Group of Taxes, Fixed, Percentage of price
- Included in Price – With this option activated, the total (including the tax) equals the Sales Price
9. Manage Bank Accounts
You can manage as many Bank Accounts as needed on your database. Configuring them well allows you to make sure that all your banking data is up-to-date and ready for the reconciliation with your Journal Entries.
Go to Invoicing → Click on Configuration → Under Accounting, Select Bank Accounts
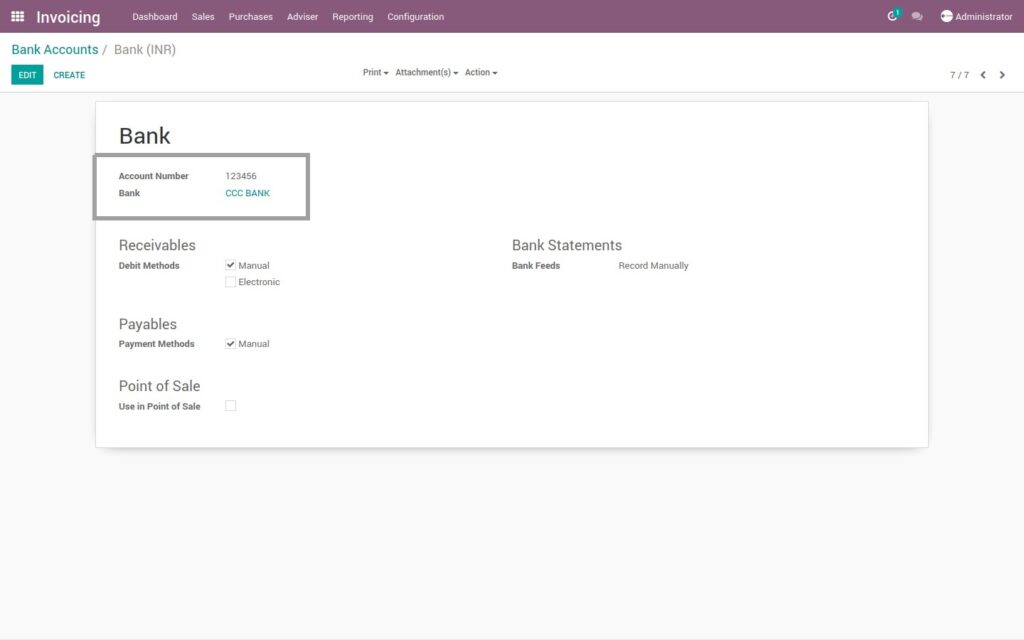
Field Description
- Create – Click on create button to create a Bank Account
- Account Number – Enter the bank account number
- Bank – Create/Select the bank from list of banks
- Debit method – Debit method is the method of collecting money
- Payment method – Payment method is the method for sending money
10. Manage Payment Terms
Payment Terms specify all the conditions under which a sale is paid, mostly to ensure customers pay their invoices correctly and on time. Payment terms can be applied to sales orders, customer invoices, supplier bills, and contacts.
Go to Invoicing → Click on Configuration → Under Management, Select Payment Terms

Field Description
- Create – Click on create button to create a payment term
- Payment Terms – Enter the name of the payment term
- Number of days – Enter the number of days in which the payment has to be paid after the date of invoice
11. Manage Currencies
Choosing to use the multi-currency option in ERP will allow you to send sales invoices, quotes and purchase orders or receive bills and payments in currencies other than your own. With multi-currency, you can also set up bank accounts in other currencies and run reports on your foreign currency activities.
Go to Invoicing → Click on Configuration menu → Under Accounting, Select Currencies
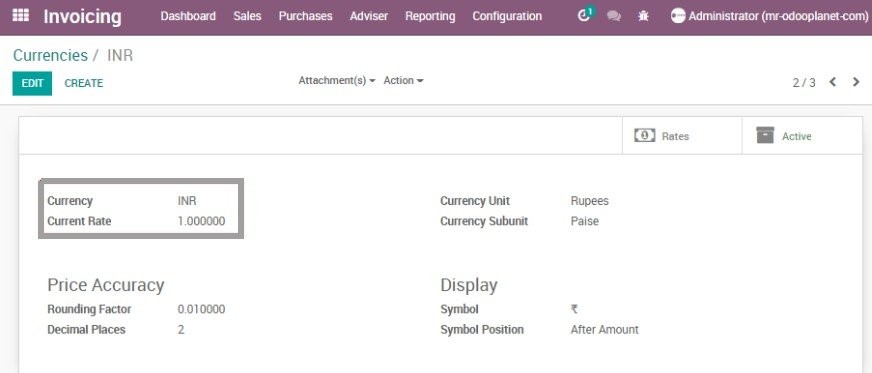
Field Description
- Create – Click on create button to create a currency
- Currency – Enter the currency code
- Currency Rate – Enter the currency rate
12. Sequence Configuration
Go to Settings → Click on Technical menu → Under Operating Unit Sequences, Select Unit Sequence
Now the Operating Units are loaded.
Select an Operating Unit → Choose a document type → Select Sequence
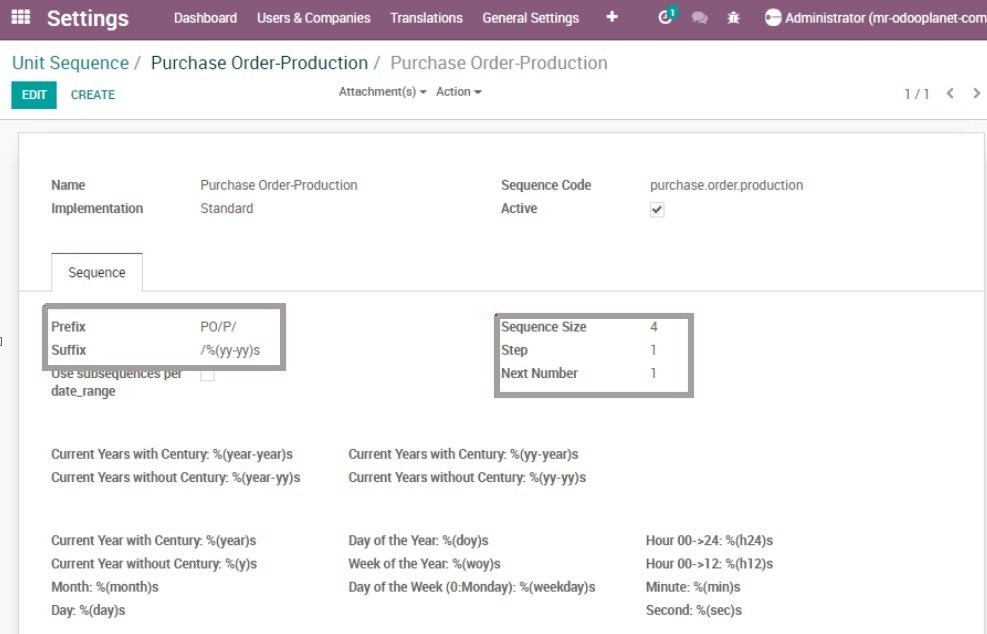
Field Description
- Create – Click on create button to create a unit sequence
- Prefix – Enter the prefix, which should display at the beginning of the document number
- Suffix – Enter the prefix, which should display at the end of the document number
- Step – Enter the step size from which the document should generate automatically
13. Manage Agents
Allows you to give the Commission to an Agent and also keep track of that Commission record.
Go to Purchase → Click on Control menu → Select Agents
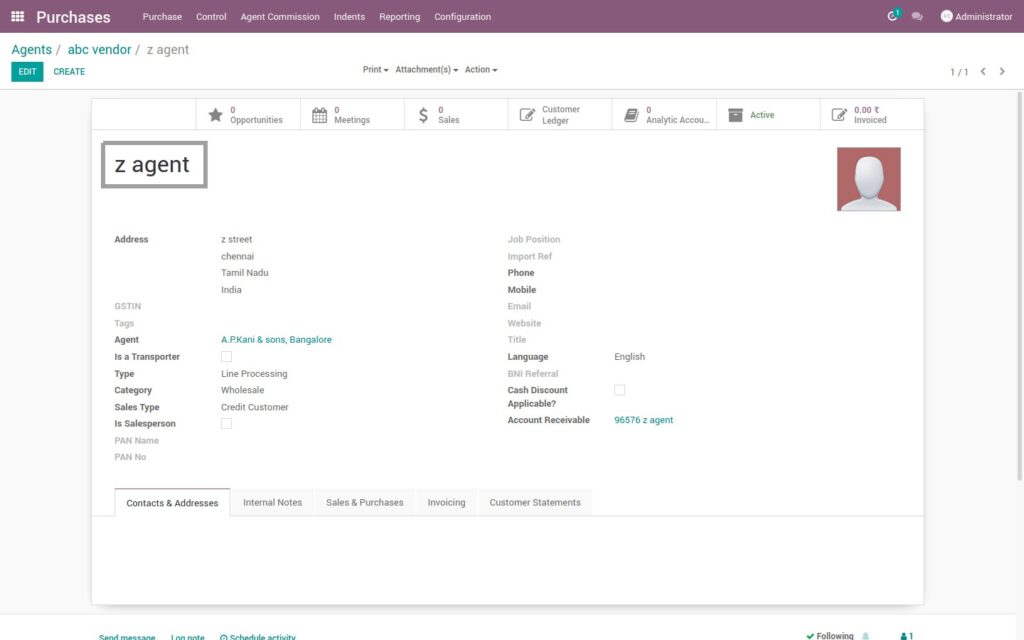
Field Description
- Agent Name – Enter the agent name
- Address – Enter the agent address
- Partner Type – Select the type of the customer. Example – B2B, B2C, etc
14. Manage Customer
In Odoo ERP both the customer and vendor are collectively called partners, so there is no separate form for creating a customer and vendor. You can create a customer profile from multiple points of Odoo ERP.
Go to Invoicing → Click on Sales menu → Under Master data, Select Customers
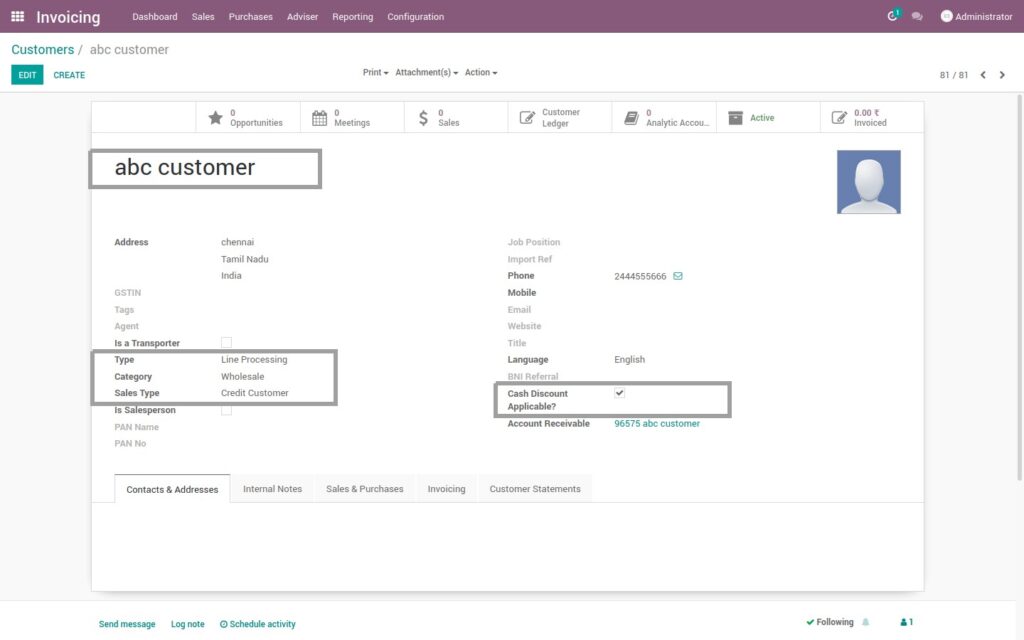
Field Description
- Create – Click on create button to create a customer
- Customer – Enter the customer name
- Address – Enter the customer address
- Partner Type – Select the type of the customer. Example – B2B, B2C, etc
- Category – Select the customer category. Example – Wholesale, Retail, etc
- Sale Type – Select the customer sale type as credit customer or cash customer
Customer Address
You can have several contacts for one partner. Contacts represent company or employees that you are in touch with, along with their address details.
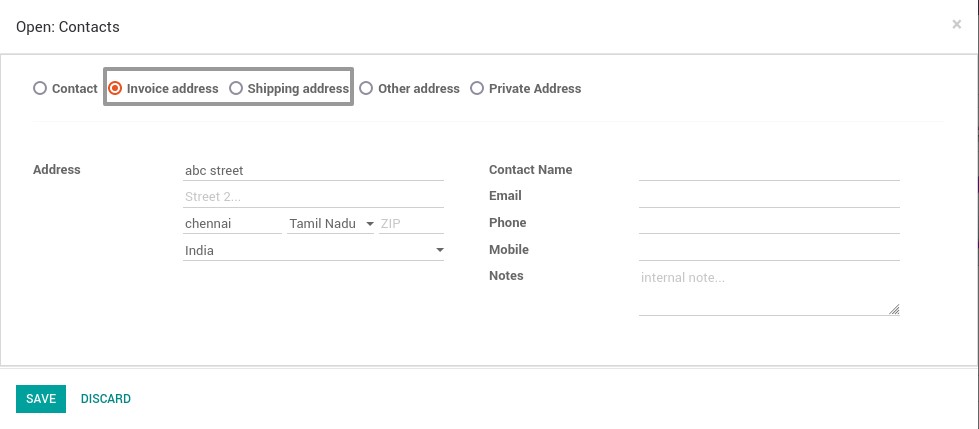
Field Description
- Invoice Address – Click on invoice address radio button to create the customer billing address
- Shipping Address – Click on invoice address radio button to create the customer delivery address
15. Manage Vendor
Vendor management system functionality enables you to efficiently manage and track vendors while doing business with them. This functionality is all about approving or disapproving vendors for using it in the product and purchase flow.
Go to Invoicing → Click on Purchase menu → Under Master data, Select Vendors
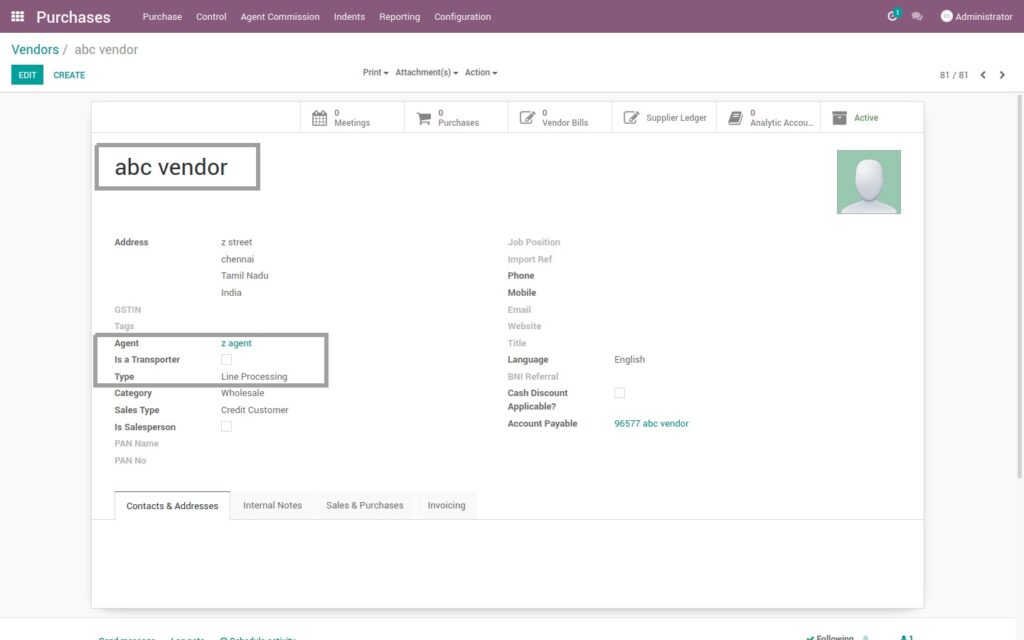
Field Description
- Create – Click on create button to create a customer
- Vendor – Enter the vendor name
- Address – Enter the vendor address
- Partner Type – Select the type of the customer. Example – B2B, B2C, etc
- Agent – Select or assign an agent for the vendor
- Sale Type – Select the vendor type
Vendor Address
You can have several contacts for one partner. Contacts represent company or employees that you are in touch with, along with their address details.
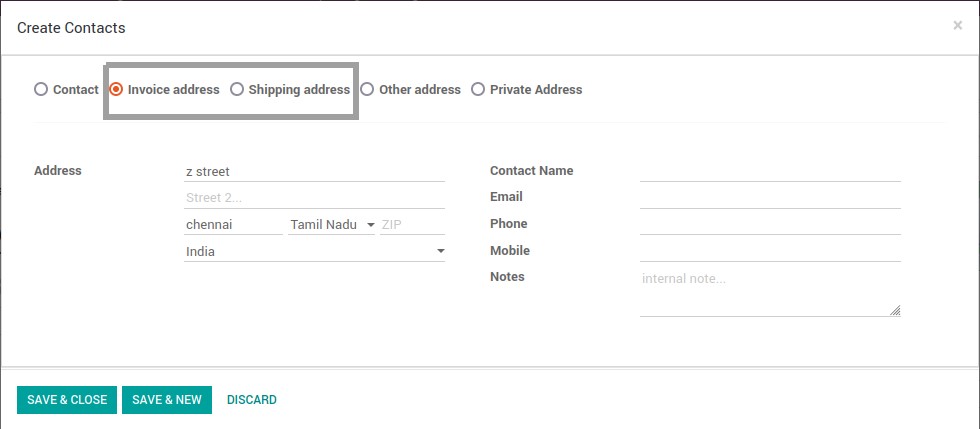
Field Description
- Invoice Address – Click on invoice address radio button to create the vendor billing address.
- Shipping Address – Click on invoice address radio button to create the vendor delivery address
16. Manage Product Categories
Product category management helps the business to categorize the products and manage their variants in an effective way.
Go to Inventory → Click on Configuration menu → Under Products, select Product Categories
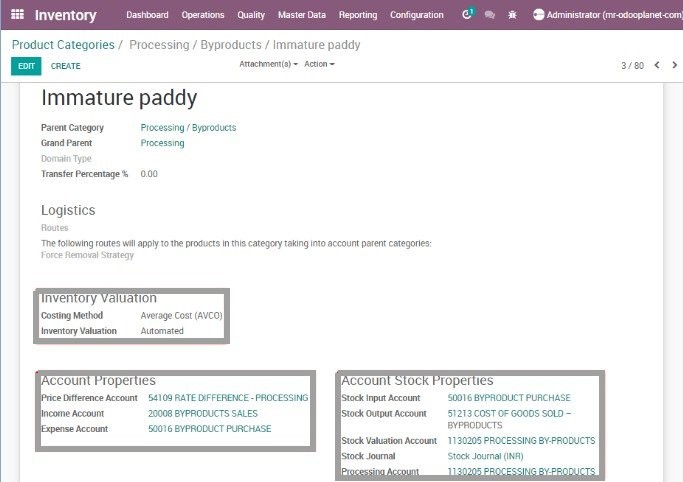
Field Description
- Category Name – One can provide the new category name in the corresponding field
- Parent category – One can create the hierarchy of the product category by choosing the parent category
- Account properties – Select the default income and expense account
- Inventory valuation
- Manual – The accounting entries to value the inventory are not posted automatically when a product enters or leaves the company
- Automated – An accounting entry is automatically created to value the inventory when a product enters or leaves the company
17. Manage Product
Odoo has a vivid product creation facility. Using it, the user can specify the details of a product image, product name, product type, procurement details, inventory details, sales and purchase information and accounting details.
Go to Inventory → Click on Master Data menu → Select Product Variants
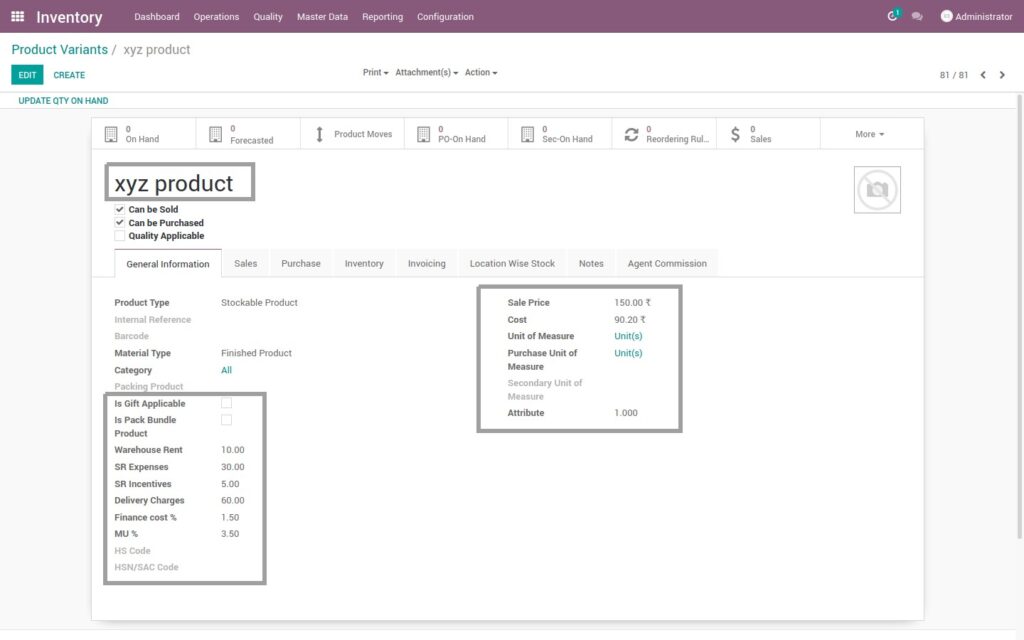
Field Description
- Product Name – Enter the product name, which will be displayed on all other screens that refer to this specific product
- Sales Price – The base sale price of the product, the product may be different if there are variants available
- Cost – Cost, used for stock valuation in standard price and as a first price to set in average/FIFO
- Unit of Measure – Select the product UOM
- Can be sold – Tick this and the product will be listed in sales
- Can be Purchased – Tick this and the product will be listed in purchase
- Can be expensed – If the product is Internal usage.
18. Product Variant Master
Product variants are combinations of a product, for example those that have different colors or sizes. These product variations are also known as parent-child relationships.
Go to Inventory → Click on Configuration menu → Under Products, Select Attributes
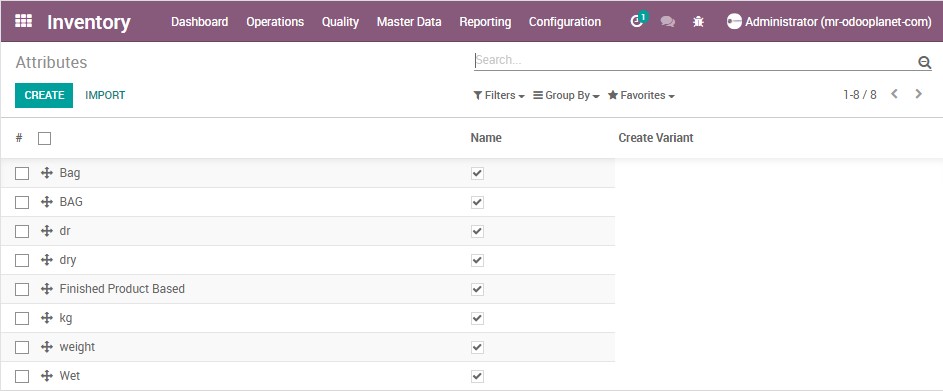
Field Description
- Attribute – Enter the attribute name
19. Lots / Serial Numbers
Odoo provides the concept of ‘Lots’, by which a group of products can be identified using Lot number. Lot numbers and serial numbers are used for the same purpose, i.e. identification of products.
Go to Inventory → Click on Master Data menu → Select Lots/Serial Numbers
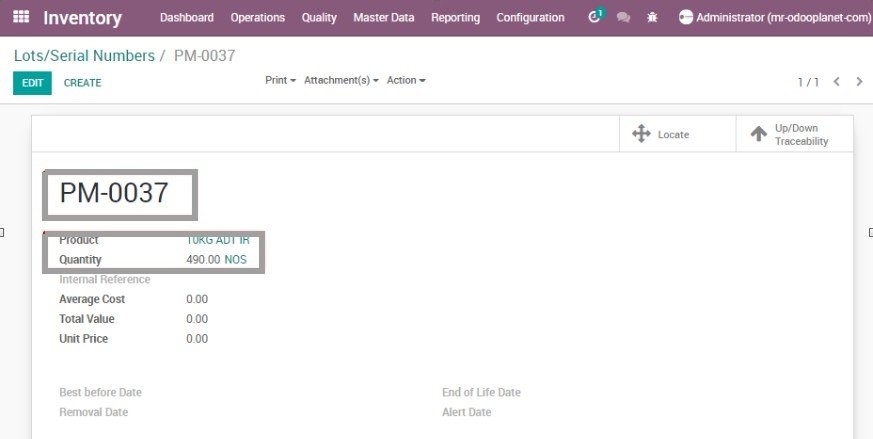
Field Description
- Lot – Enter the Lot/serial number
- Product – Enter the name of the product
- Quantity – Enter the Product quantity
20. Beat Master
Geographical area which is combined of several areas. Can choose the specific area in sales transaction.
Go to Sales → Click on Configuration menu → Select Beat Master

Field Description
- Code – Enter the code of the beat
- Name – Enter the beat name
- District – Select the district to which the beat belongs
21. Area Master
Geographical area where business transactions taking place.Can choose the specific area in sales transaction.
Go to Sales → Click on Configuration menu → Select Area Master
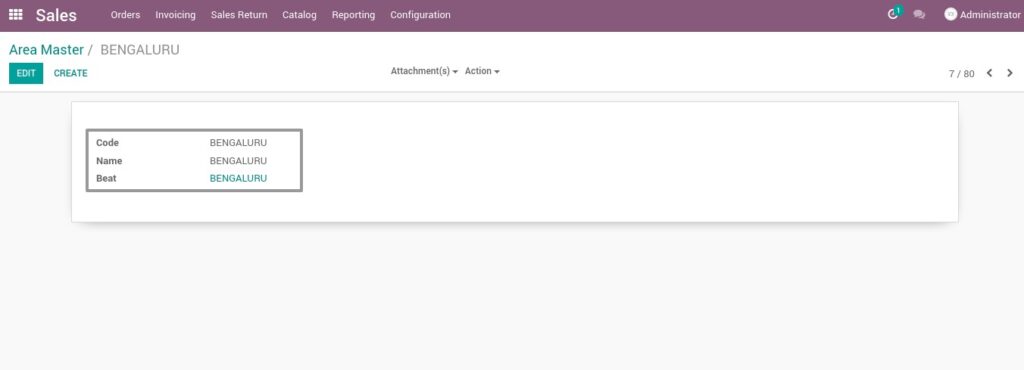
Field Description
- Code – Enter the code of the area
- Name – Enter the area name
- District – Select the beat to which the area belongs
22. District Master
Geographical area which is combined of several beat. Can choose the specific area in sales transaction.
Go to Sales → Click on Configuration menu → Select District Master
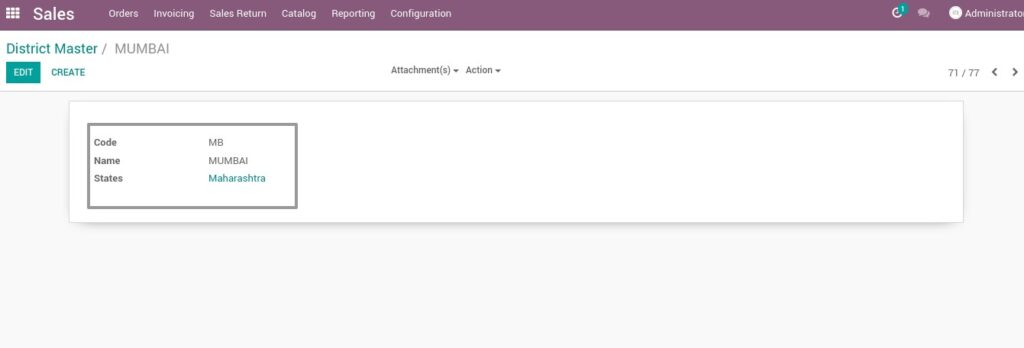
Field Description
- Code – Enter the code of the district
- Name – Enter the district name
- District – Select the state to which the district belongs
23. Material Type Master
Categorize the products based on different material types like finished products,raw materials, Asset,Packing Material etc. Able to filter the products by choosing the specific material type while creating an entry.
Go to Sales → Click on Configuration menu → Select Material Type

Field Description
- Code – Enter the code of the raw material
- Name – Enter the raw material name
- Operating Unit – Select the operating unit.
24. Price List Master
Set multiple prices per product. Specific price list can be choose during sales transactions.
Go to Sales → Click on Catalog menu → Select Pricelists
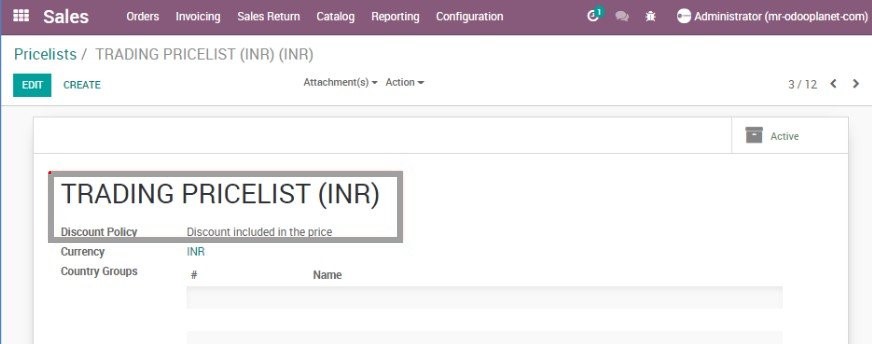
Field Description
- Name – Enter the price list name
- Discount Policy – Select a discount policy to allow different prices for products based on customer’s and other criteria.
25. Unit of Measure Master
In some cases, handling products in different units of measure is necessary. For example, if you buy products in a country where the metric system is of application and sell in a country where the imperial system is used, you will need to convert the units. Another common use case is buying products in bigger packs to your supplier and selling them in units to your customers.
Go to Inventory → Click on Configuration menu → Under Unit of Measures, Select UOM

Field Description
- Unit of Measure – Name of UM
- Category – you may add a new category or select from an existing one
- Type – Select a type
- Reference Unit – Means, this will be the base unit for all units in this category (for example, we can set Meter as base for length category.)
- Bigger than reference unit – Example, if meter is reference unit the while you add KM you must choose this option
- Smaller than reference unit – opposite of the above
- Ratio – Ratio between Reference unit and other unit.
26. Country Master
Manage sales of multiple countries with different payment currency and price. All the region countries are configurable from the Odoo backend and linked with its price list. So you can set up different price and currency for each country with its Own products.
Go to Contacts → Click on Configuration menu → Under Localizations, Select Countries.
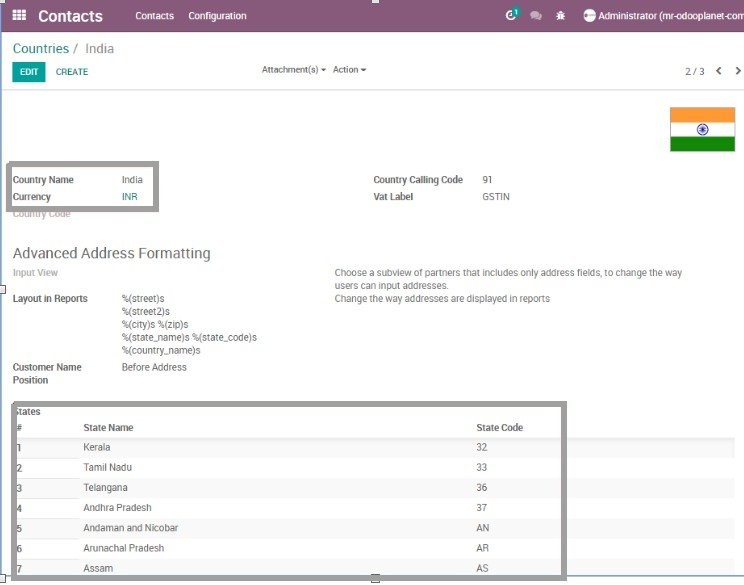
Field Description
- Country Name – Enter the country name
- Currency – Select the currency of the country
- States – Add the states of the country
27. Refund and Return reason master
Allows to list different refund and return reasons so that it can be used when a sold product is returned from the customer due to some reasons.
Go to Point of Sales → Click on Configuration menu → Under Products, Select Return Reason

Field Description
- Reason – Enter the name of the reason
- Code – Enter the return reason code
28. Driver Master
Allows to map the information regarding drivers. It can be used to set the driver details in delivery allotments
Go to Purchase → Click on Configuration menu → Select Driver Master

Field Description
- Driver Name – Enter the driver name
- License No – Enter the driver’s license number
- License Expiration Date – Select the driver’s license expiration date
- Contact No – Enter the Contact number
29. Transport Master
Information regarding transporters. In the case of delivery of goods using external transporters, they can be mentioned in the delivery allotment.
Go to Purchase → Click on Configuration menu → Select Transport Master
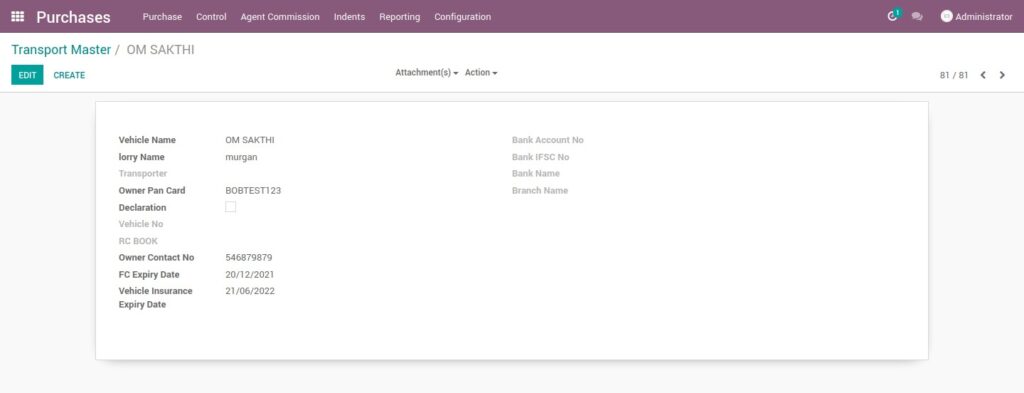
Field Description
- Vehicle Name – Enter the vehicle name
- Lorry Name – Enter the name of the lorry
- Transporter – Select the transporter name
- Owner Pan Card – Enter the pan card number of the vehicle owner
- Vehicle No – Enter the vehicle registration number
- Owner contact No – Enter the contact number
- Vehicle Insurance Expiry Date – Select the vehicle insurance expiration date.
30. Landed Cost Types
The landed cost feature in Odoo allows to include additional costs (shipment, insurance, customs duties, etc.) into the cost of the product.
Go to Inventory → Click on Configuration menu → Under Products, Select Landed Cost Types
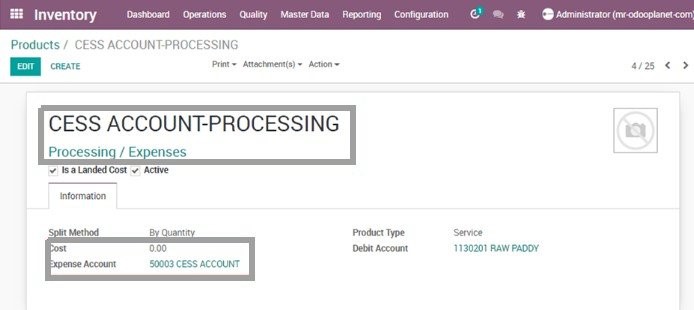
Field Description
- Product Name – Enter the name of the item for which the landed cost type is made
- Product Category – Choose the category for the chosen product
- Split Method – The field characterizes the method of landed cost type
- Cost – The field characterizes the cost utilized for stock valuation in Standard price and as a first price to set in average/FIFO
- Expense Account – Keep this field empty to utilize the default value from the product category
- Product Type :
- A storable product is a category of product for which one need to manage the stock
- A consumable product is a category of product for which one need not manage the stock
- A service is a non-material category of product you provide
31. Variant Values Master
Product variants are used to manage products having different variations like 5 kg bag,10 kg bag etc. in specific attributes. Helps to categorize products during sales transactions.
Go to Inventory → Click on Configuration menu → Under Products, Select Attribute Values
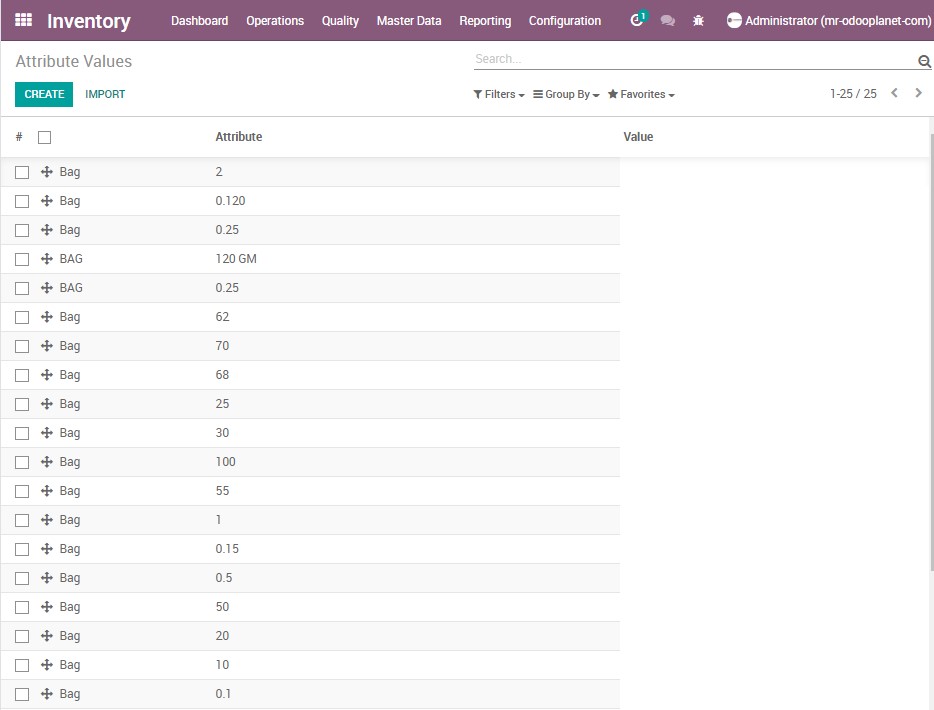
Field Description
- Name – Enter the name of the attribute
- Attribute – Enter the attribute value
32. Quality Inspection Parameters Master
Quality parameters which are checked while inspecting the product can be set as a list. Based on the quality checks, products can be accepted or rejected. Rejected products can be returned back to vendor.
Go to Manufacturing → Click on MRP Quality menu → Under Configuration, Select QI Parameters
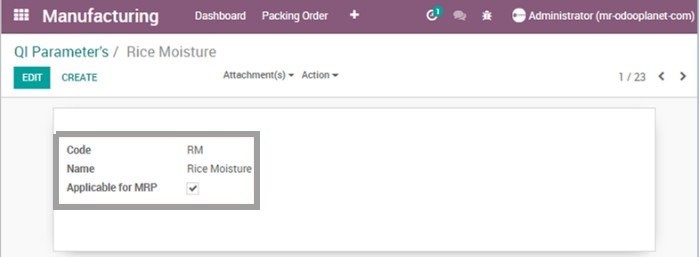
Field Description
- Code – Enter the code of the QI parameter
- Name – Enter the name of the parameter
- Applicable for MRP – Check this box, if this parameter is applicable for MRP
33. Routing Master
Different but continuous work flow steps together form a routing. A routing can be choosen to perform the specific set of processes during manufacturing.
Go to Manufacturing → Click on Master Data → Select Routings
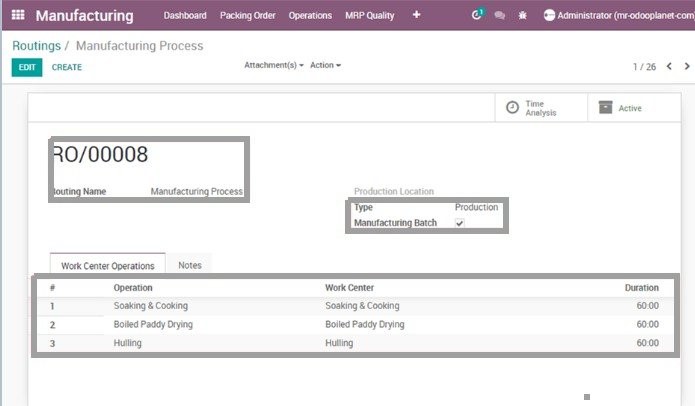
Field Description
- Routing Name – Enter the route name
- Work Center Operations – Click Add an Item to add the work centers included in this route
34. Work Center Master
Place where a process is carried out. Can manage the work centers as per the manufacturing work flow.
Go to Manufacturing → Click on Master Data → Select Work Centers
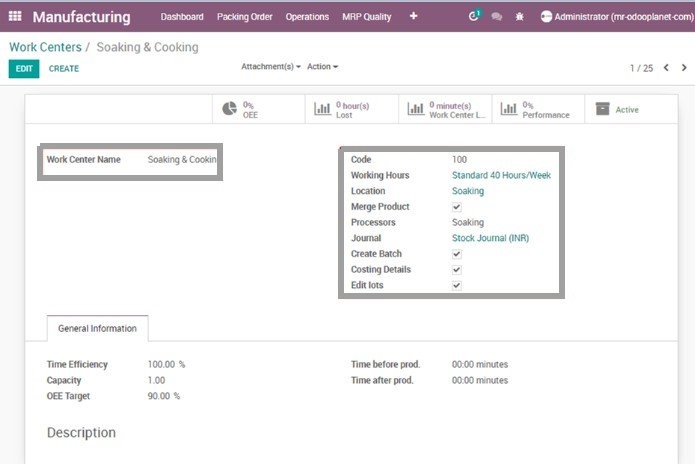
Field Description
- Work Center Name – Enter the work center name
- Working Hours – Select the standard working hours of work center
- Processors – Select processors to which the work center belongs from the drop-down list
- General Information- Add all the necessary information, including the process done here, and the performance factors etc. in field
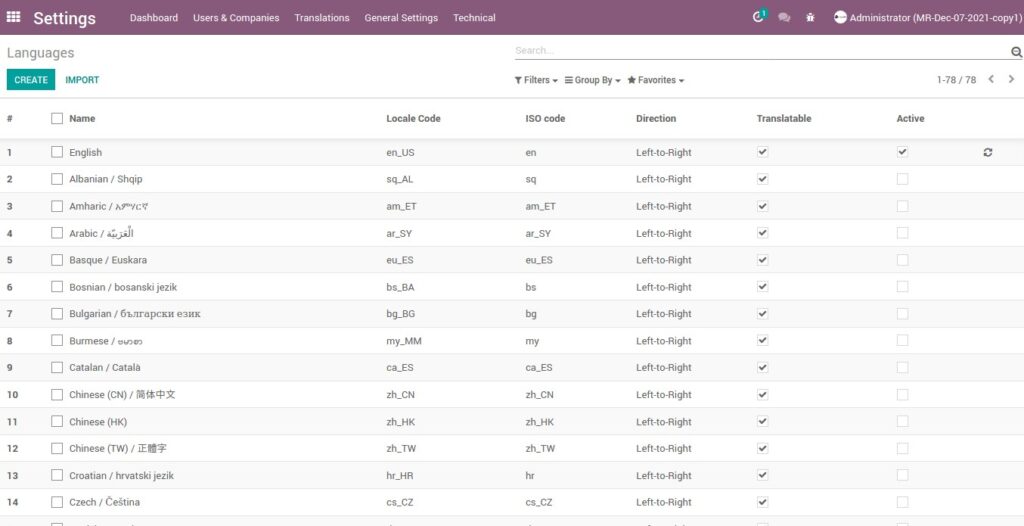
35. Language Master
Multiple languages can be mapped so that you can change the language based on the location or usage.
Go to Settings → Click on Translations → Select Languages
