Odoo ERP for Timber Trading Master Management
1. User Login
A login is a set of credentials used to authenticate a user. Most often, these consist of a username and password. Security measure designed to prevent unauthorized access to confidential data.
Enter the Application URL in the web browser and hit ‘Log in’ Button
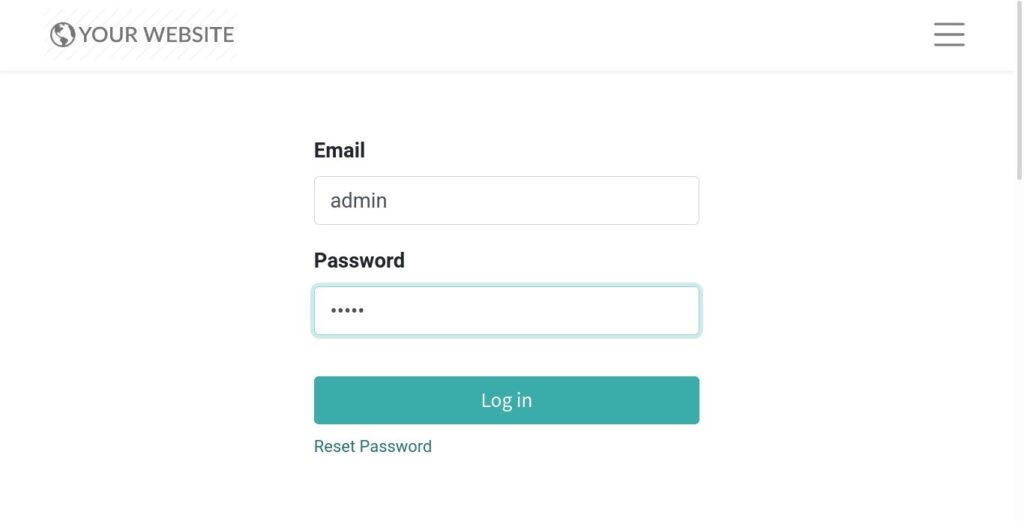
Field Description
- User – Enter the Login User ID
- Password – Enter the Login Password
2. Manage Multi Companies
A centralized management environment allows you to select multiple companies simultaneously and set their specific warehouses, customers, equipment, and contacts. It provides you the ability to generate reports of aggregated figures without switching interfaces, which facilitates daily tasks and the overall management process.
Go to Settings → Click on Users & Companies → Select Companies
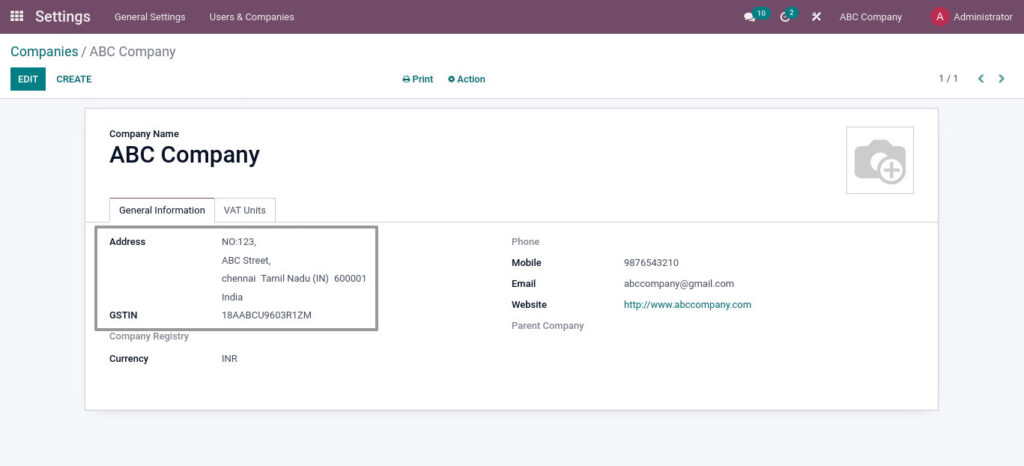
Field Description
- Create – Click on create button to create a company
- Address – Enter the address of the company
- GSTIN – Enter the GST register number of the company
3. Manage Users
Define a user as someone who has access to a database to perform daily tasks. You can add as many users as you need.
Go to Settings → Click on Users & Companies → Select Users
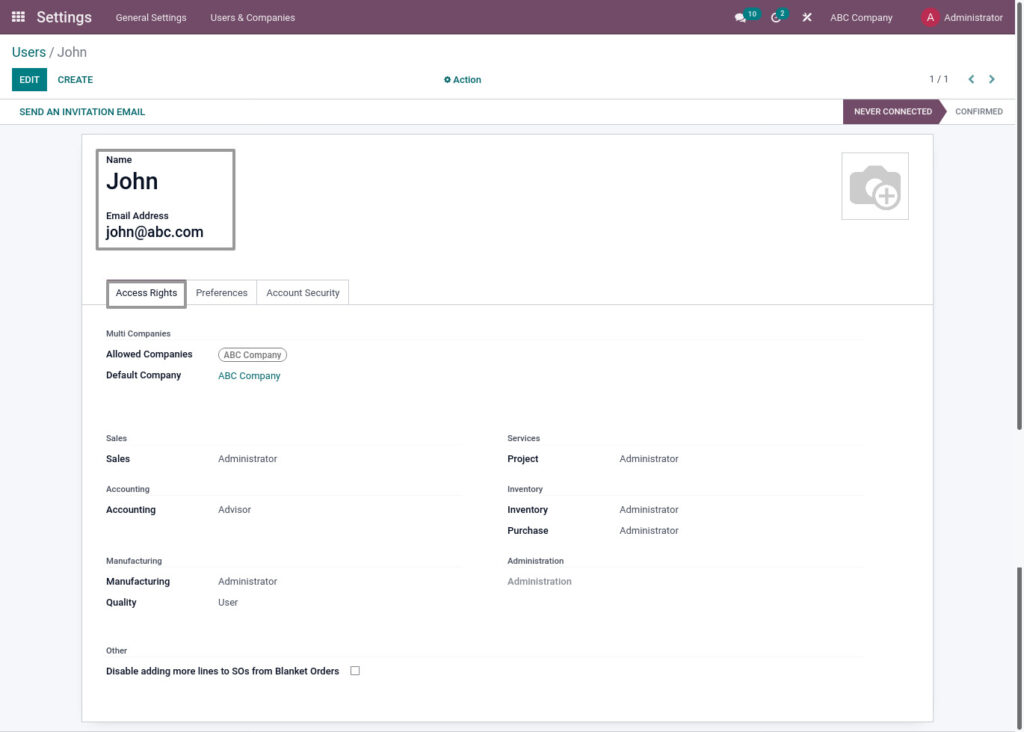
Field Description
- Name – Enter the name of the user
- Email Address – Enter the email address of the user
- Access Rights – We can set the employee’s access rights
4. Manage Groups / Roles with Access Rights
In order to restrict the type of information each user can access, rules can be applied. Users and access rights can be added and changed at any point.
Go to Settings → Click on Users & Companies → Click on Groups
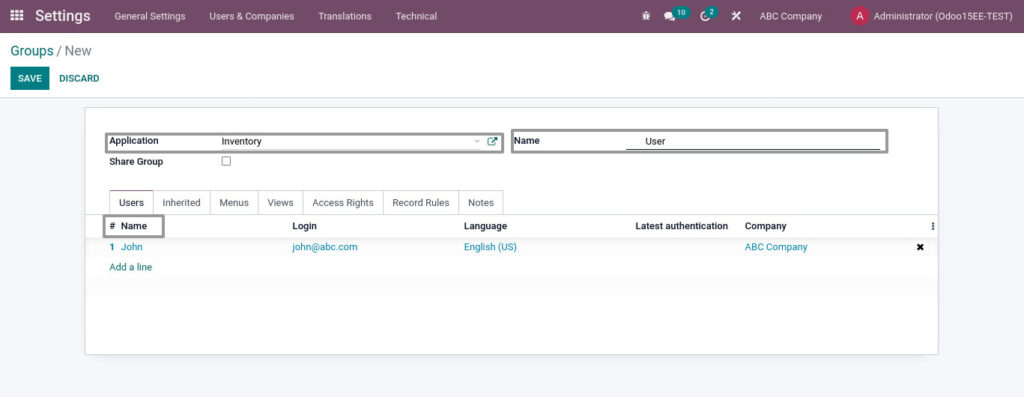
Field Description
- Create – Click on create button to create a group
- Application –Application defines the name of the application
- Name –Name defines the user level access
5. Manage Banks
Create and manage bank details. You can manage as many as bank details you want. So,you can easily define the banks in bank accounts.
Go to Contacts → Click on Configurations → Select Banks
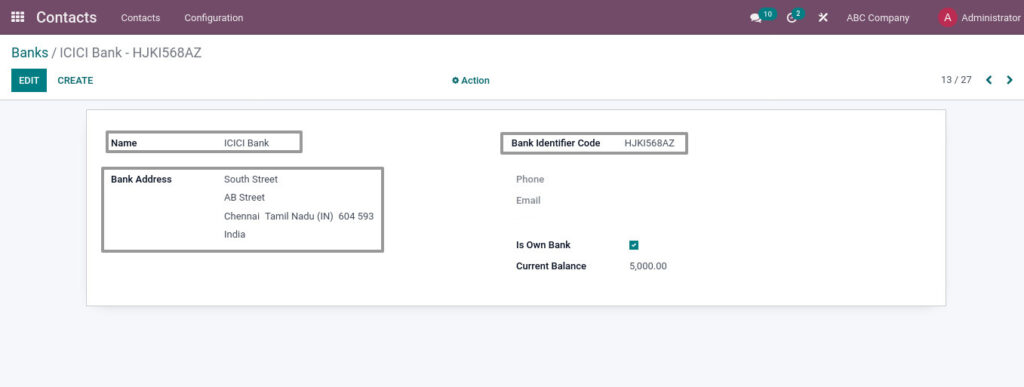
Field Description
- Name – Enter the name of the bank
- Bank Address – Enter the address of the bank
- Bank Identifier Code – Enter the Bank Identifier Code
6. Manage Bank Accounts
You can manage as many Bank Accounts as needed on your database. Configuring them well allows you to make sure that all your banking data is up-to-date and ready for the reconciliation with your Journal Entries.
Go to Contacts → Click on Configurations → Select Bank Accounts

Field Description
- Account Number – Enter the Account Number
- Account Holder – Enter the name of the account holder
- Bank – Enter/Select the bank
7. Manage Tax
There are numerous types of taxes, and their application varies greatly, depending mostly on your company’s localization. To make sure they are recorded with accuracy, Odoo’s tax engine supports all kinds of uses and computations.
Go to Accounting → Click on Configurations → Select Taxes
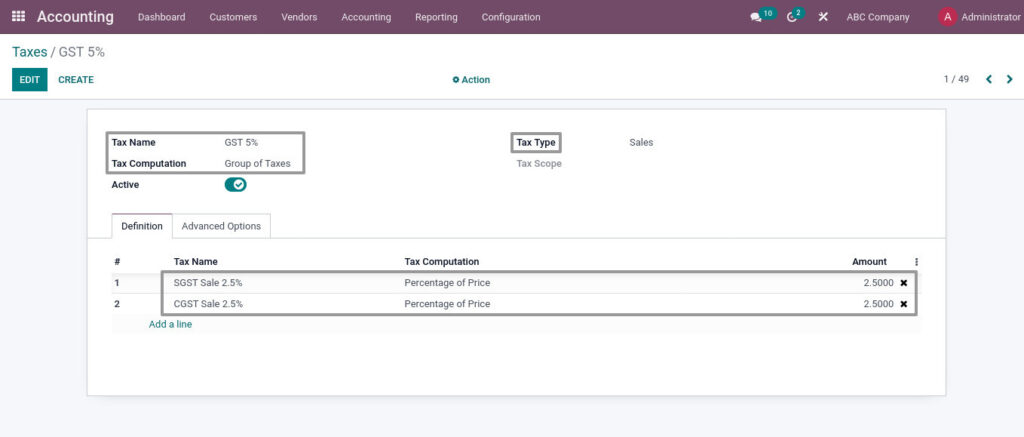
Field Description
- Tax Name – Enter tax name
- Tax Computation – Select a tax computation method
- Tax Type – Select the tax type. Example – Sales, Purchase
8. Manage Product Pricelist
A price list is a list of prices defined for a set of items. Each price list is applicable to a particular customer or a group of customers for a particular duration.
Go to Sales → Click on Products → Select Pricelists
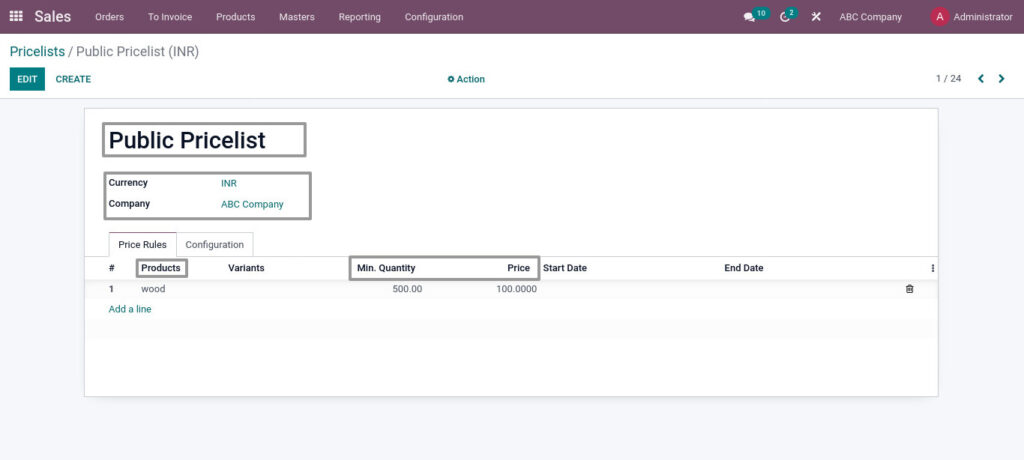
Field Description
- Public Pricelist – Enter the name of the pricelist
- Currency – Select the currency type
- Company – Enter the name of the company
- Product – Select the product
- Min.Quantity – Enter the minimum quantity of the product to sale
- Price – Enter the product’s price
9. Manage Unit Of Measure
In sometimes, handling products in different units of measure is necessary, In Odoo, one can easily configure the unit of measures.
Go to Inventory → Click on Configuration → Select UoM Categories
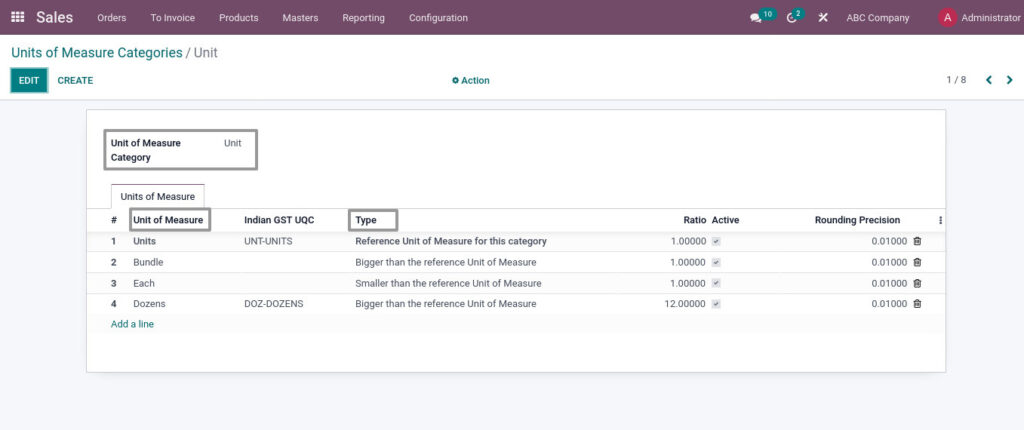
Field Description
- Unit of Measure Category – Enter the name of the Unit of Measure Category
- Unit of Measure – Enter the name of the unit of measure
- Type – Select the UoM type
10. Manage Product Category
A group of products that offer similar benefits can be referred to as product categories. Products from a same product category will have similar physical features and will offer similar benefits.
Go to Inventory → Click on Configuration → Select Product Categories
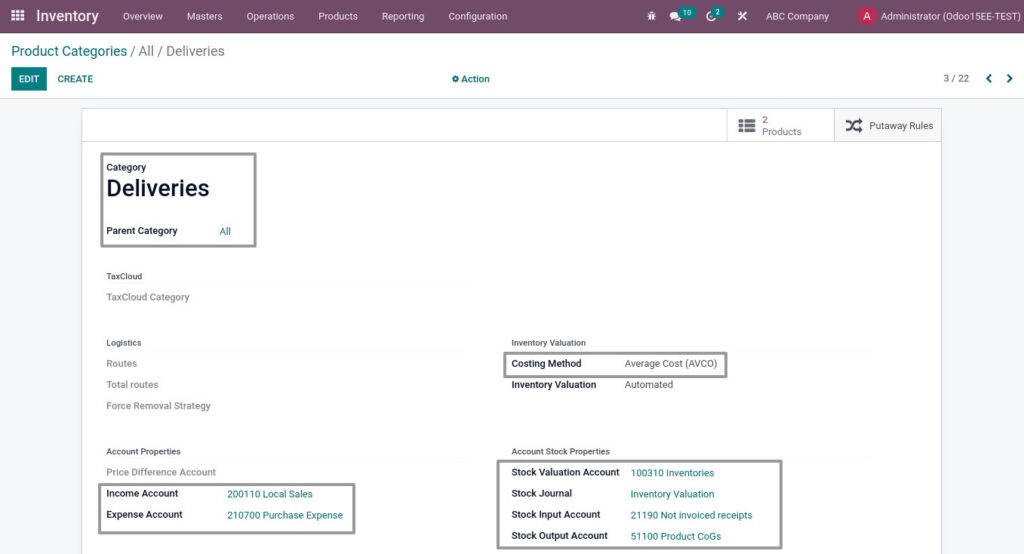
Field Description
- Category – Enter the name of the category
- Parent Category – Select the parent category
- Costing Method – Select the Costing method based on how the product to be valued
- Income Account – Select the income account for the category
- Expense Account – Select the expense account for the category
- Stock Valuation Account – Select the Stock valuation account
- Stock Journal – Select the stock journal for the category
- Stock Input Account – Select the product input account for the category
- Stock Output Account – Select the product Output account for the category
11. Manage Attributes
Products with variants are products that have similarities, they are based on the same model, but differ in some aspects from one another. Here, We can configure that variants as attributes and values.
Go to Inventory → Click on Configuration → Select Attributes
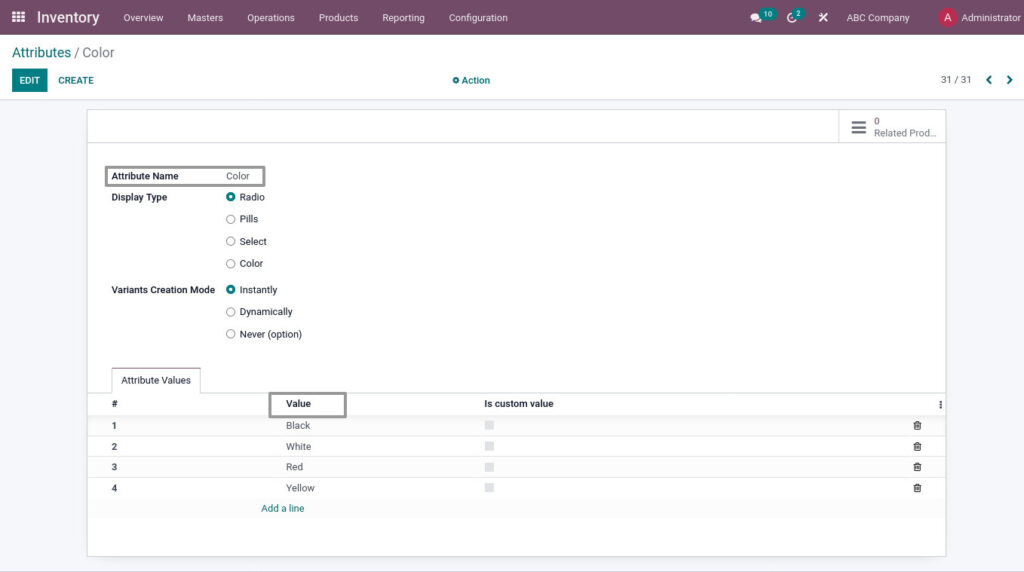
Field Description
- Attribute Name – Enter the Attribute name
- Value – Enter the attributes values
12. Manage Products
Odoo has a vivid product creation facility. Using it, the user can specify the details of a product image, product name, product type, procurement details, inventory details, sales and purchase information and accounting details.
Go to Inventory → Click on Products → Select Products
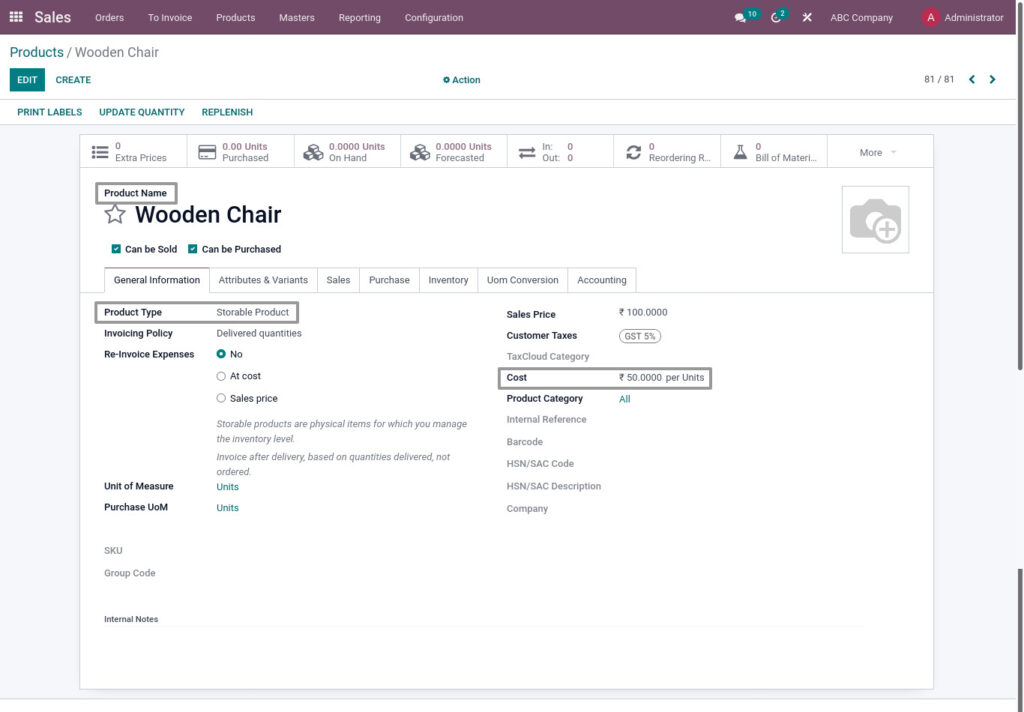
Field Description
- Product Name – Enter the name of the product
- Product Type – Select the product type. Example – Storable, Consumable, Service
- Cost – Enter the price of the product
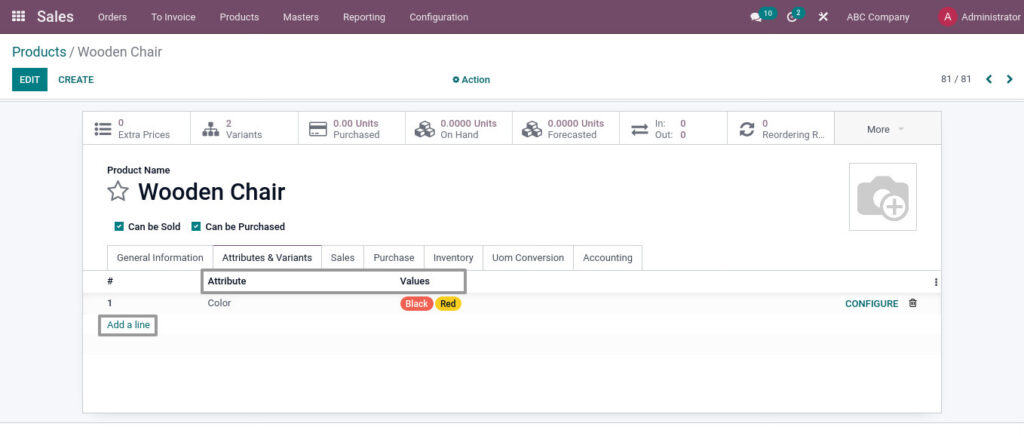
Field Description
- Attribute – Select the attribute
- Value – Select the attribute value
- Add a line – Click Add a line and select more attributes and values
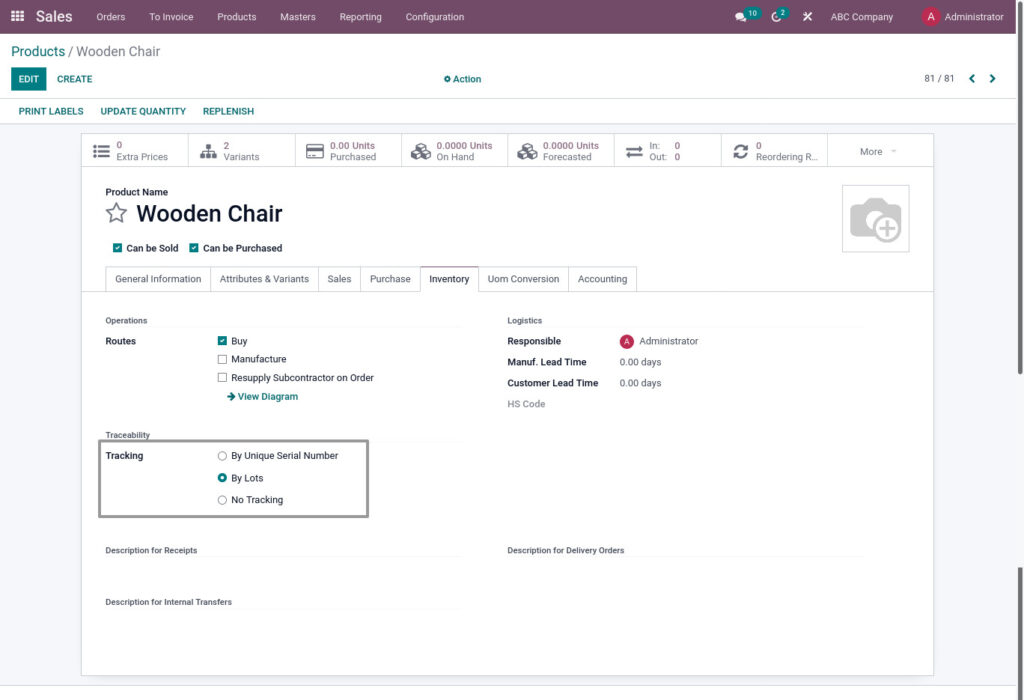
Field Description
- Tracking – Select the tracking for the product
13. Manage Payment Terms
Payment Terms specify all the conditions under which a sale is paid, mostly to ensure customers pay their invoices correctly and on time.
Go to Accounting → Click on Configurations → Select Payment Terms
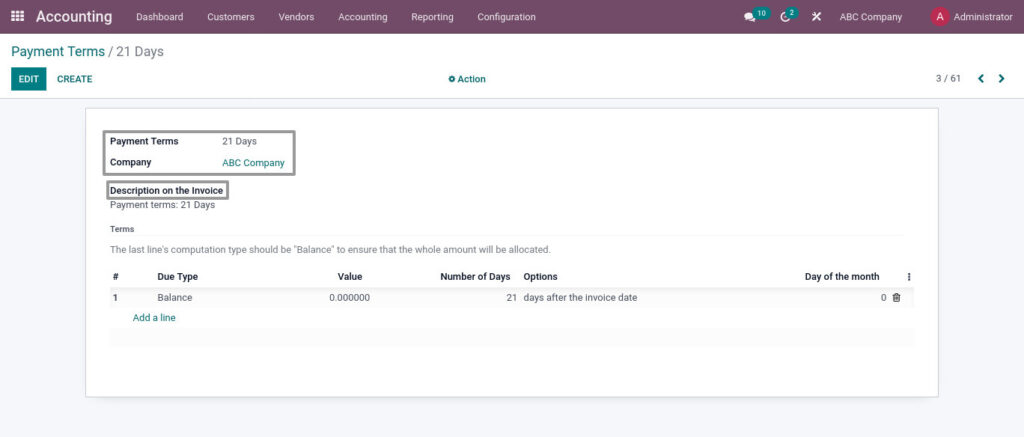
Field Description
- Payment Terms – Enter the name of the payment terms
- Description on the invoice – Enter the Description
14. Manage Partner Group
A partner group categorizes the business partners. You can create many partner groups and add business partners.
Go to Sales → Click on Masters → Select Partner Group

Field Description
- Name – Enter the name for the partner group
- Pricelist – Select the pricelist for the partner group
15. Manage Partner
In Odoo both the customer and vendor are collectively called partners, so there is no separate form for creating a customer and vendor. You can create a customer/vendor profile from multiple points of Odoo.
Go to Purchase → Click on Orders → Select Vendors
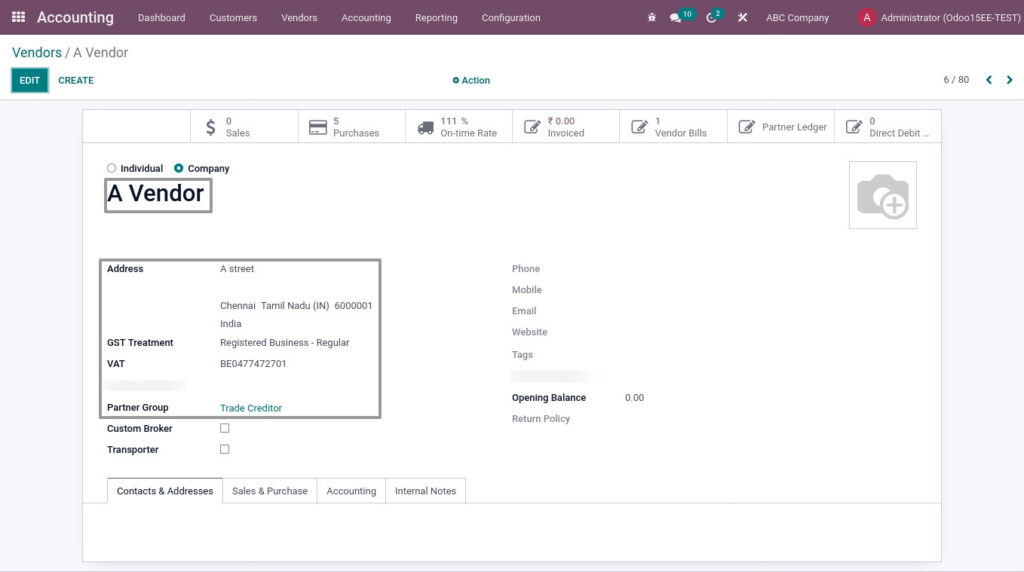
Field Description
- A Vendor – Enter the name of the partner
- Address – Enter the address of the partner
- GST Treatment – Enter the Partner’s Gst treatment
- VAT – Enter the VAT number of the partner
- Partner Group – Select the partner group for the partner
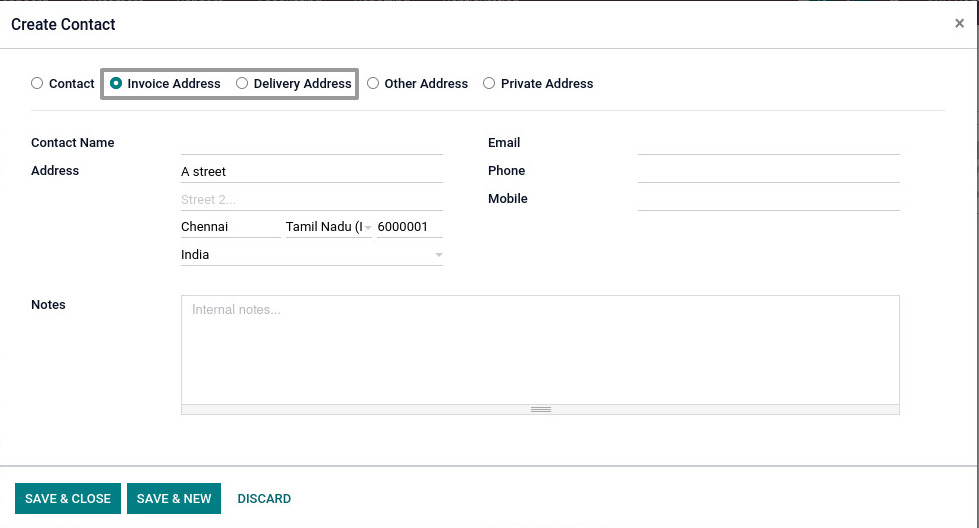
Field Description
- Invoice Address – Click on invoice address radio button to create the customer billing address
- Shipping Address – Click on invoice address radio button to create the customer delivery address
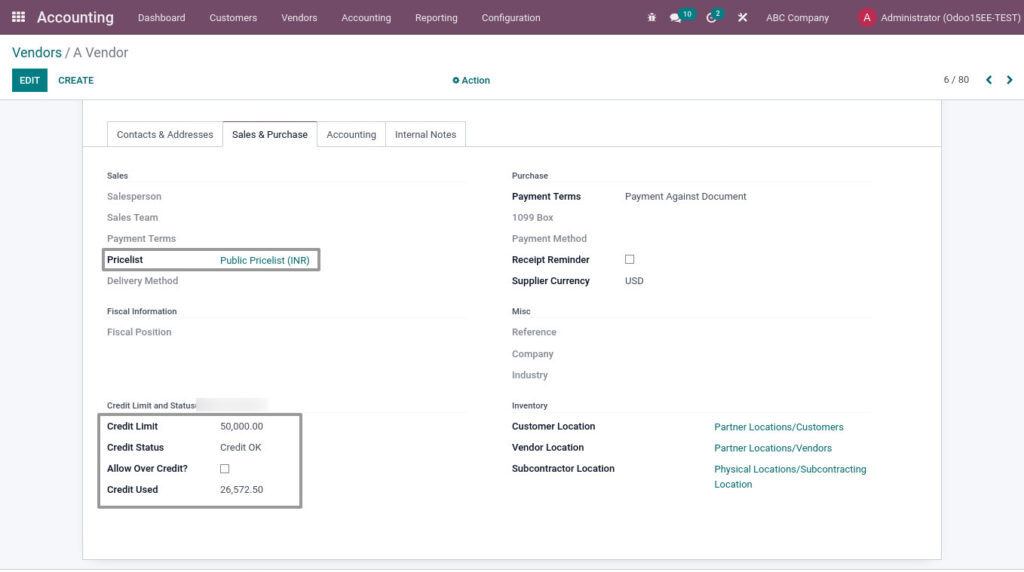
Field Description
- Pricelist – Select the pricelist for the partner
- Credit Limit – Enter the credit limit for the partner
- Credit Status – Enter the credit status of the partner
- Allow over Credit – If it’s true, the partner can use credits over credit limit
- Credit Used – Shows how many credits the partner used
16. Manage Bill Of Materials
A Bill of Materials is a document defining the quantity of each component required to make or deliver a finished product.
Go to Manufacturing → Click on Products → Select Bill of Materials
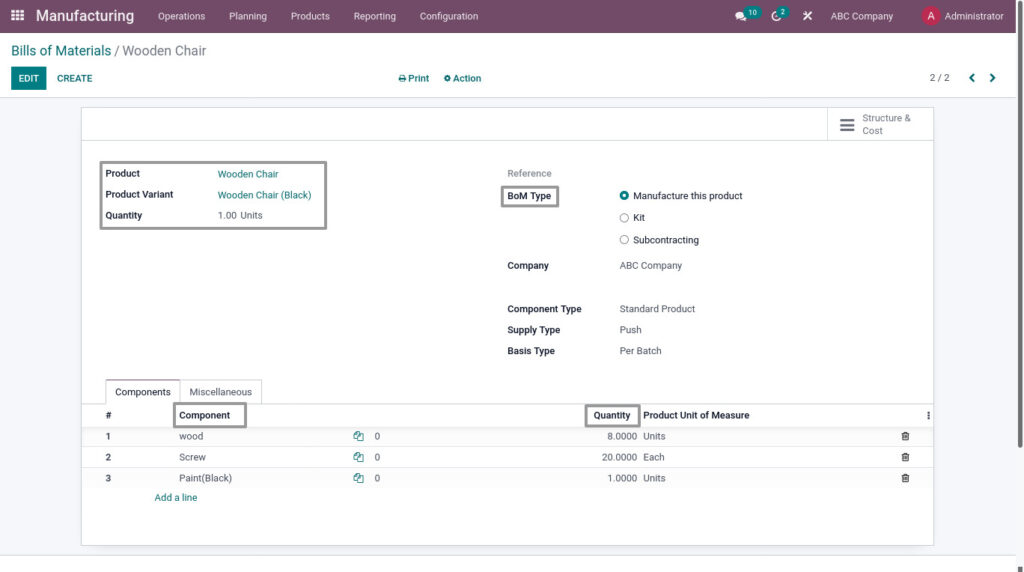
Field Description
- Product– Select the product which has to be manufactured.
- Product variant – Select/Enter the product variant
- Quantity – Enter the finished product quantity
- BoM Type – Select the BoM type for the product to be manufacture or subcontract
- Component – Select the component products for the finished product
- Quantity – Enter the quantity for component
17. Manage Warehouse
A warehouse is the actual building/place in which your items are stocked. You can set up multiple warehouses and create moves between warehouses.
Go to Inventory → Click on Configuration → Select Warehouses
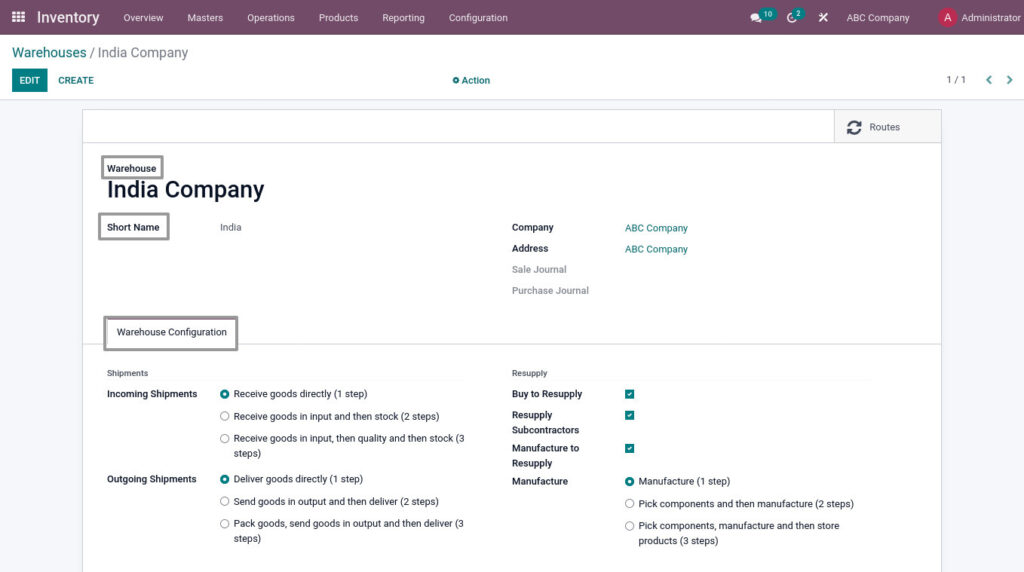
Field Description
- Warehouse– Enter the name of the warehouse
- Short Name – Enter the short code for the warehouse
- Warehouse Configuration – Select the Warehouse properties
18. Manage Locations
A Location, is a specific space within your warehouse. It can be considered as a sub-location of your warehouse, as a shelf, a floor, an aisle, etc. Therefore, a location is part of one warehouse only, and it is not possible to link one location to multiple warehouses.
Go to Inventory → Click on Configuration → Select Locations
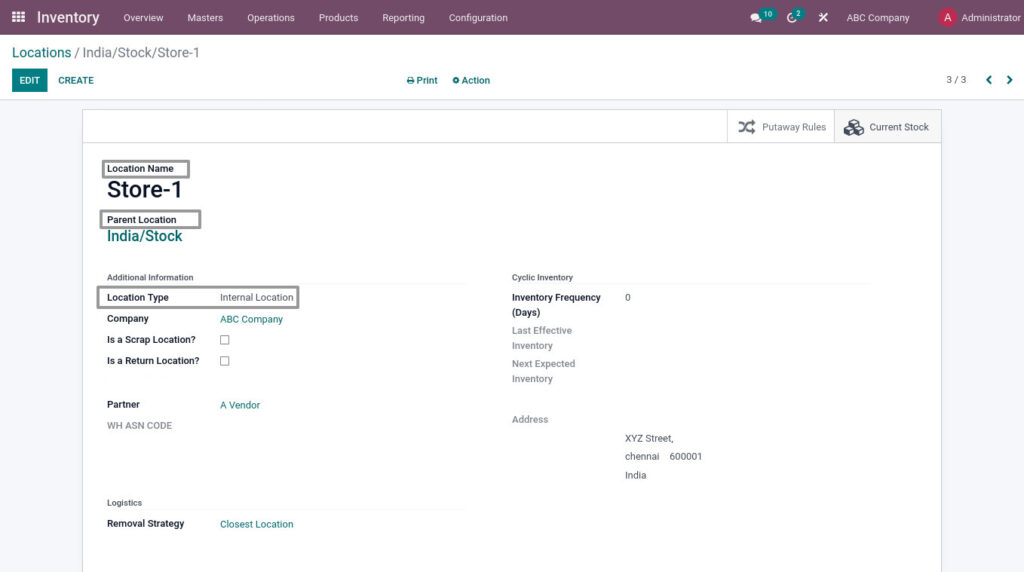
Field Description
- Location Name – Enter the name for the locations
- Parent Location – Select the Parent Location
- Location Type – Select the location type. Example – Customer/Vendor Location, Production Location
19. Manage Shipping Methods
Delivery methods can be used for your sale orders. Delivery methods allow you to manage the transport company, the price and the destination.
Go to Inventory → Click on Configuration → Select Shipping Methods
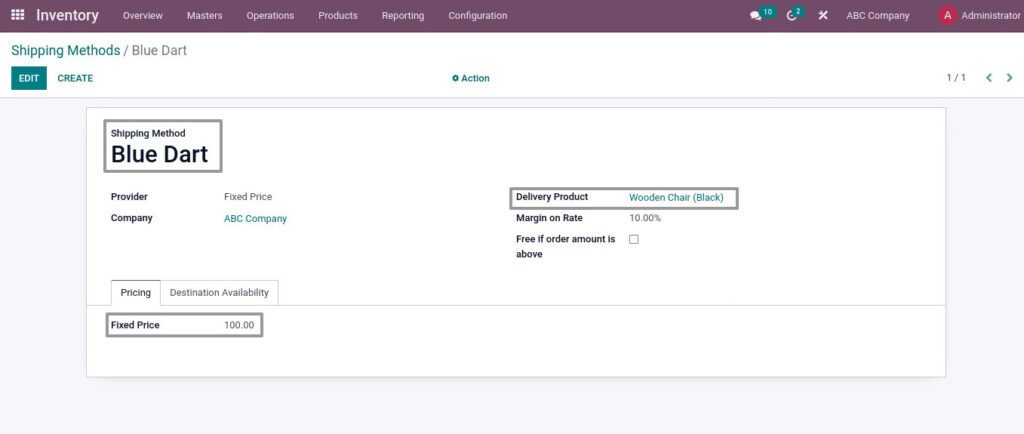
Field Description
- Shipping Method – Enter the name of the shipping method
- Delivery product – Select the Delivery Product
- Fixed Price – Enter the price for per delivery
20. Manage project(Analytic Account)
In odoo, an analytical account analyzes a single account or filters it without publishing a journal entry.
Go to Accounting → Click on Configuration → Select Analytic Accounts
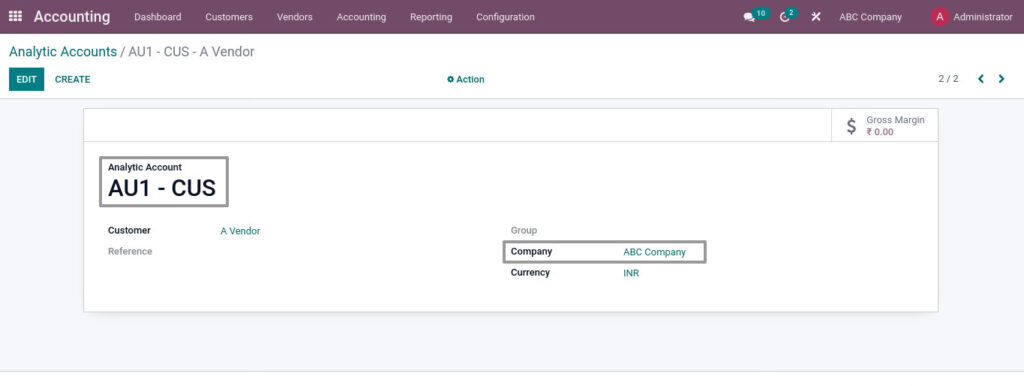
Field Description
- Analytic Account – Enter the name of the analytic account
- Company – Select the company name
21. Manage Campaign(Analytic Tags)
The analytic tag aids analytic distribution by dividing expenditures or income among various Odoo analytic accounts.
Go to Accounting → Click on Configuration → Select Analytic Tags

Field Description
- Analytic Tag – Enter the name of the analytic tag
22. Manage Incoterms
Incoterms basically intended to convey the assignments, expenses, and risk related to the transportation and delivery of products.
Go to Accounting → Click on Configuration → Select Incoterms
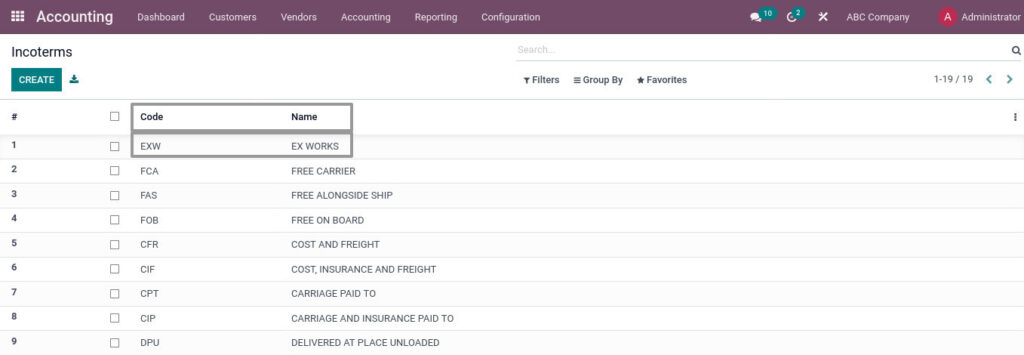
Field Description
- Code – Enter the code for the incoterm
- Name – Enter the name of the incoterm
23. Manage Ports
Odoo helps you to save major/minor ports you use for your imports/exports.
Go to Inventory → Click on Master → Select Port
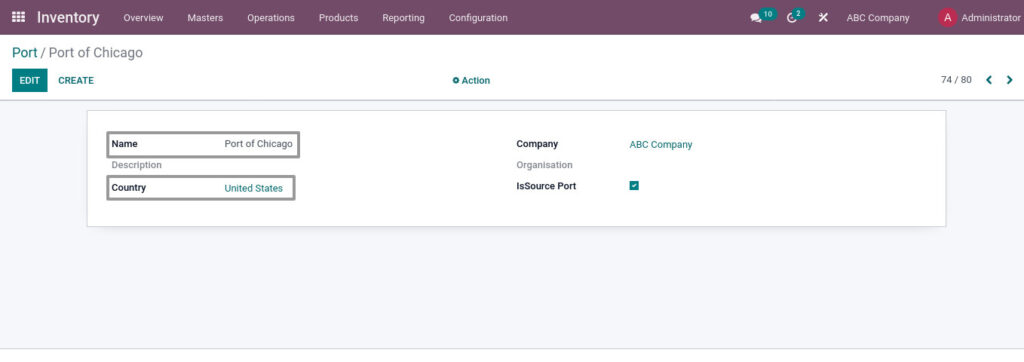
Field Description
- Name – Enter the name of the port
- Country – Select the name of the country where the port is located
24. Manage UoM Conversion
System allows you to convert one UoM to another UoM.
Go to Inventory → Click on Product → Select Product
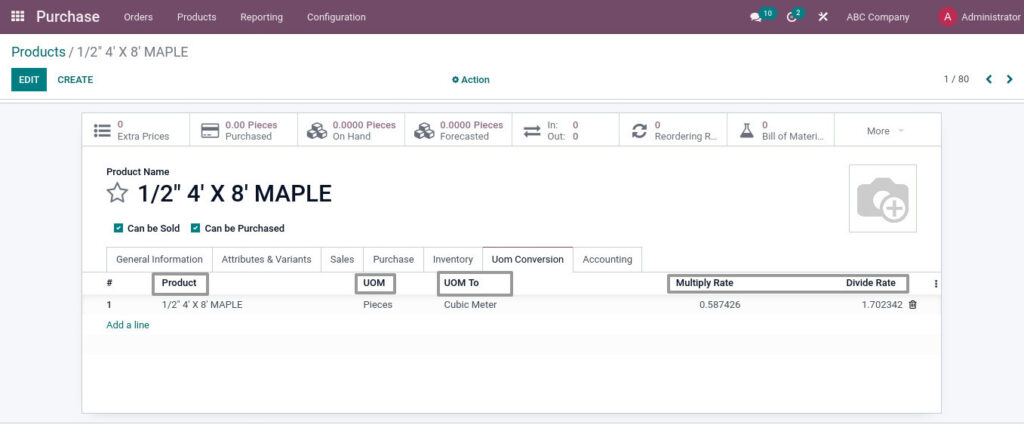
Field Description
- Product – Enter the name of the Product
- UOM – Product UOM loads automatically
- UOM To – Select the UoM you to convert
- Multiply Rate & Divide Rate – Both will automatically load based on the UoM & UoM To
25. Manage Remarks
Remarks is also known as terms and conditions. Remarks Will change based on the customer and vendor.
Go to Inventory → Click on Master → Select Remarks
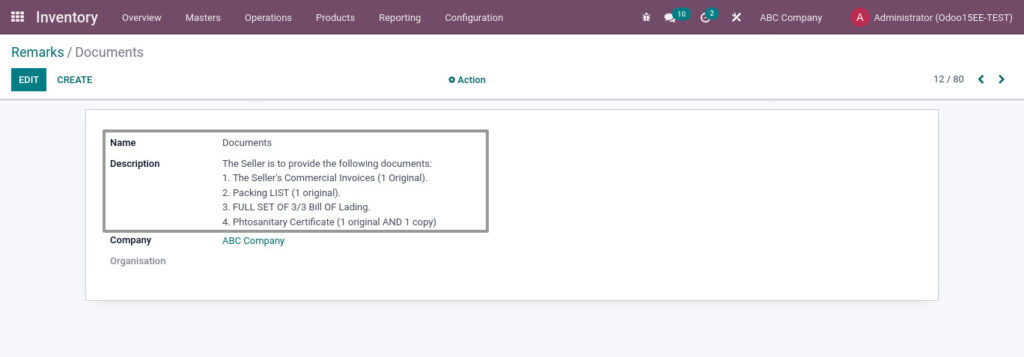
Field Description
- Name – Enter the name for Remarks
- Description – Enter the terms and condition for the partner
