Link Odoo Contacts to Mailing Lists: Data + Consent Setup

The problem most Odoo marketing setups have
Most Odoo email marketing setups force a bad choice: either you target res.partner directly (which gives you data-driven segmentation but no topic-level consent), or you target mailing.list (which gives you consent management but no easy access to customer data). The truth is you need both. This guide shows you how to link the two tables so you can run consent-compliant campaigns that filter by customer data — install date, product type, purchase history, and any custom field you’ve added
The Five-Minute Summary
- Odoo stores contacts in two tables: res.partner (customer data) and mailing.contact (marketing subscribers). They aren’t linked by default.
- For most businesses with topic-based consent needs (Newsletter, Promotions, Tips, Service Reminders), the right setup is linked tables — every res.partner has a matching mailing.contact connected via a partner_id reference.
- Marketing campaigns then target mailing.contact, filter by mailing list subscription (consent), and traverse partner_id to access res.partner data (segmentation).
- Enforce unique email on both tables. Use Automation Rules to auto-create and auto-link. Configure mailing lists with “Show in Preferences” so customers manage topics individually.
- Operational emails (orders, invoices, tickets) continue to flow through res.partner and bypass the marketing blacklist — always delivered.
1. Why Odoo has two contact tables
If you’re new to Odoo email marketing, here’s the surprise you’ll discover within your first week: Odoo stores your customers in two completely separate tables, and they aren’t linked.
res.partner is the master contact table used by Sales, CRM, Invoicing, Inventory, Helpdesk, Field Service, eCommerce, and almost every other module. When a customer buys something, books an appointment, or submits a contact form, they live here.
mailing.contact is a separate table that exists only inside the Email Marketing module. It holds newsletter subscribers, imported marketing contacts, and anyone added to a mailing list. By default, it has no foreign key to res.partner.
This separation was a deliberate design choice — newsletter subscribers from a public website don’t need billing addresses, tax IDs, or customer ranks. They just need an email and a few preferences. But for businesses with real customers who also need marketing, the lack of an automatic link causes:
- The same person stored in both tables with no connection
- Marketing campaigns missing customers (because they’re in res.partner but not in any mailing list)
- Newsletter campaigns hitting customers twice (once as res.partner, once as mailing.contact)
- No way to filter marketing campaigns by sales data (orders, install date, product type) when targeting a mailing list
2. Decision Tree: which architecture do you need?
Before choosing an architecture, answer two questions about your business:
Architecture Decision Tree
Q1: Do customers need to choose which topics of marketing they receive?
Examples: “I want product tips but not promotions” / “Send me service reminders but not newsletter”
If YES → you need a mailing.list-based consent layer → continue to Q2.
If NO (one-size-fits-all marketing) → simpler architecture: target res.partner directly with the global blacklist as the only unsubscribe option.Q2: Do your marketing emails need to filter by customer data (orders, install dates, product type, custom fields)?
If YES → linked-tables architecture (this guide) — target mailing.contact, filter by list subscription, traverse partner_id for segmentation.
If NO (purely list-based campaigns) → traditional mailing.list targeting works fine, no linking needed.
If you answered yes to both questions — which most B2C and service businesses do — the rest of this guide is for you.
3. The Linked-Tables Architecture in Detail
In the linked-tables architecture, every res.partner with an email automatically gets a paired mailing.contact, connected via a partner_id Many2one field. The mailing.contact subscribes to mailing lists for topic-level consent, and any campaign can traverse partner_id to access res.partner data.
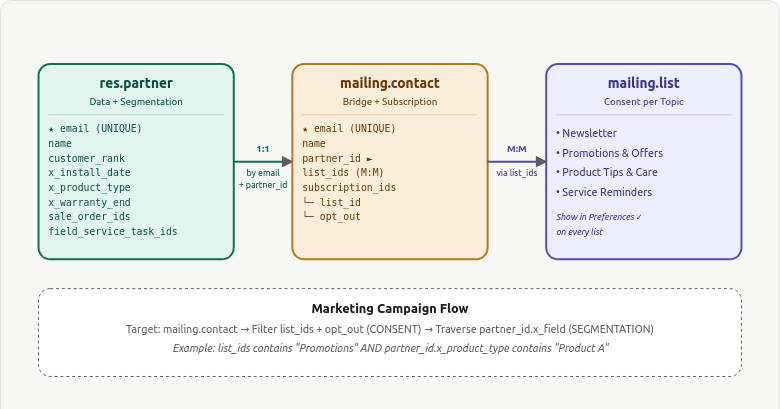
The Three Roles Each Table Plays
| Table | Role | What it stores |
|---|---|---|
| res.partner | Customer master + segmentation source | Identity, sales history, custom data fields (install date, product type, etc.) |
| mailing.contact | Marketing bridge + subscription holder | Email, partner_id link, list memberships, per-list opt-out flags |
| mailing.list | Topic-level consent grouping | List name (Newsletter, Promotions, etc.), Show in Preferences setting |
4. The Recommended Rules and Auto-Linking
You need a partner_id field on mailing.contact — this is the keystone of the architecture.
Rule 1 — On res.partner Create: Auto-Create and Link mailing.contact
Linking res.partner ↔ mailing.contact?
— A one-directional link for segmentation is fine. A mandatory bidirectional 1:1 is not.
Rule 2 — On res.partner Email Change: Propagate to mailing.contact
If a customer updates their email, the linked mailing.contact must update too. Trigger: On Update, watching the email field.
Rule 3 — On mailing.contact Create: Reverse-Link to Existing res.partner
If a newsletter signup matches an existing customer’s email, link them.
5. Configuring Mailing Lists as Your Consent Layer
The mailing.list table is your topic-level consent layer. Each list represents one category of marketing emails customers can opt into or out of.
The Standard Four-List Structure
Almost every business should start with these four lists:
| List Name | Email Types | Default Subscribe? |
|---|---|---|
| Newsletter | Monthly updates, blog roundups, education | Yes |
| Promotions & Offers | Seasonal deals, discounts, sales | Yes (easy opt-out) |
| Product Tips & Care | How-to content, maintenance, best practices | Yes |
| Service Reminders | Renewal, maintenance, reorder prompts | Yes (clearly labelled) |
Add the x_default_subscribe Field
Add a custom Boolean field x_default_subscribe on the mailing.list model via Studio. Tick it for the lists you want every new customer to be auto-subscribed to. The Automation Rule from Section 5 reads this field and subscribes new customers accordingly.
6. Campaign Targeting — The New Pattern
The targeting pattern in the linked architecture is fundamentally different from the traditional res.partner-direct approach. Here’s the formula:

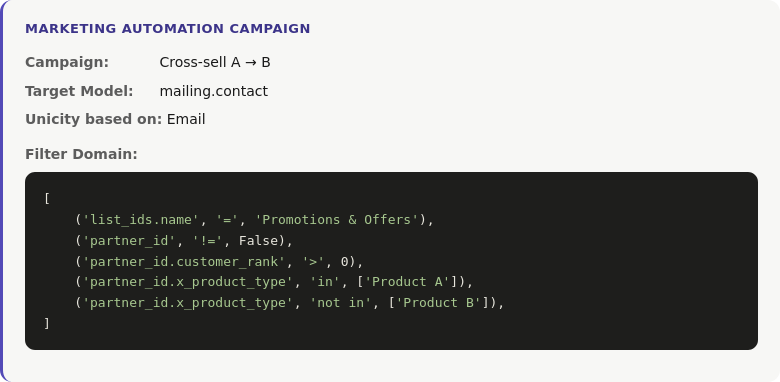
Worked Example 1 — Cross-Sell Campaign
Send a cross-sell email to customers who own Product A but not Product B, and who have consented to Promotions:
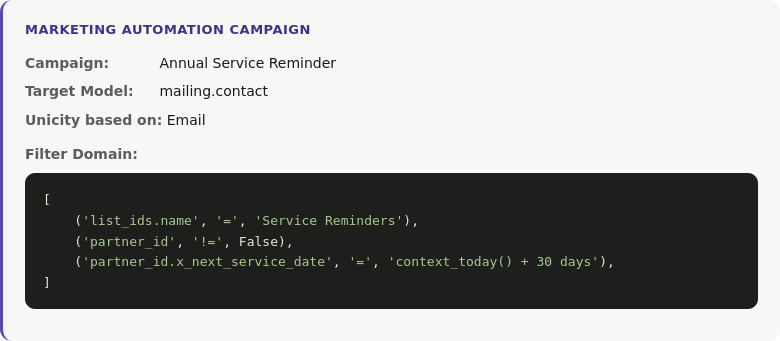
Worked Example 2 — Service Reminder
Send a service reminder to customers whose next service date is in 30 days, who have consented to Service Reminders:
7. Operational vs Marketing Emails (Still Relevant)
The linked architecture is for marketing emails. Operational emails — order confirmations, invoices, delivery notifications, support tickets — continue to flow directly through res.partner via the mail.message pipeline. They bypass the blacklist and are always delivered.
| Aspect | Operational | Marketing |
|---|---|---|
| Trigger | Business event (sale, invoice, ticket) | Marketer / automation rule |
| Pipeline | mail.message / chatter | Email Marketing / Marketing Automation |
| Target | res.partner directly | mailing.contact (linked architecture) |
| Respects blacklist? | NO | YES |
| Respects per-list opt-out? | N/A | YES |
| GDPR basis | Contract performance | Consent (opt-in) |
8. Unsubscribe, Blacklist, and GDPR
Two unsubscribe mechanisms work together in the linked architecture:
Per-List Opt-Out (Topic Level)
When customers click unsubscribe in a marketing email, they land on a preferences page showing every mailing list with “Show in Preferences” enabled. They can toggle individual lists — opt out of Promotions while staying subscribed to Service Reminders. This is the everyday consent tool.
Global Blacklist (All-Or-Nothing)
The blacklist (model mail.blacklist) is the customer’s nuclear option. Once their email is on the blacklist, all marketing across every list and every campaign is blocked. Transactional emails (orders, invoices, tickets) still flow through.
Enable in Email Marketing → Configuration → Settings → Blacklist Option when Unsubscribing.
Common misunderstanding: Some practitioners think the blacklist doesn’t block marketing to res.partner-targeted campaigns. It does. Odoo checks the blacklist by email address regardless of which model is targeted. The blacklist applies equally to mailing.contact-targeted and res.partner-targeted campaigns. What it cannot do is differentiate between topics — that’s what mailing.list subscriptions are for.
8. Challenges to accept
- Need custom Apps to avoid too much logic in Automation Rules
- Duplicate Email Storage
- Customer changes email, if automation fails.
- This creates synchronization risk.
- partner_id on mailing.contact is Custom
- Default Subscription Risk (GDPR)
- Automatically subscribe customers
- Promotions may require explicit opt-in
- Odoo Version upgrade needed
Final Thoughts
The linked-tables architecture is more work to set up than the default Odoo configuration — uniqueness constraints, custom fields, three Automation Rules, a migration script. But once it’s in place, your email marketing setup does something most Odoo deployments cannot: combine data-driven segmentation with topic-level consent, all while keeping one record per customer and zero duplicate sends.
The three rules that make this architecture work:
- Email is unique on both tables — enforced by Python constraints.
- Every res.partner has a linked mailing.contact — maintained by Automation Rules.
- Marketing campaigns target mailing.contact — filter by list subscription for consent, traverse partner_id for segmentation.
Set this up once, document it for your team, and your Odoo email marketing will be cleaner than most enterprise CRM deployments.
Need help implementing the linked-tables architecture?
TenthPlanet’s Odoo experts deploy this setup for service businesses, eCommerce, and B2B operations — including the custom constraints, Automation Rules, migration scripts, and campaign templates.
