1. Manage Bonus in Odoo HR Management
Create and manage the employee bonus for the employees. You can create many bonuses for the employee.
Go to Human Resource → Click on Annual Benefits → Select Employee Bonus
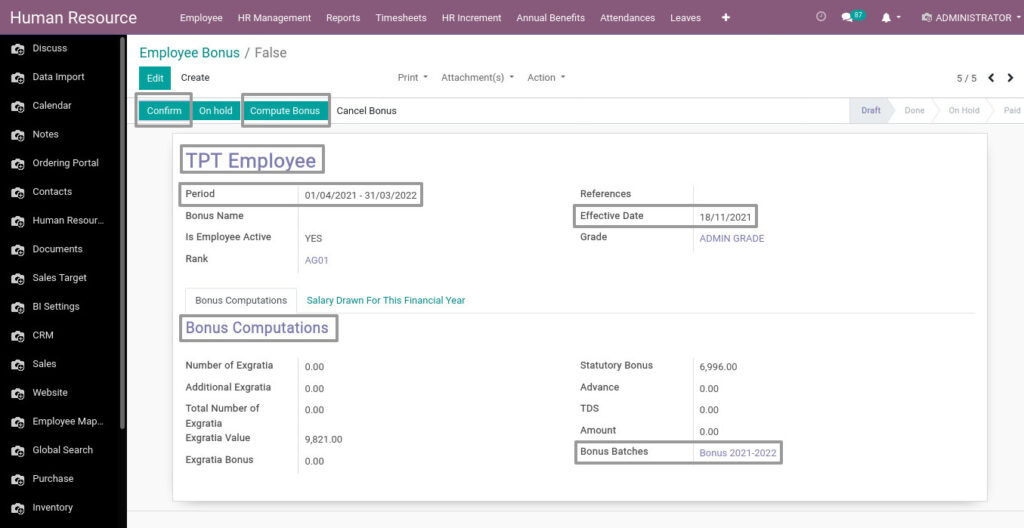
Field Description
- Confirm – To confirm the bonus
- Compute Bonus – To calculate the bonus for the financial year
- TPT Employee – Name of the employee
- Period – Select the financial year
- Effective Date – The Bonus effective date on the employee salary
- Bonus Computation – Enter the no.of.bonus and their values
- Bonus Batches – Enter or select the bonus batch name
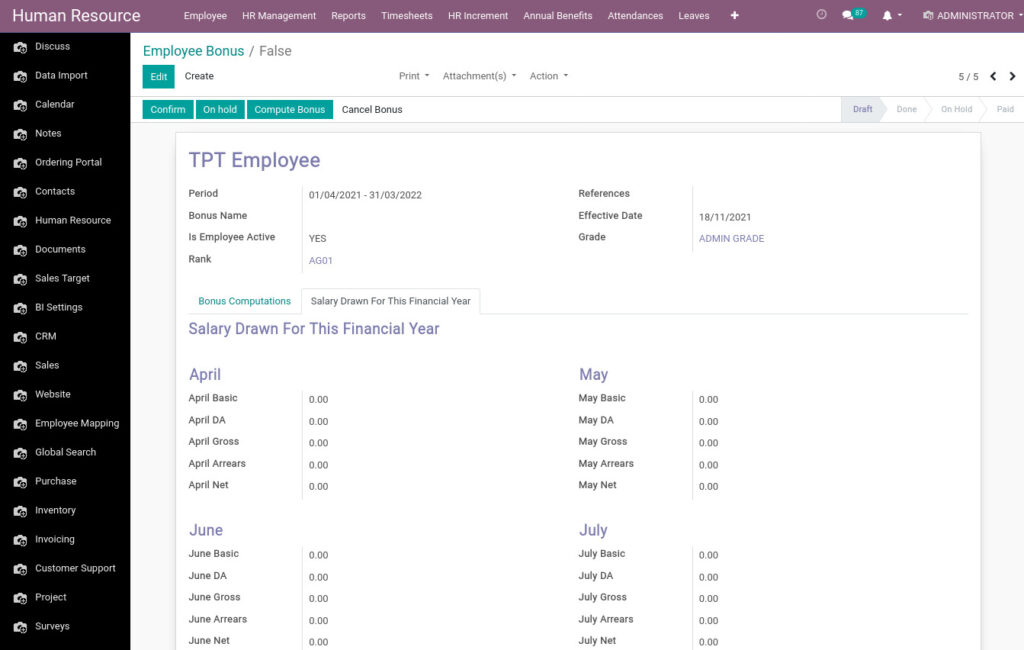
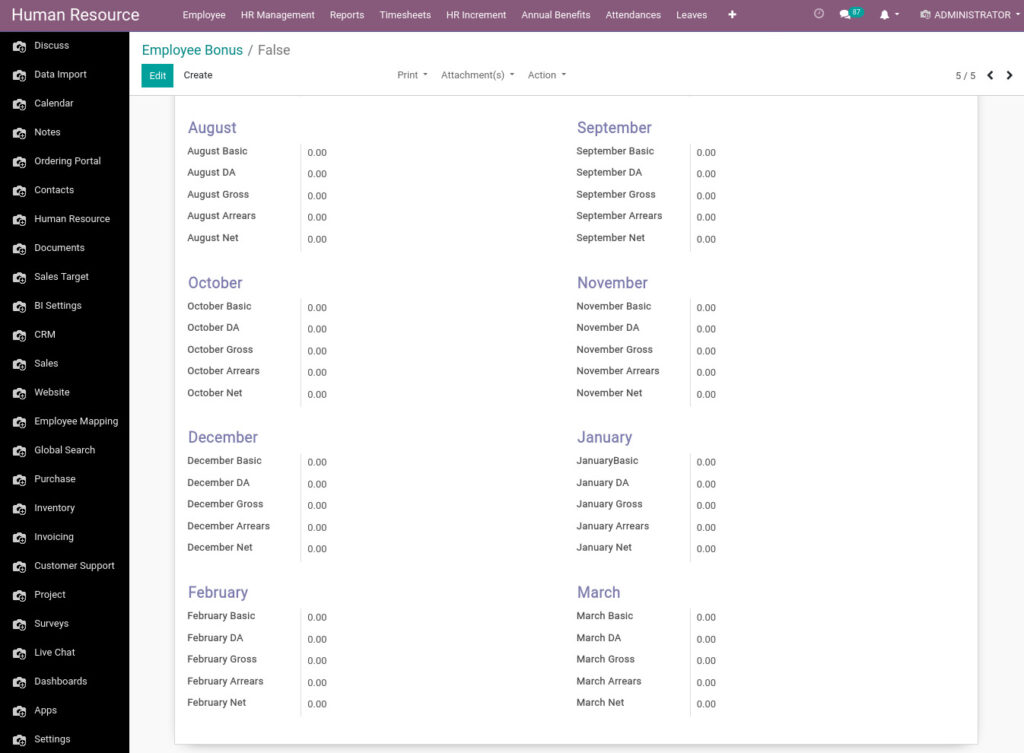
You can see the salary computation with bonus for the entire financial year.
2. Bonus Batches in Odoo HR Management
Create and manage the bonus batches. You can easily select the employees and give their bonus.
Go to Human Resource → Click on Annual Benefits → Select Employee Bonus Batches
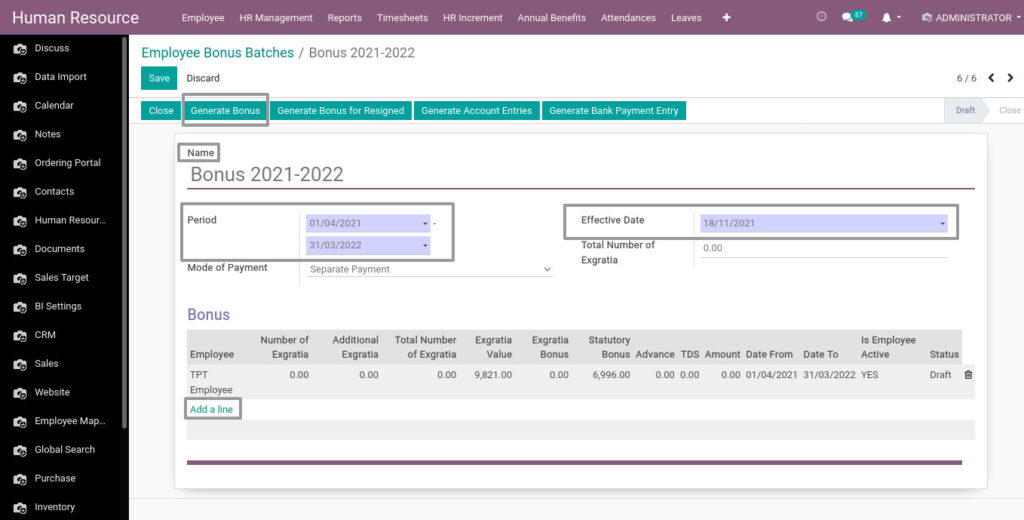
Field Description
- Generate Bonus – Click Generate Bonus to generate bonus for the selected employees
- Name – Enter the name of the bonus batch
- Period – Select the financial year
- Mode Of Payment – Payment mode of the bonus
- Effective Date – Effective date of the bonus
- Add a line – Click Add a line and select the employees for the bonus batch
3. Manage Employee Extra Refund Details in Odoo HR Management
If an employee paid extra tax, he/she can apply for the refund. Here, you can create and manage these type of requests.
Go to Human Resource → Click on HR Management → Select Employee Extra refund Details
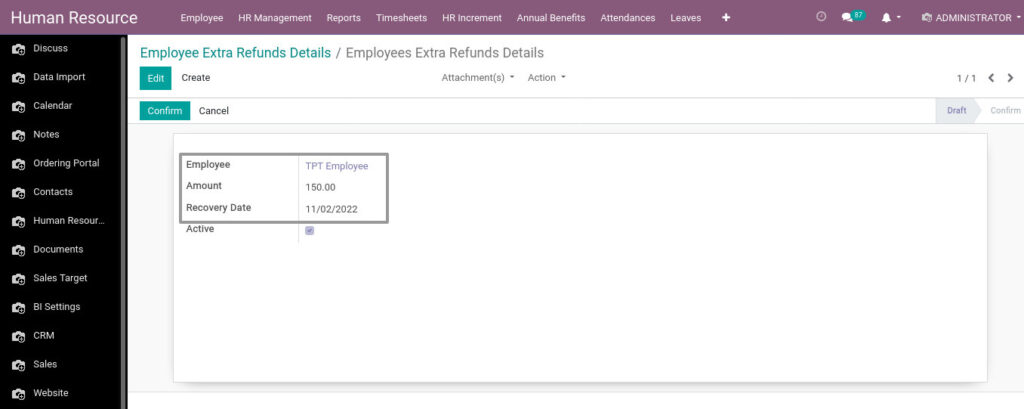
Field Description
- Employee – Select the employee
- Amount – Enter the amount to be recovered
- Recovery Date – Select the recovery date
4. Manage Employee WFH Recovery in Odoo HR Management
Create and manage the employee’s WFH recovery. You can easily manage the employee’s recovery.
Go to Human Resource → Click on HR Management → Select Employee WFH Recovery
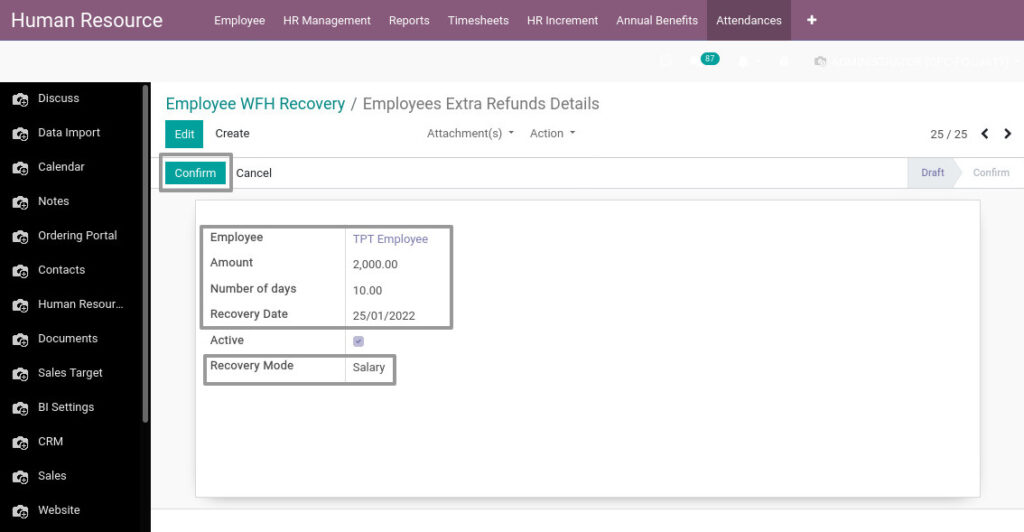
Field Description
- Confirm – Click Confirm to confirm the recovery
- Employee – Select the employee
- Amount – Enter the amount to be recovered
- Number of days – Enter the no.of.days to recover
- Recovery Date – Select the recovery date
- Recovery Mode – Select the recovery mode
5. Manage Employee TDS Details in Odoo HR Management
Create and manage employee TDS profiles. You can easily manage the TDS details of the employees.
Go to Human Resource → Click on HR Management → Select Employee TDS Details
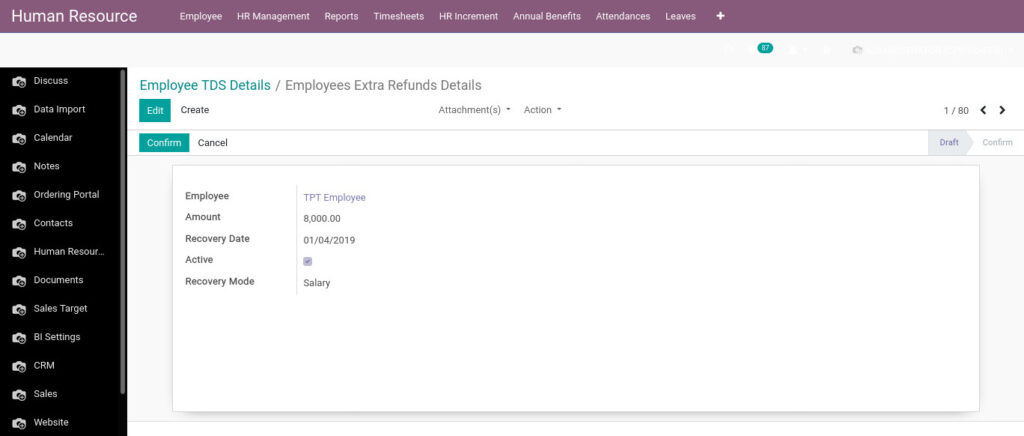
Field Description
- Employee – Select the employee
- Amount – Enter the TDS amount to be recovered
- Recovery Date – Select the recovery date
- Recovery Mode – Select the Recovery Mode
6. Manage Medical Insurance Recovery Details in Odoo HR Management
Create and manage the medical insurance recovery details of the employee.
Go to Human Resource → Click on HR Management → Select Employee Medical Insurance Recovery Details
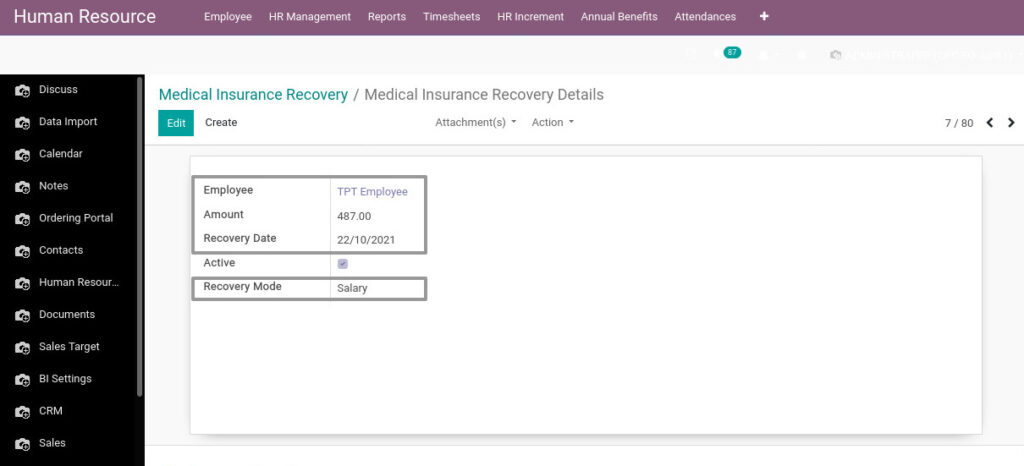
Field Description
- Employee – Select the employee
- Amount – Enter the TDS amount to be recovered
- Recovery Date – Select the recovery date
- Recovery Mode – Select the Recovery Mode
7. Manage Employee Increment in Odoo HR Management
Create and manage employee increments. You can offer increments to many employees in your company.
Go to Human Resource → Click on HR Increment → Select Employee Increment Process
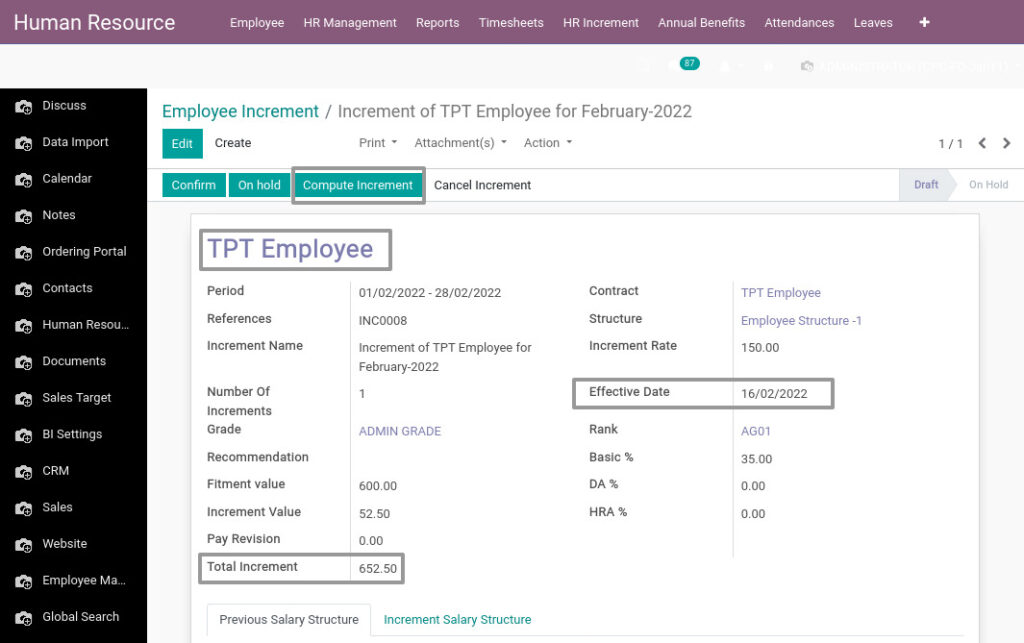
Field Description
- Compute Increment – Click Compute Increment button to update increment values to the salary structure.
- TPT Employee – Select the employee
- Effective Date – Select the Increment’s effective date on payslip
- Total Increment – The total increment value’s will be shown here
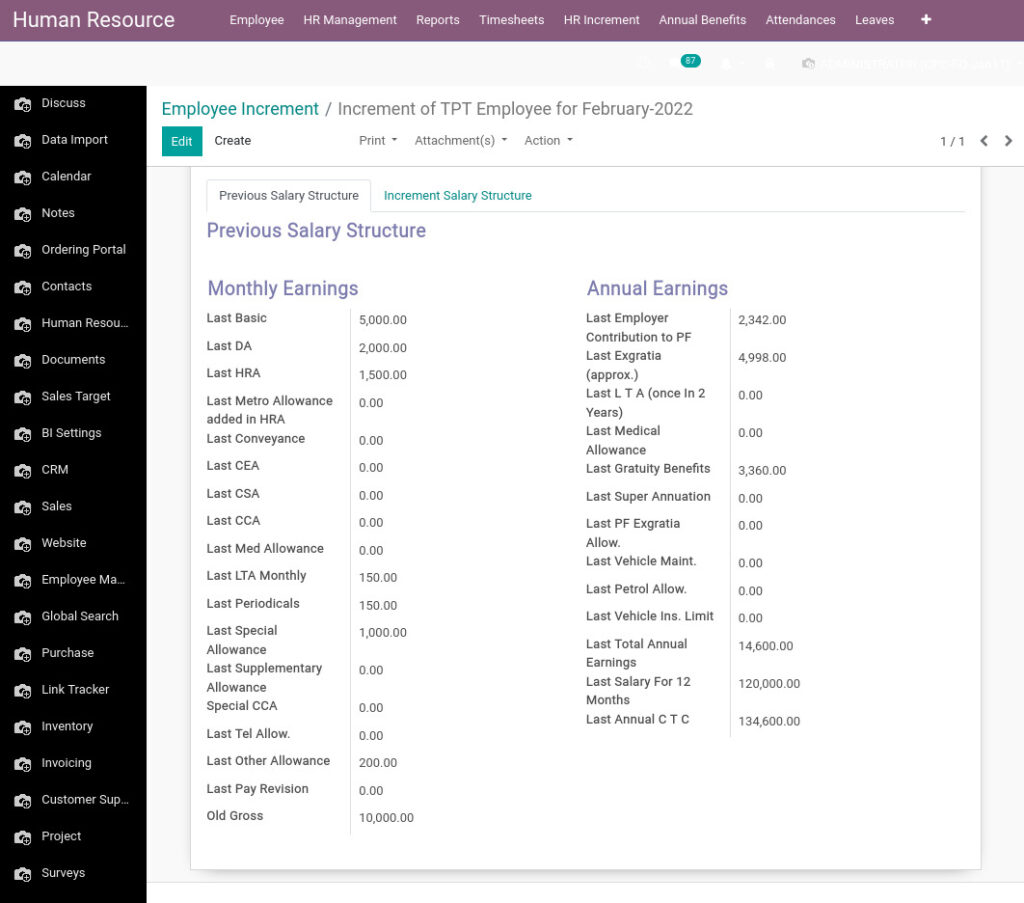
Previous Salary Structure in Odoo HR Management
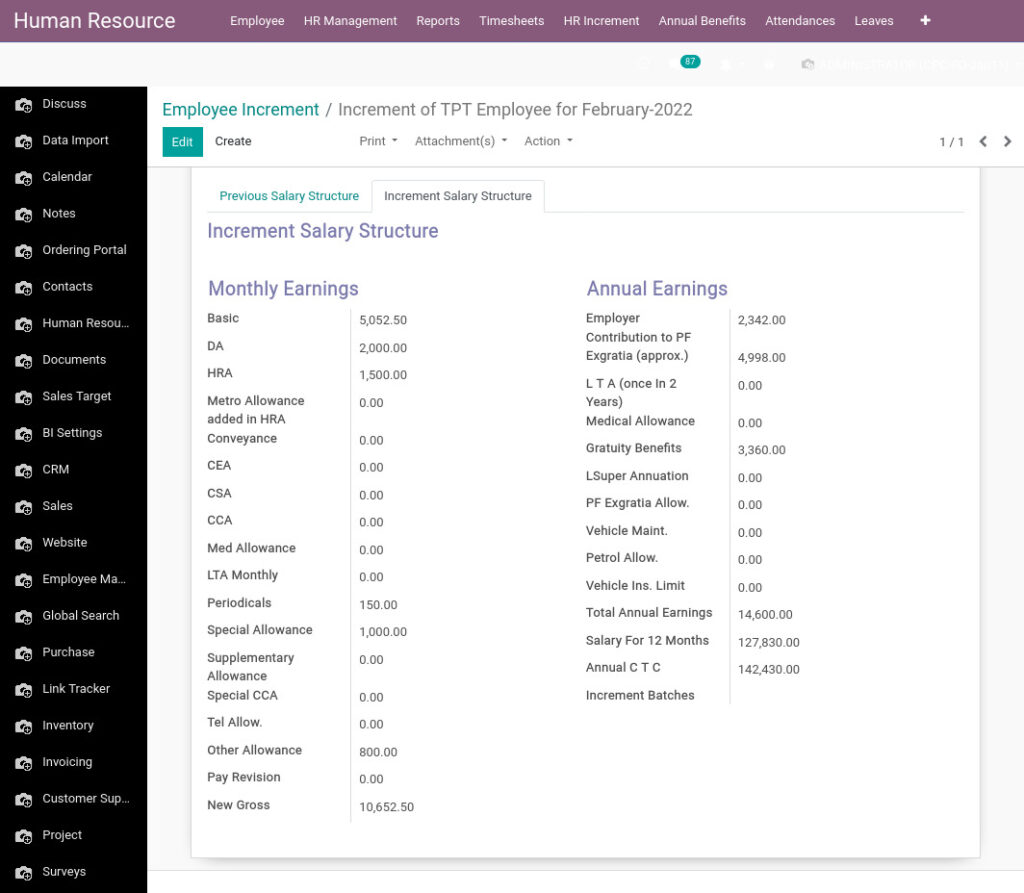
Increment Salary Structure
8. Manage Employee Increment Batches in Odoo HR Management
Create and manage the employee increment process. So you can save a lot of time in the increment batch process.
Go to Human Resource → Click on HR Increment → Select Employee Increment Batches
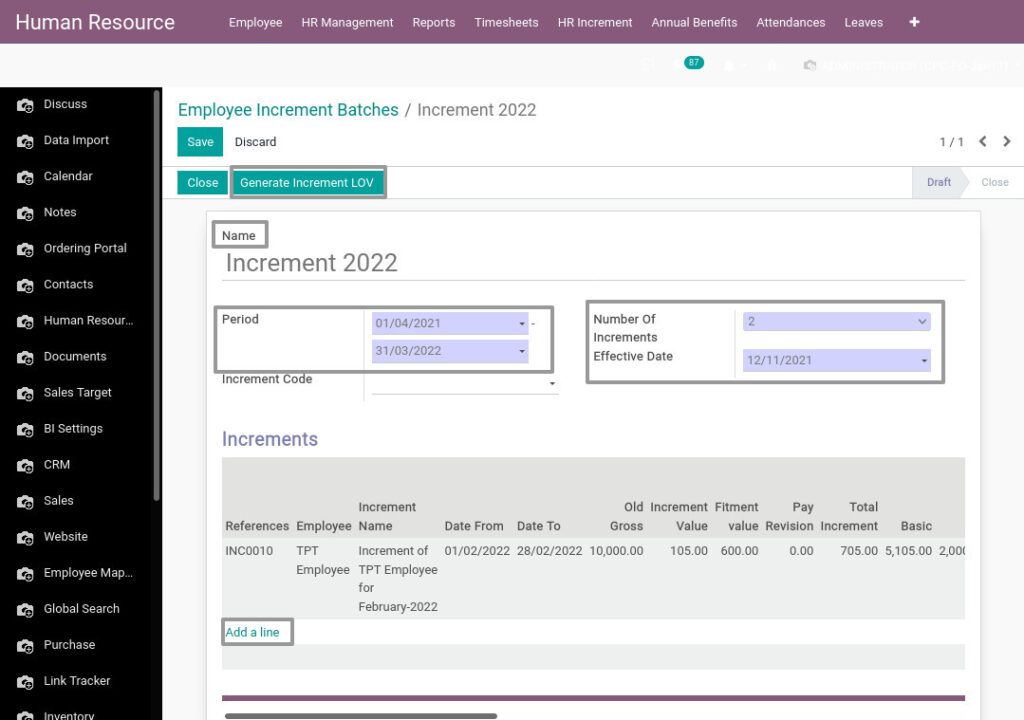
Field Description
- Generate Increment LOV – Click Generate Increment LOV button to generate the increment process to all employees
- Name – Enter the name of the batch
- Period – Select the period for the increment process
- Number of increments – Select the no.of.increments
- Effective Date – Select the Increment’s effective date on payslip
- Add a line – Click Add a line and select the employees for the increment batch
9. Manage Leave Encash in Odoo HR Management
An employee can obtain a specific amount in exchange for a period of leave. Here, You can manage these type of requests.
Go to Human Resource → Click on Annual Benefits → Select Leave Encash
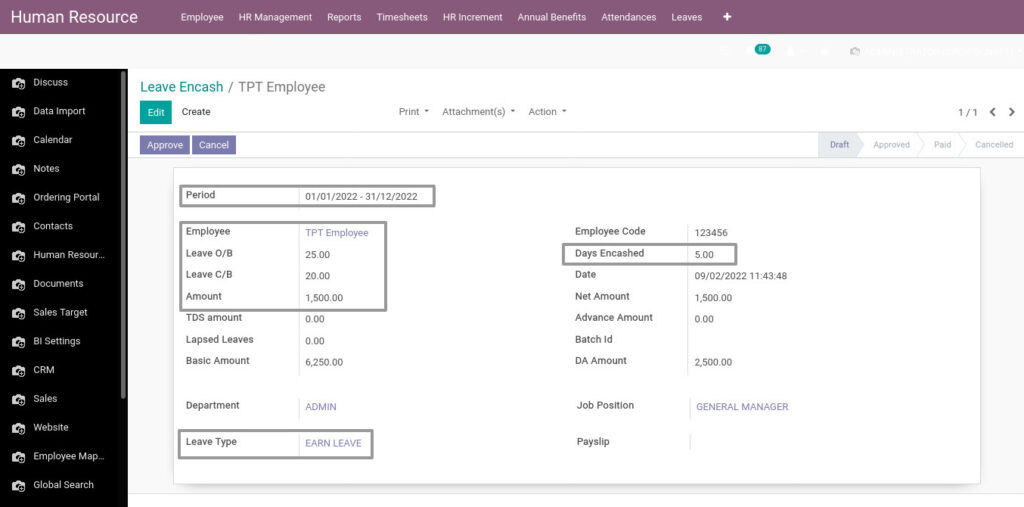
Field Description
- Period – Select the period of the leave encash
- Employee – Select the name of the employee
- Leave O/B – Enter the leave opening balance
- Leave C/B – Enter the leave closing balance
- Amount – Enter the amount for the leave encash
- Days Encashed – Enter the no.of.days to encash
- Leave Type – Select the leave type to encash
10. Manage Leave Encash Batches in Odoo HR Management
Employees can obtain a specific amount in exchange for a period of leave. Here, You can manage leave encash for all employees.
Go to Human Resource → Click on Annual Benefits → Select Leave Encash Batches
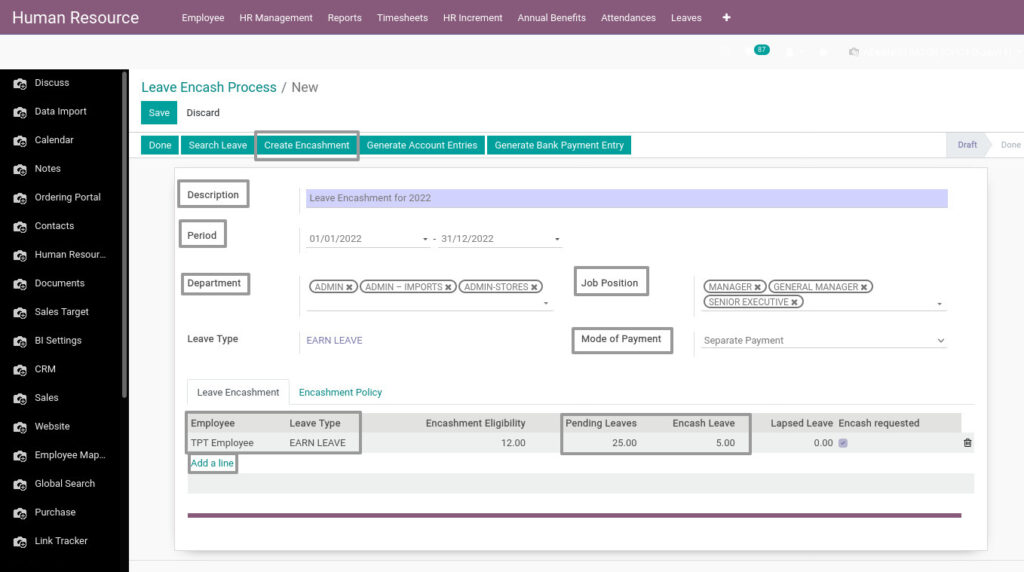
Field Description
- Create Encashment – Click Create Encashment button to create the encashment for the selected employees
- Description- Enter the name for the leave encash batch
- Period – Select the period of the leave encash
- Department – Select the departments
- Job Position – Select the job positions
- Mode Of payment – Select the payment mode
- Employee – Select the name of the employee
- Leave Types – Select the Leave type
- Pending Leaves – Enter the pending leaves
- Encash Leave – No.of.leave to be encashed
- Add a line – Click Add a line and select the employees for encash batch
11. Manage LTA Request in Odoo HR Management
The LTA is an allowance given by the employers to their employees, which can be utilized when they go for a vacation. Here, You can manage the LTA Request.
Go to Human Resource → Click on Annual Benefits → Select LTA Request
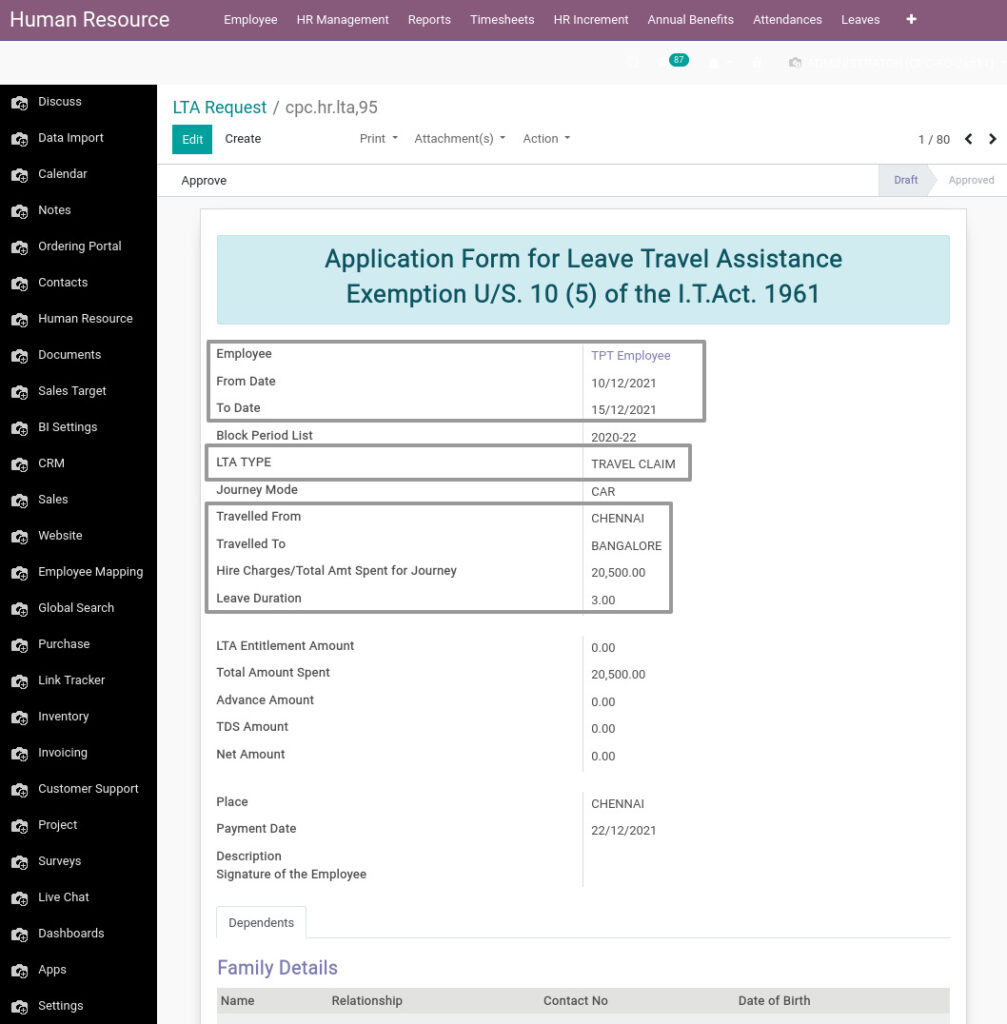
Field Description
- Employee – Select the Employee
- From Date – Select the from date
- To Date – Select the to date
- LTA Type – Select the LTA Type
- Travelled From – Enter the place where you travelled from
- Travelled To – Enter the place where you travelled to
- Hire Charges – Enter the amount spent on the travel
- Leave Duration – Enter the leave duration
12. Manage Wellness Allowance Request in Odoo HR Management
Employee Wellness Allowance is an amount for employees to maintain their health. You can manage the wellness allowance request.
Go to Human Resource → Click on Annual Benefits → Select Wellness Request
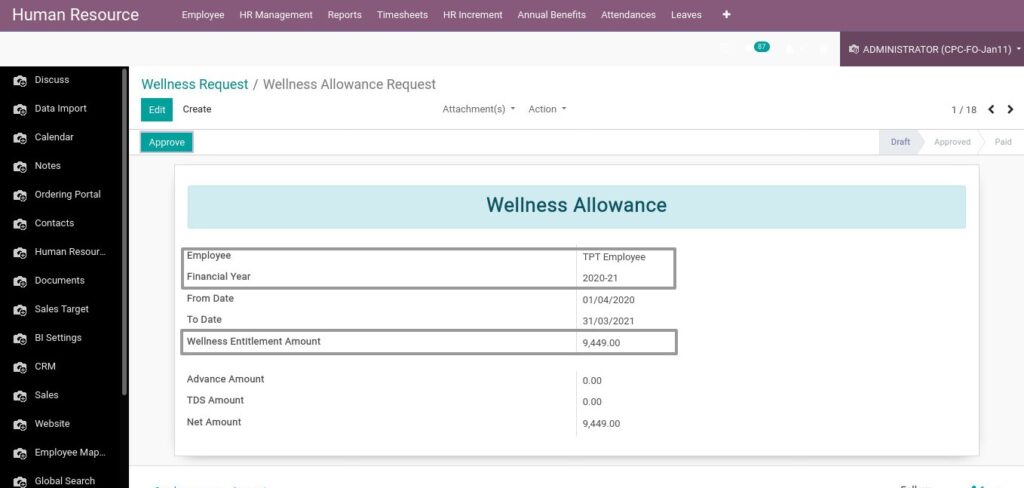
Field Description
- Employee – Select the Employee
- Financial Year – Select the financial year
- Wellness Entitlement Amount – Enter the requested wellness amount
13. Senate Exgratia in Odoo HR Management
Yearly bonus applicable for senate grade employees also known as Leadership Team.
Go to Human Resource → Click on Annual Benefits → Select Senate Exgratia Request
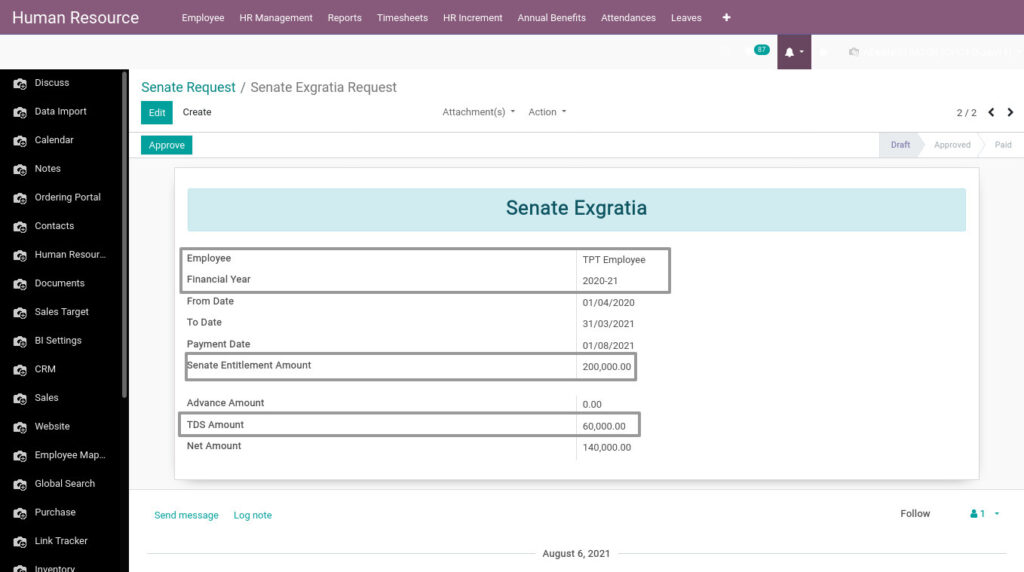
Field Description
- Employee – Select the Employee
- Financial Year – Select the financial year
- Senate Entitlement Amount – Enter the Senate Amount
- TDS Amount – Enter the TDS amount
14. Manage Employee Expenses in Odoo HR Management
The Employer might pay an employee expenses to cover any costs they incur while carrying out their duties. Here, you can manage the employee’s expenses and reimburse.
Go to Human Resource → Click on Expenses → Select My Expenses
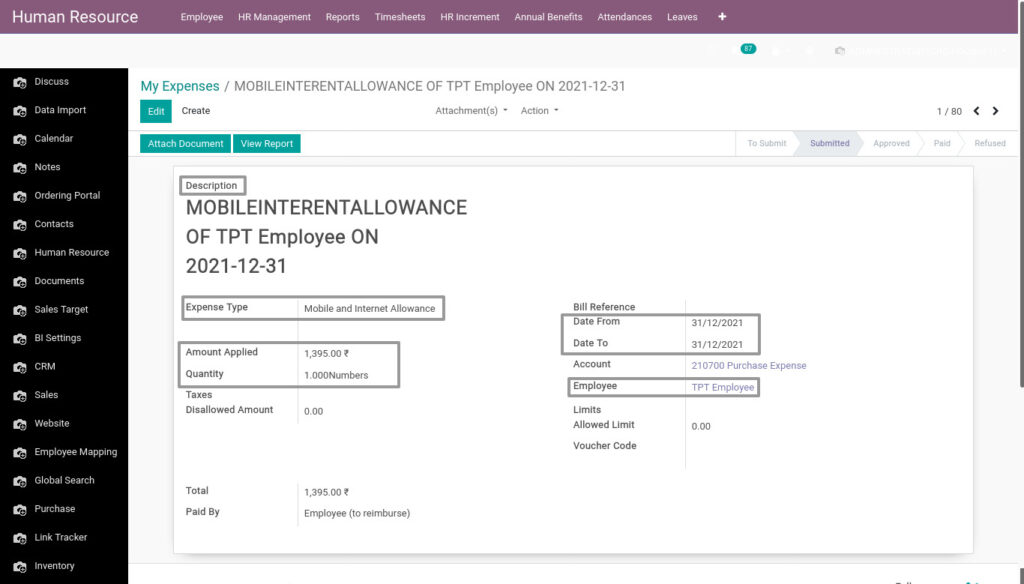
Field Description
- Description – Enter the expense description
- Amount Applied – Enter the amount to reimburse
- Quantity – Enter the no.of.quantities
- Date From – Enter the from date
- Date To – Enter the date to
- Employee – Select the Employee
15. Manage Loan Request in Odoo HR Management
Create and manage the employee’s loan taken from the company.
Go to Human Resource → Click on Loan and Salary Advance → Select Loan Requests
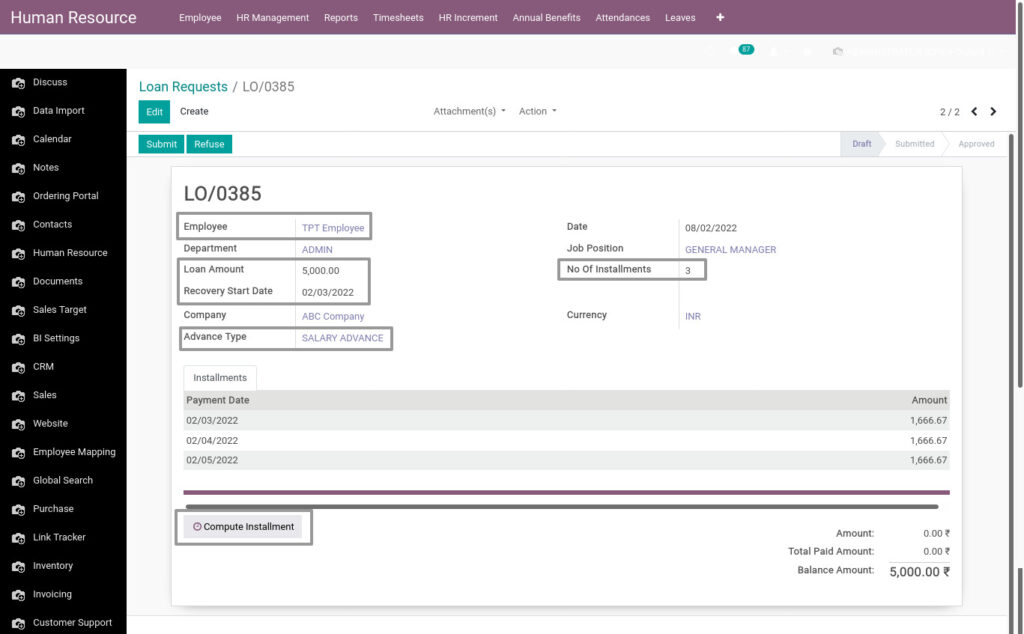
Field Description
- Employee – Select the Employee
- Loan Amount – Enter the loan amount
- Recovery Start Date – Select the recovery data of the loan
- No. Of. Installments – Enter the no.of.installments to repay the loan
- Advance Type – Select the advance type
- Compute Installment – Click Compute Installment button to calculate the installments from the recovery date
Note : Installment amounts will deduct on payslip from Recovery Start Date.
16. Manage Salary Advance in Odoo HR Management
Salary advances are paying an employee a portion of his salary in advance. Create and manage the employee’s salary advance.
Go to Human Resource → Click on Loan and Salary Advance → Select Request Salary Advance
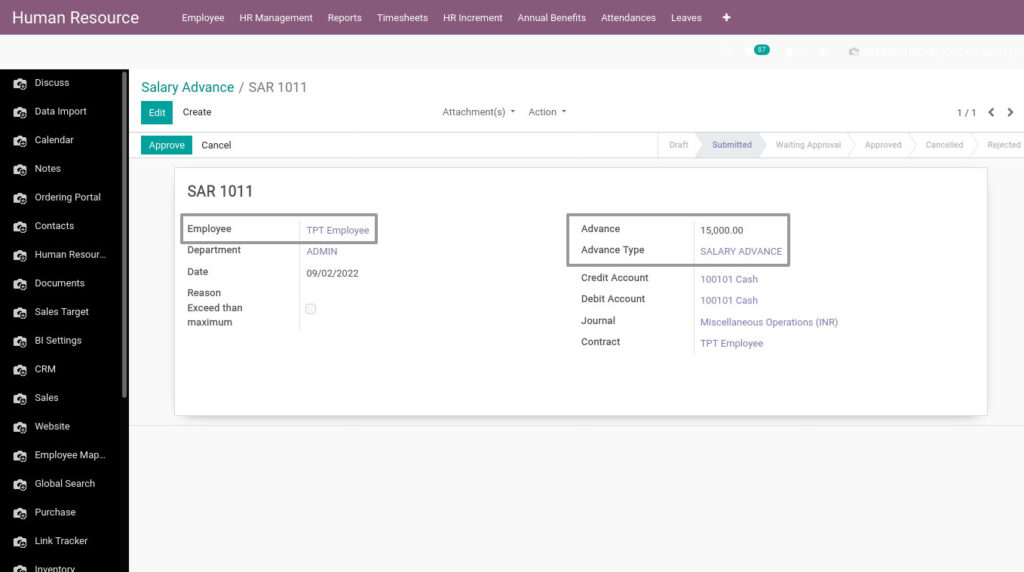
Field Description
- Employee – Select the Employee
- Advance – Enter the loan amount
- Advance Type – Select the advance type
Note : Advance amount will be deducted on next payslip
17. Manage Loan Repayment in Odoo HR Management
Create and manage the loan repayment of the employee who taken loan
Go to Human Resource → Click on Loan and Salary Advance → Select Loan Repayment
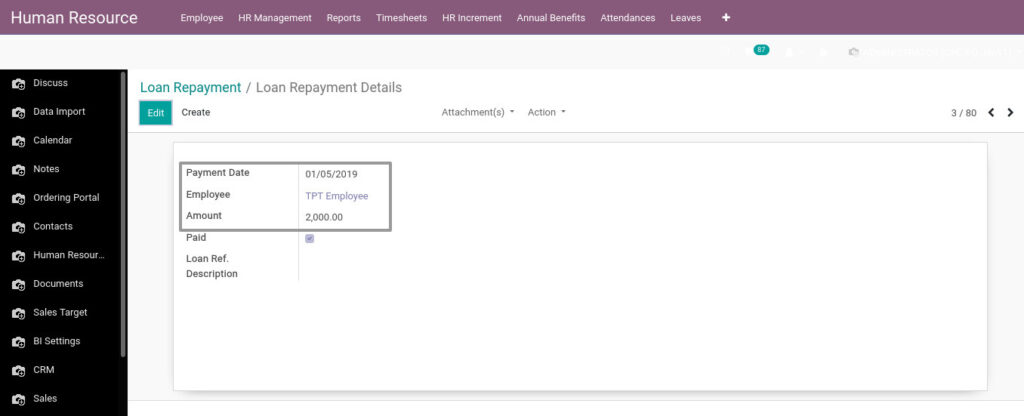
Field Description
- Payment Date – Enter the loan repayment date
- Employee – Select the Employee
- Amount – Enter the loan repayment amount
18. Manage Advances Repayment in Odoo HR Management
Create and manage the advance repayment of the employee who taken advance.
Go to Human Resource → Click on Loan and Salary Advance → Select Advance Repayment
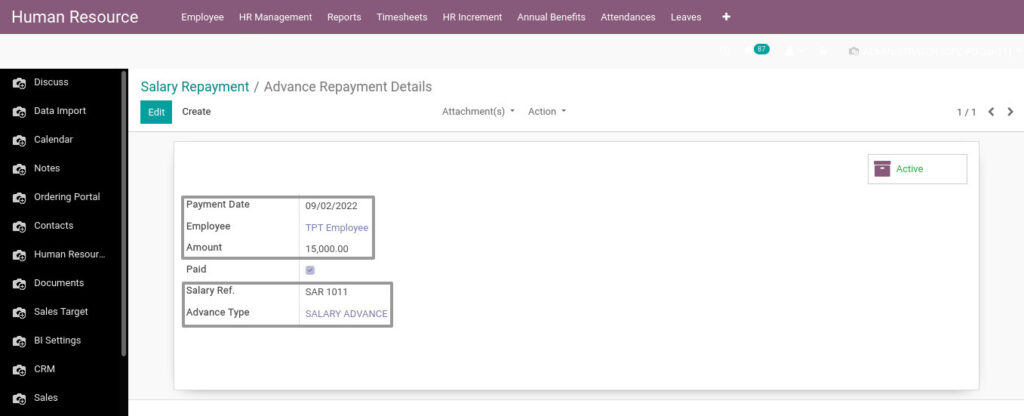
Field Description
- Payment Date – Enter the advance repayment date
- Employee – Select the Employee
- Amount – Enter the advance repayment amount
- Salary Ref – Enter the salary advance reference no
- Advance Type – Select the advance type
19. Manage Leave in Odoo HR Management
Create and manage employee leaves. So, we can calculate the salary for the working days
Go to Human Resource → Click on Leaves → Select All Leaves
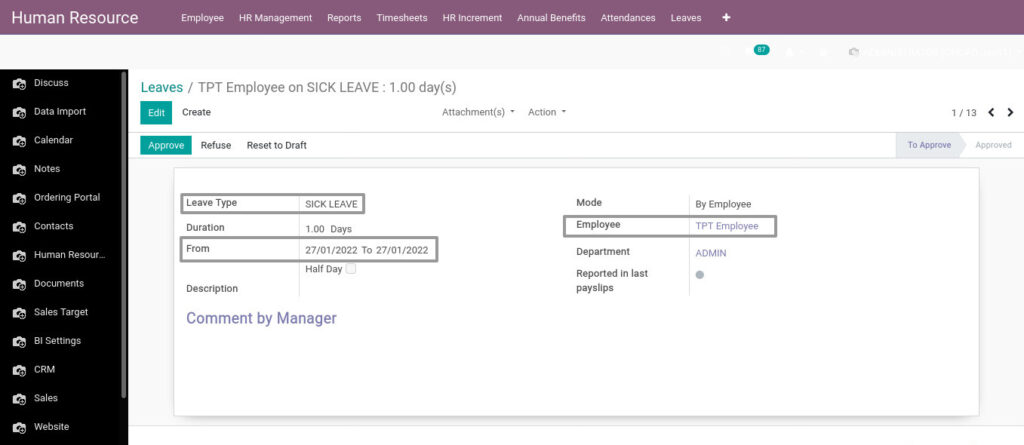
Field Description
- Leave Type – Select the leave type
- Employee – Select the Employee
- From – Select the date from and date to for leave
20. Manage Resignation in Odoo HR Management
Create and manage the employee’s resignation. So, that we can assign the work to other employee without rushing.
Go to Human Resource → Click on Resignation → Select Resignation request
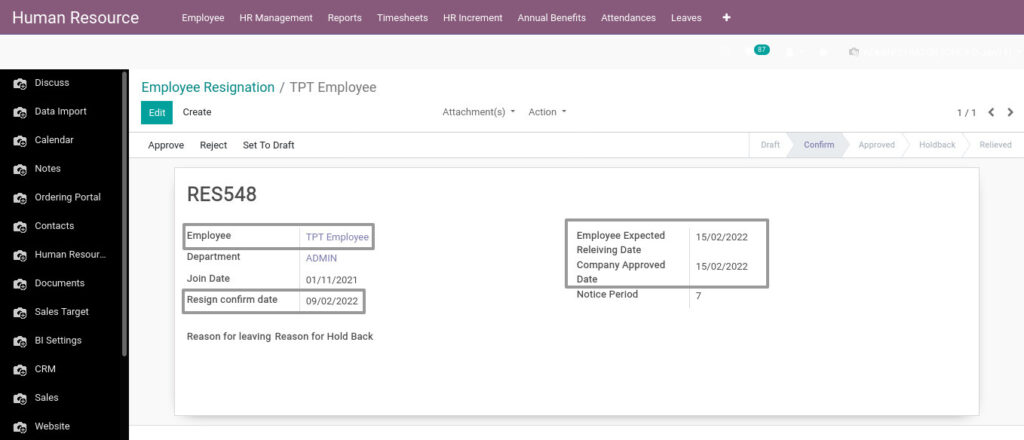
Field Description
- Employee – Select the Employee
- Employee Expected Relieving Date – Enter employee’s relieving date
- Company Approved Date – Enter the company approved relieving date
- Resign Confirm Date – Resignation confirm date
21. Manage Annual Leave Allocation Process in Odoo HR Management
Create and manage the annual leave allocation process to your employees. It’s an automated process.
Go to Human Resource → Click on HR Management→ Select Annual Leave Allocation Process
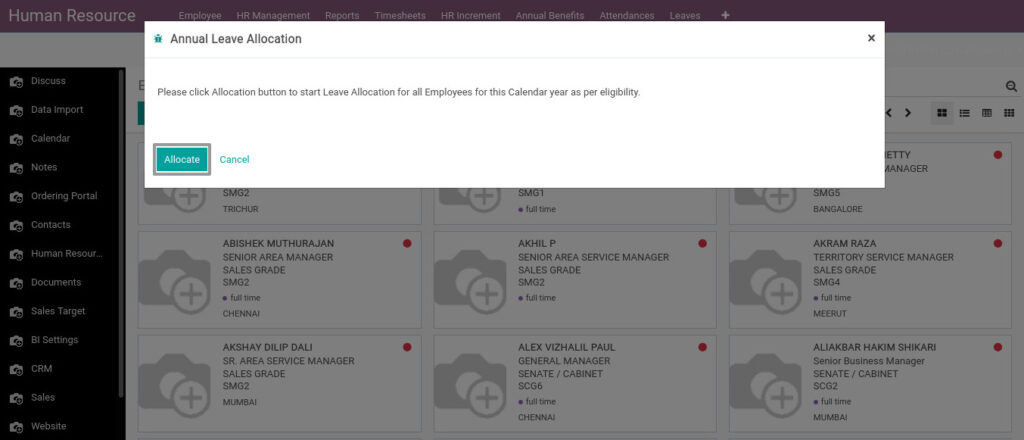
By Clicking Allocate button, leaves will allocate to the employees based on their leave eligibility on rank.
Field Description
- Allocate – Click Allocate button to allocate the leave to the employees
Here, you can see the annual leave allocation of the employee.
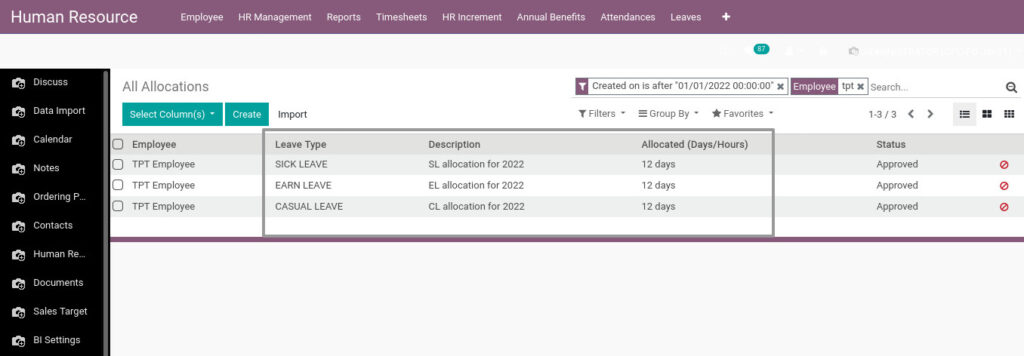
22. Manage Form-3A Process in Odoo HR Management
Employee-wise annual report for the amounts deducted/contributed by the employee. It’s an automated process.
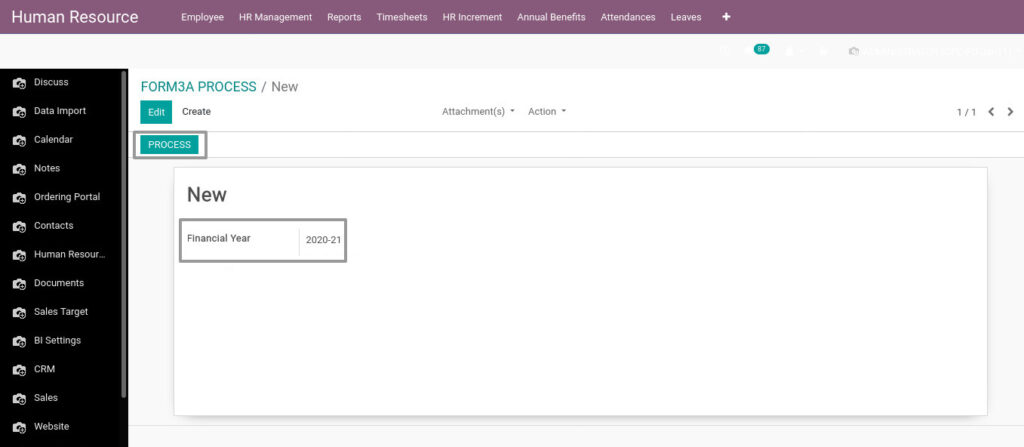
Go to Human Resource → Click on HR Management → Select Form-3A Process
Field Description
- Financial Year – Select the Financial Year
- Process – Click Process button to generate the Form-3A register
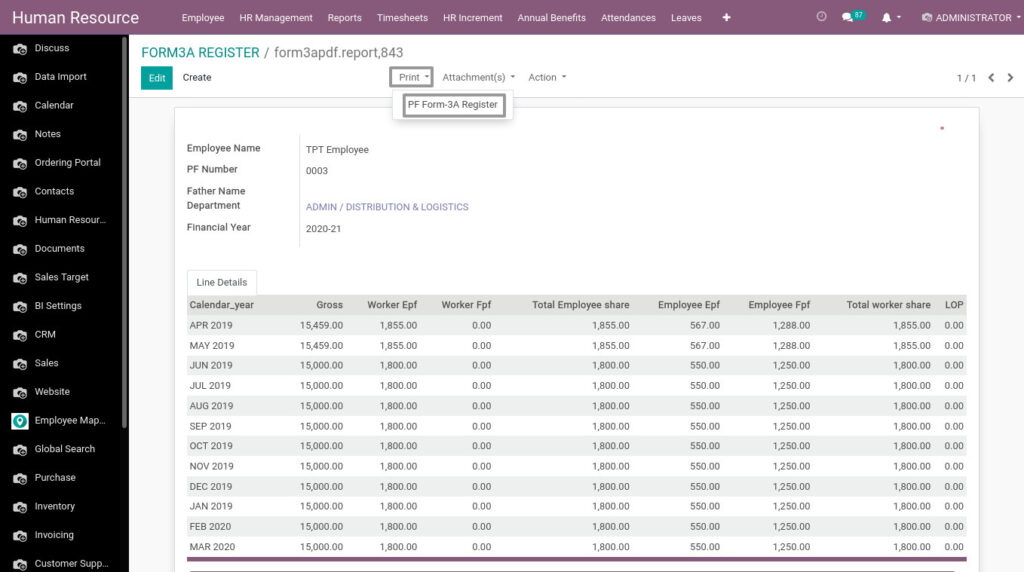
Go to Human Resource → Click on HR Management → Select Form-3A Register
Field Description
- Print – Click Print button to print the Form-3A Register as PDF
23. Manage Attendance in Odoo HR Management
Create and manage the attendance of the employees. So, that we can track the employee’s work hour.
Attendance are record by manually and punching time cards.
Go to Human Resource → Click on Payroll → Select Payslip Batches

Field Description
- Generate Attendance Entries – Click this button to generate employee attendance entries for the payslip month.
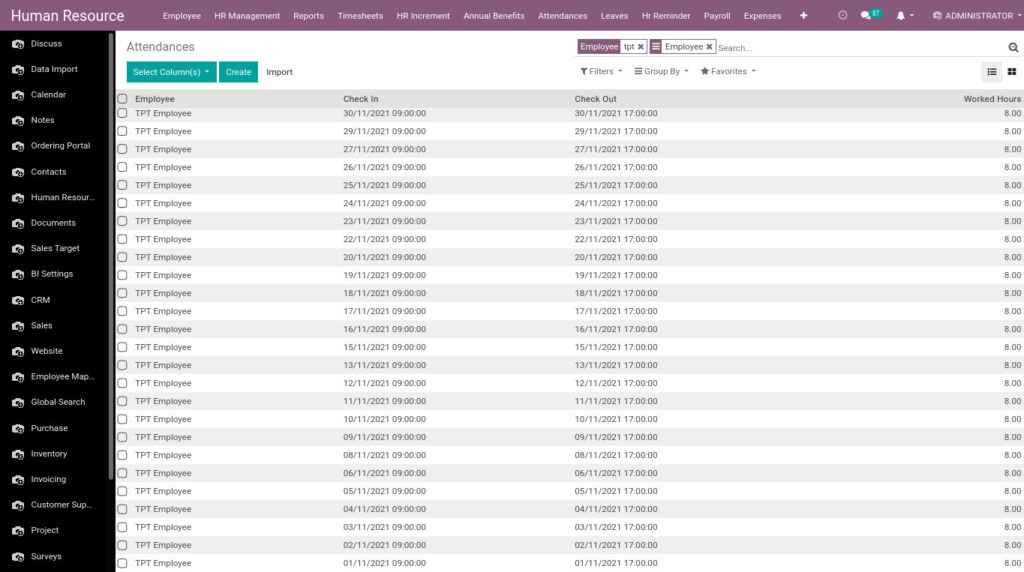
Go to Human Resource → Click on Attendances → Select Attendances
Here, You can see employee’s attendance entries for a month
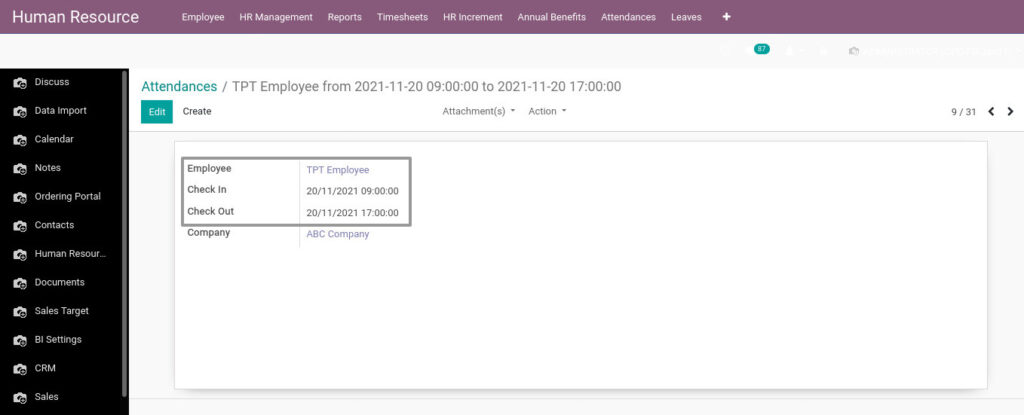
Field Description
- Employee – Select the employee
- Check In – Enter the check in time
- Check Out – Enter the check-out time
