How to Configure RMA Type in iDempiere for Retail
Learn how to configure RMA Type in iDempiere for retail returns. Set up return classifications for customer and vendor RMA transactions.
Introduction
The RMA Type master window in iDempiere defines the classification categories for Return Material Authorization transactions. Each RMA Type acts as a return reason label — such as Defective Product, Wrong Item Delivered, or Vendor Damaged Goods — that must be pre-configured before any customer or vendor return can be processed.
In retail operations, RMA Type is used every time a customer brings back merchandise or a business returns goods to a supplier. The type selected on the RMA document determines the nature of the return, drives downstream credit memo creation, and feeds into return analytics and inventory adjustments.
Without an active RMA Type record, the system will not allow users to complete a Customer RMA or Vendor RMA document. Correct configuration ensures that return transactions are properly classified, traced, and reported across all retail branches.
Prerequisites
Ensure the following configurations are completed before configuring RMA Type:
- System Administrator or Configuration Manager role assigned to the logged-in user.
- Organisation records created and active (for Organisation = * or branch-specific assignments).
- Material Management module enabled in the iDempiere instance.
- Business Partner master records created for customers and vendors involved in returns.
Business Rules
- At least one active RMA Type record must exist before any Customer RMA or Vendor RMA transaction can be completed.
- Each RMA Type must have a unique Name to avoid selection confusion during return processing.
- Inactive RMA Types are not available in the type drop-down on RMA transaction windows.
Navigation
Menu → Returns → RMA Type
The window displays all existing RMA Type records. Use the search bar to filter by Name or Description. Click any row to open and edit an existing record.
Step-by-Step Configuration
Step 1: Open the RMA Type Window
Navigate to Material Management → RMA Type from the iDempiere main menu. The window opens showing a grid list of all existing RMA Type records. If this is a new installation, the list will be empty or contain only seed data records.
Purpose: This window is the master list for all return classification types used across Customer RMA and Vendor RMA transactions.
Step 2: Create a New RMA Type Record
Click the New Record icon (+) in the toolbar or press F5. A blank form opens ready for data entry. Fill in all mandatory fields before saving.
Field Reference
| Field | Sample Value | Description |
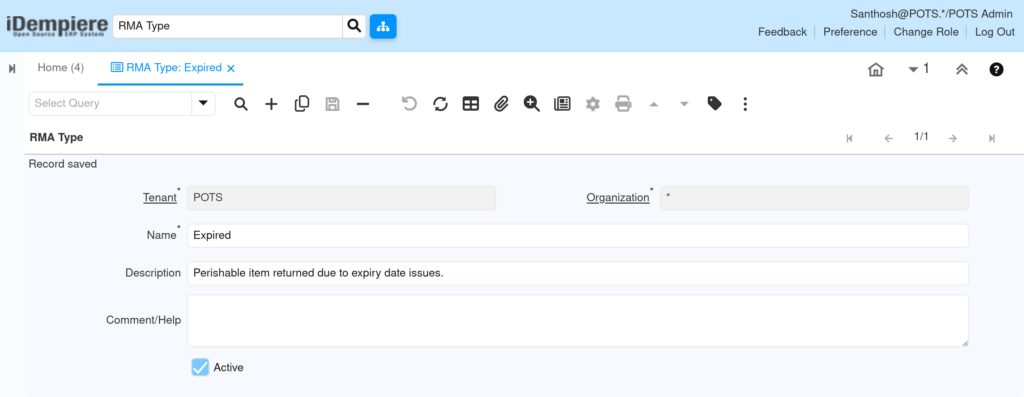
| Name | Expired | Unique label for this return type. Used in drop-down selection on RMA documents. |
| Description | Perishable item returned due to expiry date issues. | Brief explanation of when this return type applies. Guides store staff during RMA entry. |
| Organization | * | Set to * to share across all branches. Set to a specific org to restrict to one location. |
| Active | Yes (checked) | Controls whether this RMA Type appears in transaction drop-downs. Uncheck to deactivate. |
Step 3: Configure Standard RMA Types for Retail
Set up the following RMA Types as a standard retail baseline. These cover the most common return scenarios across customer-facing and vendor-side operations.
| Name | Description |
| Defective Product Return | Item returned due to manufacturing defect or fault. |
| Wrong Item Delivered | Customer received incorrect SKU or variant. |
| Customer Change of Mind | Customer no longer wants the purchased item. |
| Damaged in Transit | Product arrived damaged during delivery or shipping. |
| Expired | Perishable item returned due to expiry date issues. |
| Vendor — Damaged Goods | Goods received from vendor in damaged or unacceptable state. |
| Vendor — Wrong Quantity | Vendor supplied fewer or more units than ordered. |
| Vendor — Quality Rejection | Goods failed incoming quality inspection. |
Create each record separately using the New Record (+) action. Ensure each Name is unique and the Active checkbox is checked before saving.
Step 4: Save the Record
After entering all field values, save the record by Clicking the Save icon in the toolbar
The record is saved immediately and becomes available for selection in Customer RMA and Vendor RMA transaction windows.
Configuration Summary
| Configuration Item | Purpose |
| RMA Type Name | Unique label used in RMA transaction drop-downs. |
| Description | Describes return reason to guide staff during entry. |
| Organization | Controls branch scope — * for all, specific org for restricted access. |
| Active | Enables or disables the record in transaction selection. |
Business Flow Overview
- Configuration user creates RMA Type records in the RMA Type master window.
- Each RMA Type is activated — it becomes available in Customer RMA and Vendor RMA document drop-downs.
- Store staff or procurement team raises an RMA document and selects the appropriate RMA Type.
- The RMA document is completed — iDempiere validates the RMA Type is active.
- Credit memo generation is triggered for the customer or vendor based on the completed RMA.
- Inventory adjustments are recorded and accounting entries are posted per the configured rules.
Common Issues and Resolutions
| Issue | Cause | Resolution |
| RMA Type drop-down is empty on Customer RMA window. | No active RMA Type records exist. | Open RMA Type window and create at least one active record. |
| RMA Type not visible in Vendor RMA window. | RMA Type is set to Inactive. | Open the RMA Type record, check the Active checkbox, and save. |
| Duplicate RMA Type names causing selection confusion. | Multiple records created with similar names. | Review and consolidate. Deactivate duplicates and keep the correctly named record. |
| Cannot delete an RMA Type record. | The record is referenced in one or more existing RMA transactions. | Deactivate the record instead of deleting it to preserve transaction history. |
| RMA Type saved but not available in transaction. | Browser or session cache issue in iDempiere. | Log out and log back in, or clear the browser cache and retry. |
| Description field left blank causing staff confusion. | Record created without description during initial setup. | Edit each RMA Type record and add a clear description for staff guidance. |
| Wrong RMA Type selected on a completed transaction. | Staff selected incorrect type during data entry. | Void and re-create the RMA document with the correct type before completing. |
| RMA Type visible but transaction still fails to complete. | Other required fields on the RMA document are missing, not the type. | Check RMA header fields such as Business Partner and Shipment reference. |
Best Practices
- Use a consistent naming convention — e.g., prefix Customer types with ‘Cust —’ and Vendor types with ‘Vendor —’ for easy identification.
- Keep RMA Type records active only for return reasons currently in use at your retail stores.
- Review RMA Type records quarterly and deactivate any types that are no longer operationally relevant.
- Avoid creating duplicate records — search the existing list before adding a new RMA Type.
- Always populate the Description field to help store staff select the correct return reason quickly.
- Deactivate rather than delete unused RMA Types to preserve historical transaction integrity.
- Align RMA Type names with your retail return policy categories for consistent reporting.
Next Steps
After completing RMA Type configuration in iDempiere, proceed with:
- Customer RMA — Create Return Material Authorization documents for customer product returns.
- Vendor RMA — Create Return Material Authorization documents for vendor return transactions.