How to Configure Settings for Printing in iDempiere for Retail
Configure Print Format, Print Paper, Print Font, Print Color, Print Table Format, and Print Form in iDempiere for retail document printing.
Introduction
iDempiere controls all document printing through a set of inter-linked configuration windows: Print Format, Print Paper, Print Font, Print Color, Print Table Format, and Print Form. Together, these windows define exactly how every printed document — invoice, order, shipment, or report — looks when it reaches the printer or is exported as a PDF.
In retail, accurate and consistent document printing is essential. Invoices must carry the correct layout and branding, sales orders need a clean format for warehouse staff, and receipts must fit the paper size used at each branch. Configuring iDempiere’s print settings ensures that every document printed from any branch matches the company standard.
Prerequisites
Ensure the following configurations are completed before configuring Print Settings in iDempiere:
- Tenant (Client) and Organization records are active.
- Report Views or database tables required by the Print Format exist in the system.
- Printer hardware or PDF export is configured on the iDempiere server.
- User roles include access to the Print Format, Print Paper, Print Font, Print Color, Print Table Format, and Print Form windows.
- Document types (Invoice, Order, Shipment) are configured and active.
Business Rules
- A Print Format must be linked to a database table or report view before it can generate any output.
- Only active Print Format records are available for selection in transaction and report windows.
- The Landscape checkbox on Print Paper rotates the page; use this for wide reports such as sales summaries.
- Print Paper defines the page size and margins; incorrect margins cause content to be cut off at the edges.
- Print Font applies globally to the format; individual field fonts can override this at the format-item level.
- Print Color defined as Default is used as the fallback color for all printed text unless overridden.
- Print Table Format controls the visual style of tabular reports including header lines, grid lines, and function row appearance.
- Print Form assigns the correct Print Format to each document type (Order, Invoice, Shipment, Remittance) for a given client setup.
Navigation
The print configuration windows are accessed individually from the iDempiere menu:
- Print Format: Menu → System Admin → General Rules → Printing → Print Format
- Print Paper: Menu → System Admin → General Rules → Printing → Print Paper
- Print Font: Menu → System Admin → General Rules → Printing → Print Font
- Print Color: Menu → System Admin → General Rules → Printing → Print Color
- Print Table Format: Menu → System Admin → General Rules → Printing → Print Table Format
- Print Form: Menu → System Admin → General Rules → Printing → Print Form
Each window displays all existing records in a list view. Use the search bar at the top to locate specific records by name.
Step-by-Step Configuration
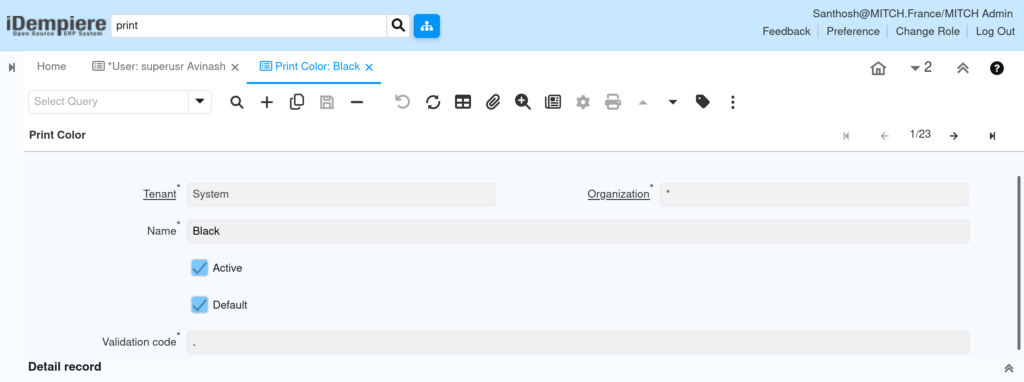
Step 1: Configure Print Color
Configure Print Color first — it is referenced by Print Table Format and Print Format. iDempiere ships with system colors including Black, which is the most commonly used default.
Click the New Record (+) button to open a blank form. Fill in the fields as shown below.
Field Reference — Print Color
| Field | Sample Value | Description |
| Tenant | System | The client this color belongs to. |
| Organization | * | Use * to share across all branches. |
| Name | Black | Descriptive name for the color. |
| Active | Checked | Makes the color available for selection. |
| Default | Checked | Auto-selected when no color is specified. |
| Validation code | . | Java color code (e.g., “.” = black). |
| Tip: The Validation code field accepts standard Java color names or hex codes. A single period (.) represents black in iDempiere’s color system. |
Step 2: Configure Print Font
Print Font defines the typeface and size used across a printed document. iDempiere includes a library of pre-configured fonts covering serif, sans-serif, and monospaced options in multiple sizes.
Click New Record (+) to create a font entry. The Validation code field must contain the font descriptor string that iDempiere passes to the Java rendering engine.
Field Reference — Print Font
| Field | Sample Value | Description |
| Tenant | System | The client this font belongs to. |
| Organization | * | Use * to share across all branches. |
| Name | Monospaced 10 | Display name used in Print Format selection. |
| Active | Checked | Makes the font available for selection. |
| Default | Unchecked | If checked, used when no font is specified. |
| Validation code | monospaced-PLAIN-10 | Font descriptor: family-STYLE-size. |
Sample Font Records
| Name | Validation Code | Active |
| SansSerif 10 | sansserif-PLAIN-10 | Yes |
| SansSerif bold 10 | sansserif-BOLD-10 | Yes |
| Serif bold 10 | serif-BOLD-10 | Yes |
| Monospaced 10 | monospaced-PLAIN-10 | Yes |
The validation code format is: fontFamily-STYLE-pointSize. Supported styles are PLAIN, BOLD, ITALIC, and BOLDITALIC.

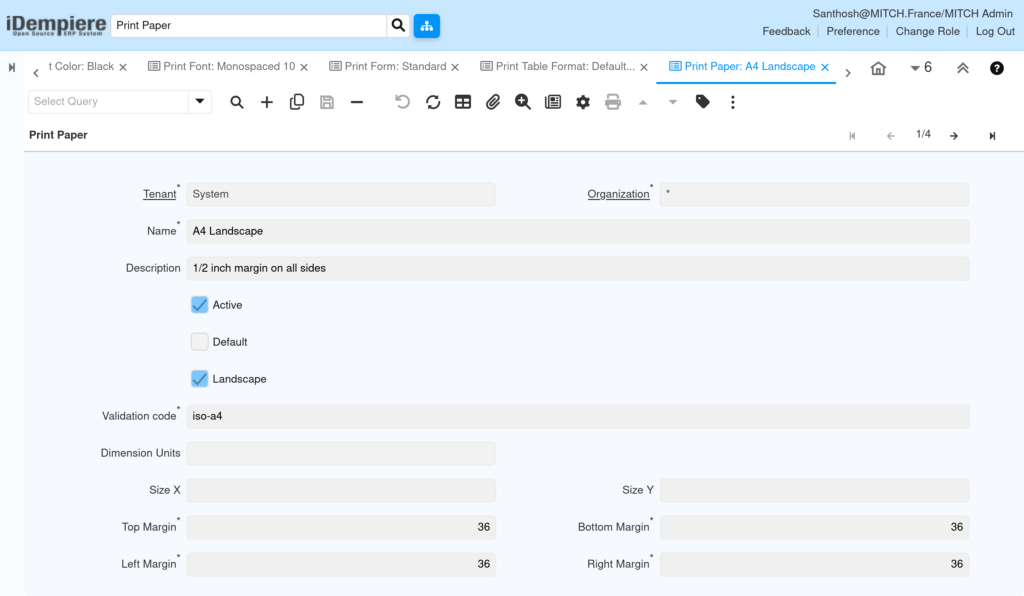
Step 3: Configure Print Paper
Print Paper defines the physical page: its size, orientation, and margins. Every Print Format must reference a Print Paper record. Retail operations commonly use A4 Portrait for invoices and A4 Landscape for sales reports.
Click New Record (+). Set the paper dimensions and margins. The Validation code maps to a standard ISO or JIS paper identifier.
Field Reference — Print Paper
| Field | Sample Value | Description |
| Tenant | System | The client this paper belongs to. |
| Organization | * | Use * to share across all branches. |
| Name | A4 Landscape | Display name shown in Print Format. |
| Description | 1/2 inch margin on all sides | Internal reference note. |
| Active | Checked | Makes this paper size available. |
| Default | Unchecked | Auto-selected when no paper is specified. |
| Landscape | Checked | Rotates the page to landscape orientation. |
| Validation code | iso-a4 | ISO/JIS paper identifier. |
| Dimension Units | (blank) | Leave blank for default system units. |
| Size X | (blank) | Custom width; leave blank for ISO sizes. |
| Size Y | (blank) | Custom height; leave blank for ISO sizes. |
| Top Margin | 36 | Top page margin in points. |
| Bottom Margin | 36 | Bottom page margin in points. |
| Left Margin | 36 | Left page margin in points. |
| Right Margin | 36 | Right page margin in points. |
Sample Print Paper Records
| Name | Validation Code | Landscape | Margins (pt) |
| A4 Landscape | iso-a4 | Yes | 36 all sides |
| A4 Portrait | iso-a4 | No | 36 all sides |
| Letter Landscape | na-letter | Yes | 36 all sides |
| Letter Portrait | na-letter | No | 36 all sides |
36 points = approximately ½ inch. Use 72 points for a standard 1-inch margin.
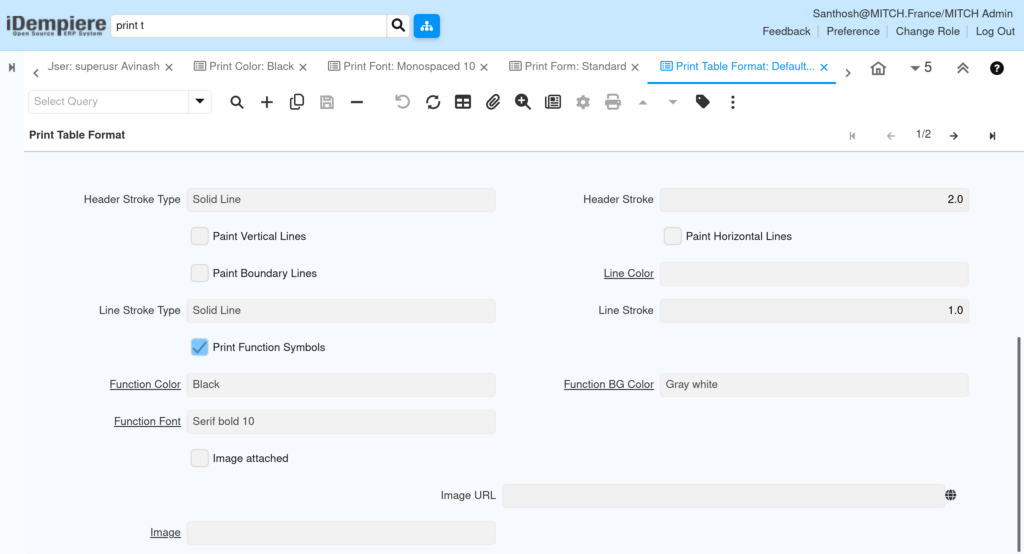
Step 4: Configure Print Table Format
Print Table Format controls the visual appearance of tabular (grid-style) reports. It defines header row styling, grid line visibility, function row colors, and whether images are included in the table background.
Click New Record (+). The record has two groups of fields: header row styling (top section) and function row styling (bottom section).
Field Reference — Print Table Format
| Field | Sample Value | Description |
| Tenant | System | The client this format belongs to. |
| Organization | * | Use * to share across all branches. |
| Name | Default Report | Display name used in Print Format. |
| Description | With Lines; Default Colors and Fonts | Internal reference. |
| Active | Checked | Makes this table format available. |
| Default | Checked | Auto-selected when no table format is specified. |
| Header Row Color | Black | Text color for the table header row. |
| Header Row BG Color | Gray white | Background color of the header row. |
| Header Row Font | SansSerif bold 10 | Font used in the table header row. |
| Multi Line Header | Unchecked | Allows header text to wrap to multiple lines. |
| Paint Header Lines | Checked | Draws a border line below the header row. |
| Header Line Color | (blank) | Color of the header border line. |
Field Reference — Print Table Format
| Field | Sample Value | Description |
| Header Stroke Type | Solid Line | Line style for the header border. |
| Header Stroke | 2.0 | Thickness of the header border line. |
| Paint Vertical Lines | Unchecked | Draws vertical grid lines between columns. |
| Paint Horizontal Lines | Unchecked | Draws horizontal lines between data rows. |
| Paint Boundary Lines | Unchecked | Draws a border around the entire table. |
| Line Color | (blank) | Color of the grid lines. |
| Line Stroke Type | Solid Line | Style of the grid lines. |
| Line Stroke | 1.0 | Thickness of the grid lines. |
| Print Function Symbols | Checked | Shows sum/count symbols in the function row. |
| Function Color | Black | Text color in the function (totals) row. |
| Function BG Color | Gray white | Background color of the function row. |
| Function Font | Serif bold 10 | Font used in the function row. |
| Image attached | Unchecked | Attach a background image to the table. |
| Image URL | (blank) | URL of the background image if used. |

Step 5: Configure Print Form
Print Form assigns a specific Print Format to each document type for a given client. This is the record that connects your Print Format configurations to the actual business documents — orders, invoices, shipments, and remittances — that retail staff print daily.
Click New Record (+). Assign a Print Format to each document type relevant to your retail operation. Leave unused document types blank.
Field Reference — Print Form
| Field | Sample Value | Description |
| Tenant | System | The client this Print Form applies to. |
| Organization | * | Use * to apply across all branches. |
| Name | Standard | Display name for this print form set. |
| Description | (blank) | Internal reference note. |
| Active | Checked | Makes this form set available. |
| Order Print Format | Order_Header ** TEMPLATE ** | Print Format used for Sales Orders. |
| Order Mail Text | (blank) | Email template sent with order documents. |
| Shipment Print Format | InOut_Header ** TEMPLATE ** | Print Format used for Delivery Notes. |
| Shipment Mail Text | (blank) | Email template sent with shipment documents. |
| Invoice Print Format | Invoice_Header ** TEMPLATE ** | Print Format used for Customer Invoices. |
| Invoice Mail Text | (blank) | Email template sent with invoice documents. |
| Remittance Print Format | PaySelection_Remittance ** TEMPLATE ** | Print Format for payment remittance advice. |
| Remittance Mail Text | (blank) | Email template sent with remittance documents. |
| Project Print Format | (blank) | Print Format for project documents if applicable. |
| Note: ** TEMPLATE ** in the format name indicates a system-level template. Replace these with your customised Print Format records once they are configured. |
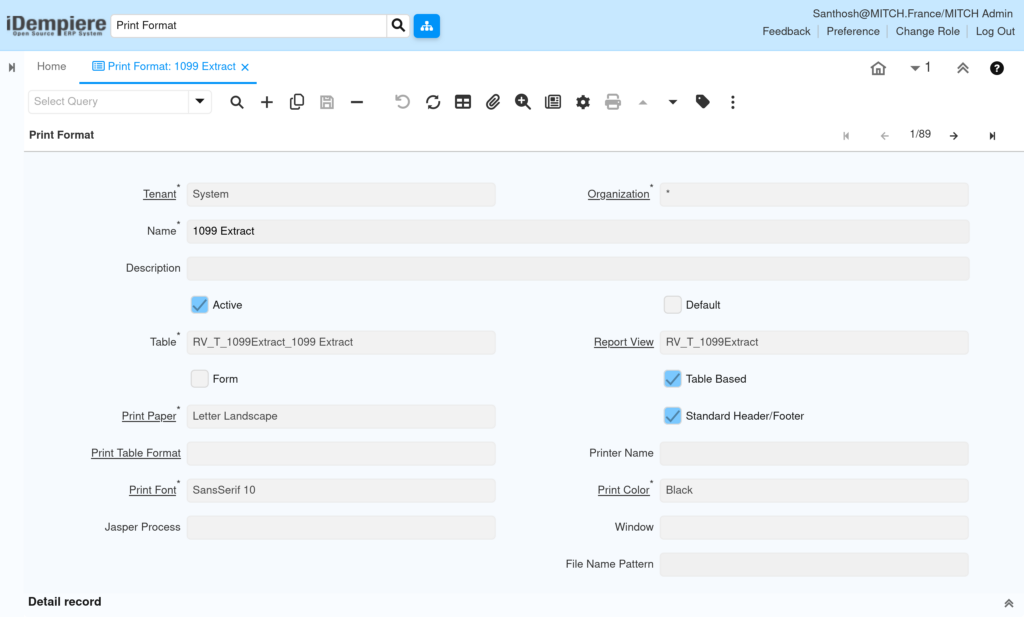
Step 6: Configure Print Format
Print Format is the master configuration record. It ties together the Print Paper, Print Font, Print Color, and Print Table Format into a single named format that can be assigned to reports, transactions, and the Print Form window.
Click New Record (+). Select the correct table or report view, choose the output type (Form or Table Based), and link the previously configured Paper, Font, and Color records.
Field Reference — Print Format
| Field | Sample Value | Description |
| Tenant | System | The client this format belongs to. |
| Organization | * | Use * to share across all branches. |
| Name | 1099 Extract | Unique name for this print format. |
| Description | (blank) | Internal reference note. |
| Active | Checked | Makes the format available for printing. |
| Default | Unchecked | Auto-selects this format in the linked window. |
| Table | RV_T_1099Extract_1099 Extract | The database table or report view driving this format. |
| Report View | RV_T_1099Extract | The report view used if different from the base table. |
| Form | Unchecked | Check for document layouts (invoices, orders). |
| Table Based | Checked | Check for columnar report output. |
| Print Paper | Letter Landscape | The paper size record for this format. |
| Standard Header/Footer | Checked | Includes company name and page number. |
| Print Table Format | (blank) | The table format record for tabular output. |
| Printer Name | (blank) | Specific printer; leave blank for default. |
| Print Font | SansSerif 10 | Default font for this format. |
| Print Color | Black | Default text color for this format. |
| Jasper Process | (blank) | Used only for Jasper-based custom reports. |
| Window | (blank) | Links the format to a specific iDempiere window. |
| File Name Pattern | (blank) | Pattern for generated PDF file names. |
| Important: Set either Form or Table Based — not both. Form = positioned document layout. Table Based = columnar report grid. The choice determines how the Detail record section is configured. |
Step 7: Save and Validate
After completing all fields in each configuration window, click the Save button (disk icon) in the toolbar or press F10. The record is immediately available for use.
- Verify the record appears in the list view.
- Navigate to a transaction window (e.g., Sales Invoice) and trigger a print to confirm the format loads correctly.
- Check that the correct paper size appears in the print preview.
- Confirm the font and color match the configured records.
| Notes: Use the Print Preview button (magnifier + document icon) in any transaction window to test the format without sending to a physical printer. |
Configuration Summary
| Configuration Window | Purpose |
| Print Color | Defines text and background colors used in printed documents. |
| Print Font | Defines font families, styles, and sizes for printed output. |
| Print Paper | Defines page size, orientation, and margins. |
| Print Table Format | Controls header row, grid lines, and function row appearance in reports. |
| Print Form | Assigns Print Formats to document types (Order, Invoice, Shipment). |
| Print Format | The primary record linking table, paper, font, color, and layout type. |
Business Flow Overview
- Administrator configures Print Color, Print Font, and Print Paper as master records.
- Print Table Format is created for tabular report styling.
- Print Format records are created, linking the above master records to a database table or report view.
- Print Form assigns each Print Format to the relevant document type (Invoice, Order, Shipment, Remittance).
- Retail staff print documents from transaction windows; iDempiere resolves the Print Form to identify the correct Print Format.
- iDempiere renders the document using the linked Paper, Font, Color, and layout settings and sends it to the printer or PDF export.
Common Issues and Resolutions
| Issue | Cause | Resolution |
| Document prints on wrong paper size | Print Paper record not linked or incorrect paper selected in Print Format | Open Print Format, verify Print Paper field, and select the correct record. |
| Text is cut off at the page edge | Margins in Print Paper are too small | Increase Top, Bottom, Left, and Right Margin values in the Print Paper record. |
| Invoice prints in landscape instead of portrait | Landscape checkbox enabled on the wrong Print Paper record | Create a separate A4 Portrait paper record and assign it to the Invoice Print Format. |
| Print Format not appearing in the document window | Active checkbox is unchecked on the Print Format | Open the Print Format record and check the Active checkbox. |
| Wrong font appearing on printed output | Print Format references an incorrect or inactive Print Font | Open Print Format, verify Print Font field, and select the correct active font record. |
| Header row not displaying in reports | Paint Header Lines unchecked in Print Table Format | Open Print Table Format and check the Paint Header Lines checkbox. |
| Function totals row missing | Print Function Symbols unchecked in Print Table Format | Check the Print Function Symbols checkbox in the Print Table Format record. |
| Order printing with wrong layout after recent change | Print Form still references the old Print Format | Open Print Form and update the Order Print Format field to the new record. |
| Standard header/footer not appearing | Standard Header/Footer checkbox unchecked in Print Format | Check the Standard Header/Footer checkbox in the Print Format record. |
Best Practices
- Use a consistent naming convention: include document type and paper size in the Print Format name (e.g., Invoice_A4_Portrait).
- Create separate Print Paper records for portrait and landscape; never reuse one record for both orientations.
- Always set one Print Color and one Print Font as Default to prevent blank output on misconfigured formats.
- Test every Print Format in Print Preview before deploying to production.
- Deactivate outdated Print Format records rather than deleting them to preserve historical document integrity.
- Keep Print Table Format records generic (e.g., “Default Report”, “No Lines Report”) so they can be reused across multiple Print Formats.
- Review Print Form assignments whenever a new Print Format is created to ensure document types are updated.
- Document the Validation code used in each Print Font and Print Color record in the Description field for future reference.
Next Steps
After completing print configuration in iDempiere, proceed with:
- Configure Document Types to link Print Forms to the correct business document workflows.
- Set up Report Views and custom database views required for advanced Print Format layouts.
- Configure Email Templates for the Mail Text fields in Print Form to enable document delivery by email.
- Review and customise the Detail Records within each Print Format to control which fields appear on printed documents.
- Configure Jasper Reports integration if custom-designed documents with complex layouts are required.