How to Configure Sales Region in iDempiere
The Sales Region window in iDempiere for Distribution is used to define geographical or operational sales territories that organize customers, sales activities, and distribution operations. Sales Regions help distribution companies segment markets, assign responsibility to sales teams, and analyze performance across different territories. By associating customers and transactions with specific regions, organizations can improve sales tracking, commission management, demand forecasting, and regional reporting. This structure provides greater visibility into market performance and supports more effective planning and decision-making throughout the distribution network.
Process Flow

Prerequisites
Before starting, ensure the following configuration is complete:
- Initial Tenant Setup completed successfully
- Organisation structure defined and active
- Sales Representative records created (if assigning representatives to regions)
- Logged in with a role that has access to the Sales Region window
- Required administrative permissions granted for master data creation
Step-by-Step Configuration
Step 1: Open the Sales Region Window
Navigate to the Sales Region window
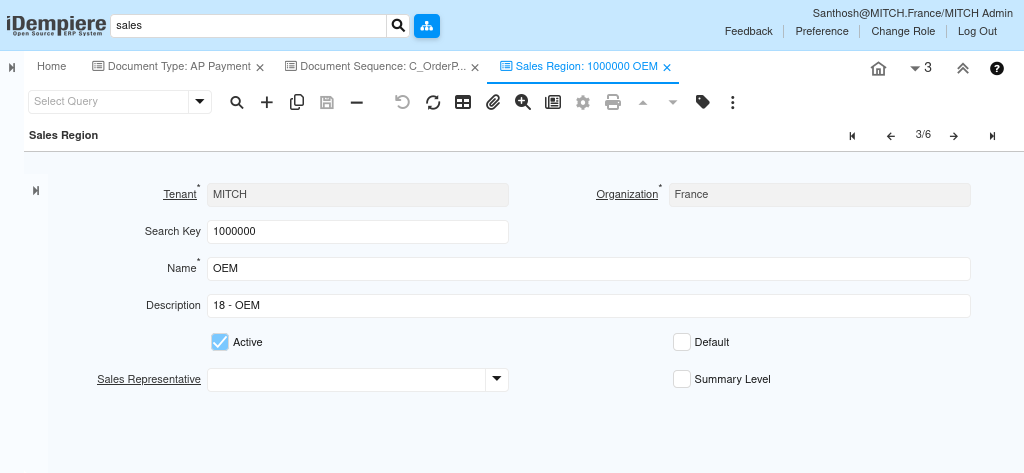
The window displays all existing Sales Region records in list view.
Step 2: Create a New Record
To create a new Sales Region record, click the New Record button in the toolbar: New Record (+)
A blank form opens. Enter the required field values as described below.
Field Reference
- Search Key — Unique short code used to identify the Sales Region across the system
- Name — Descriptive name of the Sales Region displayed in transactions and reports
- Description — Additional business context or notes about the region
- Sales Representative — The staff member or agent responsible for this Sales Region
- Active — Controls whether the record is available for use in transactions
- Default — Marks this region as the default selection when no region is specified
- Summary Level — Indicates whether this is a summary (parent) region grouping child records
- Tenant — The client organisation this record belongs to (auto-populated)
- Organisation — Defines the organisational scope of the record; use * for shared records
Step 3: Configure Sales Region — Point S
Enter the following values to create the Point S regional record:
| Field | Value |
| Tenant | Your Tenant |
| Organisation | * |
| Search Key | 10000 |
| Name | Point S |
| Description | Point-S regional sales territory |
| Sales Representative | (None assigned) |
| Active | Yes |
| Default | No |
| Summary Level | No |
The Point S region represents a specific Distribution channel or partner network territory. Linking this region to business partners ensures all transactions, orders, and reports are correctly attributed to the Point S sales territory for performance tracking and operational review.
Step 4: Configure Sales Region — OEM
Enter the following values to create the OEM regional record:
| Field | Value |
| Tenant | Your Tenant |
| Organisation | * |
| Search Key | 18 |
| Name | OEM |
| Description | Oem |
| Sales Representative | Sales Rep — OEM |
| Active | Yes |
| Default | No |
| Summary Level | No |
This region is associated with the OEM channel managed by A. Pirazzi. By assigning a dedicated Sales Representative to this region, the organisation can track OEM-specific performance, commissions, and order volume independently from other sales territories.
Step 5: Configure Sales Region — Tracked Vehicles Sales Sector
Enter the following values:
| Field | Value |
| Tenant | Your Tenant |
| Organisation | * |
| Search Key | 16 |
| Name | TRACKED VEHICLES SALES SECTOR |
| Description | |
| Sales Representative | (None assigned) |
| Active | Yes |
| Default | No |
| Summary Level | No |
This region defines the third commercial sector for tracked vehicles. It groups a segment of the tracked vehicles market under a separate territory identifier, enabling granular sales analysis and facilitating future assignment of a dedicated Sales Representative.
Step 7: Save the Record
After entering all required field values, save the record using the toolbar: Save (Floppy Disk icon or Alt + S)
The record is saved and assigned a unique system identifier. It is now available for use in transactions and business partner assignments.
Common Issues
| Issue | Resolution |
| Mandatory field validation error on save | Ensure Search Key and Name fields are populated. Both are required before the record can be saved. |
| Sales Region not visible in Business Partner location dropdown | Confirm the Active field is set to Yes. Inactive records are hidden from transaction dropdowns. |
| Sales Representative field is empty after assignment | Verify the Sales Representative record exists and is Active in the system before linking |
Next Steps
After completing the Sales Region configuration, continue with the following setup topics:
- Business Partner — Link the newly created Sales Regions to customer and vendor records
- Sales Representative — Verify representative records are active and correctly assigned to regions
- Price List — Configure region-specific pricing if applicable to the sales territory
- Sales Order — Create test orders to validate region assignment in live transactions
- Reporting Setup — Configure territory-level sales reports using the Sales Region dimension