How to Configure Vendor in iDempiere for Retail
Vendor setup in iDempiere is managed through two windows: Business Partner Group and Business Partner. Together they maintain supplier master records required for procurement, purchase transactions, vendor invoicing, payment processing, and GST handling.
| Business Value – In retail, vendor configuration supports two supplier types: GST-registered vendors for formal procurement and input tax credit, and unregistered local vendors for petty purchases and immediate cash procurement. |
Prerequisites
Before starting, ensure the following:
- Initial Tenant Setup completed successfully
- Organization structure configured
- Purchase Price List configured and activated
- Payment Terms configured
- GST Tax configuration completed
Business Rules
- Every procurement vendor must be created as a Business Partner with the Vendor checkbox enabled.
- Vendor Location records should include accurate address and state information because GST and IGST determination depends on vendor location configuration.
- At least one Location record should be configured with Invoice Address and Pay-From enabled before processing purchase transactions.
- Vendor Contact records should be maintained for purchase coordination, invoice communication, and operational follow-up.
- Purchase Price List and PO Payment Terms should be configured before using the vendor in procurement transactions.
- Credit Limit and Credit Watch % can be configured to monitor vendor payable exposure during procurement operations.
- Vendor master records should remain Active to appear in Purchase Orders, Material Receipts, and Vendor Invoice transactions.
Navigation
Two windows are used for vendor configuration:
Business Partner Group:
Menu → Partner Relations → Business Partner Group
Business Partner:
Menu → Partner Relations → Business Partner
Step-by-Step Configuration
Step 1: Open Business Partner Group Window
The window lists all existing Business Partner Groups under the tenant.
Step 2: Create Registered Vendor Group
Click New Record (+) and enter the following details:
| Field | Value |
| Organization | * |
| Search Key | REG-VEN |
| Name | Registered Vendor |
| Description | GST registered suppliers and procurement vendors |
| Purchase Price List | Purchase Price List |
| Credit Watch % | 75.0 |
| Price Match Tolerance | 5.0 |
| Active | Yes |
Used for GST-registered vendors. Supports GST purchase transactions and input tax credit handling.
Step 3: Create Unregistered Vendor Group
Click New Record (+) and enter the following details:
| Field | Value |
| Organization | * |
| Search Key | UNREG-VEN |
| Name | Unregistered Vendor |
| Description | Local non-GST vendors and petty suppliers |
| Purchase Price List | Purchase Price List |
| Active | Yes |
Used for local and non-GST vendors. Supports petty purchases and immediate cash procurement transactions.

Step 4: Open Business Partner Window
Navigate to Menu → Master Data Rules → Business Partner. Click New Record (+) to create individual vendor records.
Step 5: Configure Registered Vendor
Header Information
| Field | Value |
| Search Key | 1000007 |
| Business Partner Group | Registered Vendor |
| Name | Hello Telecom Pvt Ltd |
| Name 2 | Mobile Accessories Division |
| Vendor | Yes |
| Credit Status | No Credit Check |
| Credit Limit | 150000.00 |
| Tax ID | 33AABCH8645K1Z2 |
| Description | GST registered telecom accessories and electronics supplier |
| Active | Yes |

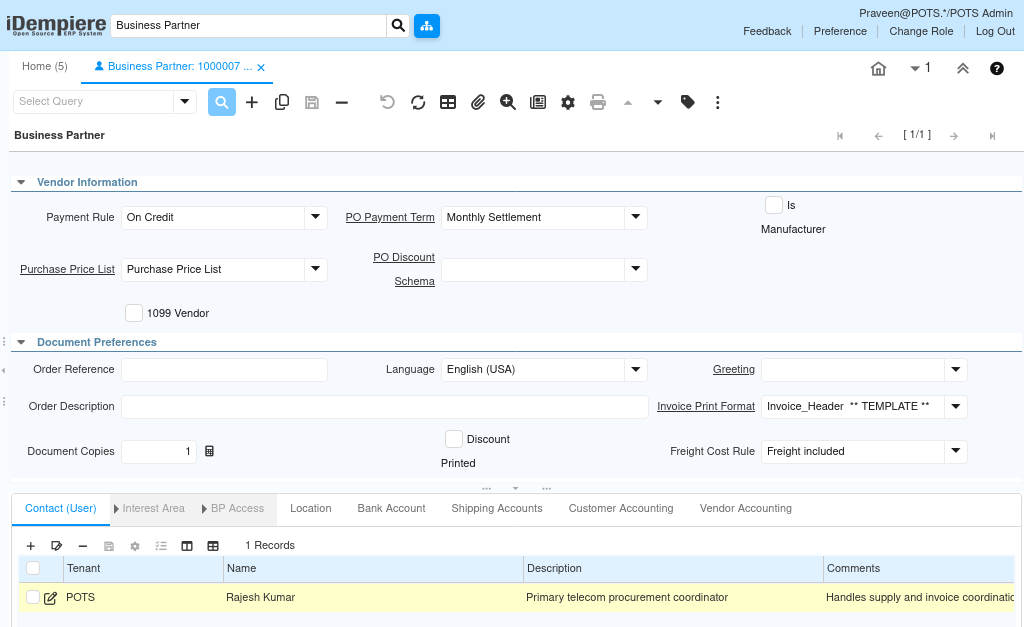
Vendor Information
| Field | Value |
| Payment Rule | On Credit |
| PO Payment Term | Monthly |
| Purchase Price List | Purchase Price List |
Used for GST-registered supplier transactions. Supports GST purchases and credit-based procurement with monthly payment settlement.
Step 6: Configure Unregistered Vendor
Header Information
| Field | Value |
| Search Key | 1000006 |
| Business Partner Group | Unregistered Vendor |
| Name | Chennai Suppliers |
| Name 2 | Local Consumables Division |
| Vendor | Yes |
| Credit Status | No Credit Check |
| Credit Limit | 25000.00 |
| Tax ID | Leave Empty |
| Description | Local non-GST consumable supplier |
| Active | Yes |
Vendor Information
| Field | Value |
| Payment Rule | Cash |
| PO Payment Term | Immediate |
| Purchase Price List | Purchase Price List |
Used for local, non-GST purchases. Suitable for petty suppliers requiring immediate cash payment at the time of procurement.
Step 7: Configure Contact and Location Details
After saving the vendor header, use the sub-tabs to add contact and address records.
Contact (User) Tab
Business Partner → Contact (User) tab → New Record (+)
| Field | Value |
| Name | Rajesh Kumar |
| Email Address | rajesh@hellotelecom.in |
| Phone | 9841012456 |
| Position | Vendor Relationship Executive |
| Active | Yes |
Stores vendor communication details used for purchase coordination and invoice correspondence.

Location Tab
Business Partner → Location tab → New Record (+)
| Field | Value |
| Name | Chennai Main Office |
| Address | No.125 Ritchie Street, Mount Road, Chennai – 600002 |
| Ship Address | Yes |
| Invoice Address | Yes |
| Pay-From | Yes |
| Remit-To Address | Yes |
| Active | Yes |
| GST Accuracy The vendor state in the Location record is used for GST calculation on purchase transactions. Ensure the address is accurate before raising purchase orders. |

Vendor Contact and Communication
Vendor communication details are maintained through the Contact (User) records under the Business Partner.
Multiple contact records can be created for the same vendor to manage procurement communication, invoice coordination, operational contacts, and department-specific vendor communication.
The Email Address field in Contact records can be used for purchase communication and vendor correspondence activities.
Step 8: Save the Record
Click Save. The vendor is now available for use across:
- Purchase Orders
- Material Receipts
- Vendor Invoices
- Procurement Transactions
- Vendor Payments
Field Reference
Business Partner Group Fields
- Search Key – Unique short code for the group (e.g., REG-VEN, UNREG-VEN)
- Name – Display name used in vendor records
- Purchase Price List – Default purchase price list assigned to all vendors in this group
- Credit Watch % – Threshold percentage that triggers credit watch alerts on outstanding balances
- Price Match Tolerance – Acceptable price variance percentage between PO and vendor invoice
- Active – Makes the group available for use
Business Partner Fields
- Search Key – Unique vendor code used in transactions
- Business Partner Group – Links the vendor to a group for pricing and credit rules
- Vendor – Must be enabled — makes the record available in purchase windows
- Tax ID – Vendor GSTIN — required for registered vendors; leave empty for unregistered
- Credit Status – Controls credit check behaviour during procurement processing
- Credit Limit – Maximum outstanding payable balance allowed for the vendor
- Payment Rule – Default payment method (Cash / On Credit)
- PO Payment Term – Payment term applied to purchase order transactions
- Purchase Price List – Price list used for vendor purchase transactions
Configuration Summary
| Vendor Type | Group | Tax ID | Payment |
| Registered Vendor | REG-VEN | GSTIN required | On Credit / Monthly |
| Unregistered Vendor | UNREG-VEN | Leave empty | Cash / Immediate |
Business Flow Overview
Business Partner Group (pricing + credit rules)
↓
Business Partner / Vendor record
↓
Contact + Location (address → GST state determination)
↓
Purchase Order
↓
Material Receipt (Goods Receipt)
↓
Vendor Invoice (GST applied)
↓
Payment Processing
Common Issues
| Issue | Resolution |
| Purchase Price List not visible | Create and activate a Price List Version |
| Vendor unavailable in purchase transactions | Enable the Vendor checkbox on the Business Partner record |
| Address not appearing on purchase invoice | Enable Invoice Address on the Location record |
| Vendor payment term unavailable | Verify Payment Term is configured and active |
| Vendor not appearing in procurement documents | Check Business Partner Group and Active status |
| Changes not reflected after save | Run Cache Reset and log in again |
Best Practices
- Use numeric Search Keys for Business Partners to maintain a consistent vendor numbering sequence.
- Always enable the Vendor checkbox — records without it will not appear in procurement transactions.
- Maintain accurate GSTIN details for registered vendors to ensure proper GST and IGST calculation during purchasing.
- Leave the Tax ID field empty for unregistered vendors to avoid incorrect tax application.
- Configure at least one active Location record with Invoice Address and Pay-From enabled before procurement processing.
- Maintain vendor Contact records for purchase communication and operational coordination.
- Configure Purchase Price Lists and PO Payment Terms before using vendors in purchase transactions.
- Use Credit Watch % and Credit Limit carefully to monitor procurement exposure and vendor payable management.
Next Steps
After completing Vendor setup, continue with:
- Purchase Order Setup — raise orders against configured vendors
- Material Receipt — record goods received from vendors
- Vendor Invoice — process purchase invoices with correct GST
- Payment Processing — apply payment terms and record vendor payments