How to Configure the Warehouse and Locators in iDempiere for Retail
Learn how to configure Warehouse and Locators in iDempiere for retail inventory management, stock transfers, and multi-store operations.
Introduction
The Warehouse window in iDempiere is used to create inventory storage locations for purchasing, stock transfers, inventory management, and sales operations. A Warehouse defines where inventory is stored, while a Locator defines the exact storage position inside the warehouse.
Prerequisites
Before starting, ensure the following are completed:
- Initial Tenant Setup completed successfully
- Organizations created and configured
- Warehouse address details are available
Business Rules
- Each warehouse must contain at least one active locator before inventory transactions begin.
- Reservation Locator should be assigned to define the default inventory storage location.
- In Transit warehouse should only be used for stock transfer movements between locations.
- Disallow Negative Inventory should remain enabled to avoid stock inconsistencies during retail operations.
- Replenishment rules should be configured before running automated stock movement or reorder processes.
Step-by-Step Configuration
Step 1: Open the Warehouse Window
In iDempiere, navigate to:
Menu →Material Management and Pricing →Material Management Rules →Warehouse & Locators
The window displays all warehouse records available under the tenant.
Step 2: Create a New Warehouse Record
Click New Record (+) to begin entering warehouse information.
Use unique warehouse Search Keys and Names to avoid duplicate warehouse creation and improve inventory management clarity.
Disclaimer: All data in this document are illustrative samples and not intended for real-world use.
Field Reference
| Field | Purpose |
| Search Key | Short code used to identify the warehouse |
| Name | Warehouse name displayed in transactions |
| Description | Additional warehouse information |
Retail Warehouse Structure
Retail businesses commonly maintain multiple warehouse types based on operational requirements.
| Warehouse Type | Business Usage |
|---|---|
| Godown | Main inventory storage location |
| Selling Floor | Inventory available directly for customer sales |
| InTransit Warehouse | Temporary inventory movement during stock transfers |
| Return Warehouse | Returned or damaged product handling |
Step 3: Configure CDC Godown Warehouse
Enter the following details for the main central distribution warehouse:
| Field | Value |
| Organization | CDC |
| Search Key | CDCGD |
| Name | CDC Godown |
| Description | Central Distribution Center Main Inventory Warehouse |
| Address | POTS Head Office, No.145, GST Road, Guindy Industrial Estate, Chennai – 600032 |
| Element Separator | – |
Enable: ✔ Disallow Negative Inventory

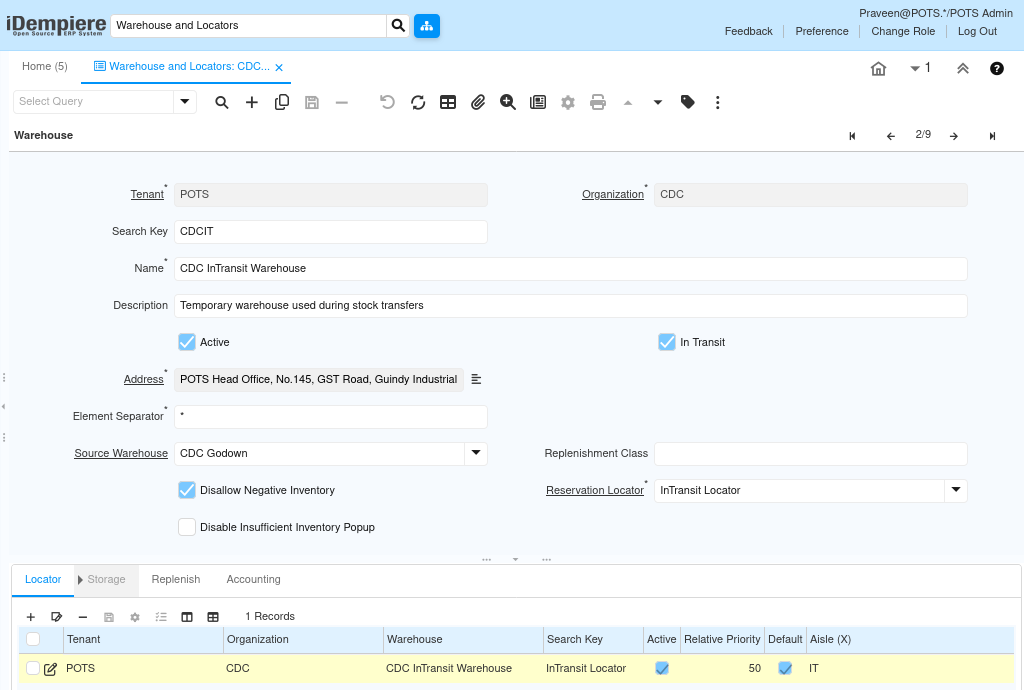
Step 4: Configure CDC InTransit Warehouse
Enter the following details for the transit warehouse:
| Field | Value |
| Organization | CDC |
| Search Key | CDCIT |
| Name | CDC InTransit Warehouse |
| Description | Temporary warehouse used during stock transfers |
| Source Warehouse | CDC Godown |
Enable: ✔ In Transit
Step 5: Configure CDC Return Warehouse
| Field | Value |
| Organization | CDC |
| Search Key | CDCRT |
| Name | CDC Return Warehouse |
| Description | Warehouse for returned and damaged inventory |

Step 6: Configure Store Warehouses
Create warehouses based on each store’s operations. Refer to the tables below.
Chennai Store
| Organization | Search Key | Name |
| Chennai Store | CHNSF | Chennai Selling Floor |
Pondicherry Store
| Organization | Search Key | Name |
| Pondicherry Store | PDYGD | Pondicherry Godown |
| Pondicherry Store | PDYSF | Pondicherry Selling Floor |
Trivandrum Store
| Organization | Search Key | Name |
| Trivandrum Store | TVMGD | Trivandrum Godown |
| Trivandrum Store | TVMSF | Trivandrum Selling Floor |
Warehouse Purpose Reference
| Warehouse Type | Purpose |
| Godown | Stores inventory locally before moving stock to selling areas |
| Selling Floor | Inventory available directly for customer sales |
| InTransit Warehouse | Virtual warehouse used during stock movement in iDempiere |
| Return Warehouse | Stores returned products for review and further processing |

Step 7: Save the Warehouse Record
Click Save after entering all warehouse details. Proceed to configure locators once saved.
Step 8: Create a Locator
Navigate to Warehouse → Locator tab, then click New Record (+).
Only one locator is configured initially for each warehouse to keep the setup simple.
Enter the following:
- Locator Type: Storage
- Relative Priority: 100
- Enable: Default & Active
Step 9: Configure Locator Values
Use the following locator structure for each iDempiere warehouse:
| Warehouse | Locator Name |
| CDC Godown | Godown Locator |
| CDC InTransit Warehouse | InTransit Locator |
| CDC Return Warehouse | Return Locator |
| Chennai Selling Floor | Selling Locator |
| Pondicherry Godown | Godown Locator |
| Pondicherry Selling Floor | Selling Locator |
| Trivandrum Godown | Godown Locator |
| Trivandrum Selling Floor | Selling Locator |
Note: The locator acts as the default inventory storage location inside each warehouse. Additional locators can be created later if separate storage zones are required.

Step 10: Configure the Reservation Locator
Return to the warehouse header record and select the created locator in the Reservation Locator field. Click Save.
This links the locator as the default warehouse storage location in iDempiere.
Step 11: Configure Replenishment Rules
Navigate to: Warehouse → Replenish Tab
Configure replenishment rules to maintain inventory availability based on minimum and maximum stock levels.
Common Replenishment Types:
| Type | Usage |
|---|---|
| Manual | Replenishment handled manually |
| Reorder Below Minimum Level | Generates replenishment when stock falls below minimum quantity |
| Maintain Maximum Level | Maintains inventory up to defined maximum quantity |
| Custom | Business-specific replenishment handling |
This configuration helps retail businesses automate inventory planning and stock movement between warehouses.

Step 12: Inventory Flow Overview
Inventory movement in iDempiere follows the structure below:
Purchase Flow:
Purchase → CDC Godown → InTransit → Store Godown → Selling Floor → Customer Sale
Return Flow:
Customer Return → CDC Return Warehouse
Common Issues and Resolutions
| Issue | Resolution |
| Mandatory field validation error while saving | Verify all required fields are populated |
| Reservation Locator unavailable | Create and save the locator first before assigning |
| Locator not available for selection | Save the locator record before assigning it to a warehouse |
| Changes not reflected in iDempiere | Execute Cache Reset and log in again if required |
Next Steps
After completing the Warehouse and Locator setup in iDempiere, continue with the following configurations:
- Calendar Year & Period
- Product Category Setup
- Product Setup