How to Configure Role in iDempiere
Configure Roles in iDempiere to control user access, permissions, and security. Ensure retail staff access only relevant functions while protecting sensitive business data.
Introduction
The Role window in iDempiere defines the security profile for every user in the system. It controls which menus, windows, processes, reports, and document actions a user can access — and what they can do within each. Every user must be assigned at least one role before they can log in and operate.
In retail businesses, Role configuration is a core part of the initial system setup. Retail operations span cashiers, store managers, warehouse operators, finance personnel, and administrators — each requiring a carefully scoped permission set. A correctly configured role ensures staff see only what is relevant to their function, reducing errors and protecting sensitive business data.
Process Flow

Business Rules
- A role must be created and activated before it can be used for login or user assignment.
- Disabling the Active flag on a role immediately prevents all assigned users from logging in under that role.
- Role Access (user assignment) must be configured to link user accounts to the role. A user with no role assignment cannot log in.
- Enabling Approve Own Documents allows a user to approve transactions they created. Disable this flag to enforce separation of duties in retail operations.
- Enabling Overwrite Price Limit allows the role to override price floor and ceiling controls on sales orders. Restrict this to store manager roles only.
- Enabling Maintain Change Log records every field-level change made by users in this role. Enable for manager and finance roles to maintain a full audit trail of all record modifications.
- Enabling Show Accounting displays accounting columns (account, debit, credit) within transaction windows. Enable for finance roles; disable for cashier and warehouse roles.
- Enabling Access All Orgs grants the role visibility across all organizations in the tenant. Use only for head-office or administrator roles.
- Enabling Use User Org Access restricts data visibility to the organizations explicitly listed on the individual user’s profile, overriding role-level organization settings.
- Enabling Can Report allows the role to run and generate reports. Must be enabled for any role that prints operational reports or receipts.
- Enabling Can Export allows the role to export data to CSV or Excel. Disable for cashier roles to prevent unauthorized data extraction.
- Personal Lock restricts editing of a record to the user who originally created it. Enable for roles that manage sensitive records requiring ownership control.
- Personal Access allows the user to apply their own access restrictions to records they own.
- Enabling Allow Info Account allows the role to open the Account Info inquiry screen from within transactions. Disable for operational roles that do not require accounting visibility.
- User Access must be configured on the User Assignment tab to assign specific users to the role.
- Window Access must be configured on the Window Access tab. Each entry grants the role access to one iDempiere window. Without a Window Access entry, the window does not appear in the user’s menu.
- Process Access must be configured on the Process Access tab. Each entry grants the role permission to execute a specific background process or report.
- Form Access must be configured on the Form Access tab. Each entry grants the role access to a Special Form such as the POS terminal or Payment Allocation screen.
- Workflow Access must be configured on the Workflow Access tab. Each entry grants the role permission to trigger or participate in a specific iDempiere workflow.
- Task Access must be configured on the Task Access tab. Each entry grants the role permission to execute a specific OS-level or system task. Restrict to administrator roles only.
- Document Action Access must be configured on the Document Action Access tab. Each entry controls which document status transitions (Complete, Void, Reverse, Close) the role is permitted to perform.
Prerequisites
Ensure the following are completed before configuring the Role window in iDempiere:
- Initial Tenant setup has been completed successfully.
- System Administrator role is available and accessible.
- Organization structure has been defined (head office, stores, warehouses).
- Currency master data is configured.
- User accounts have been created in the system.
- Windows, Processes, Workflows, Forms, and Tasks to be assigned already exist in iDempiere.
Navigation
| Menu → System Admin → General Rules → Security → Role |
The Role window lists all existing roles defined in the system. Each row represents one role configuration record.
| Note: Use the search bar at the top of the window to quickly locate an existing role by name. You can also use Select Query to filter by organization or user level. |
Step-by-Step Configuration
Step 1: Open the Role Window
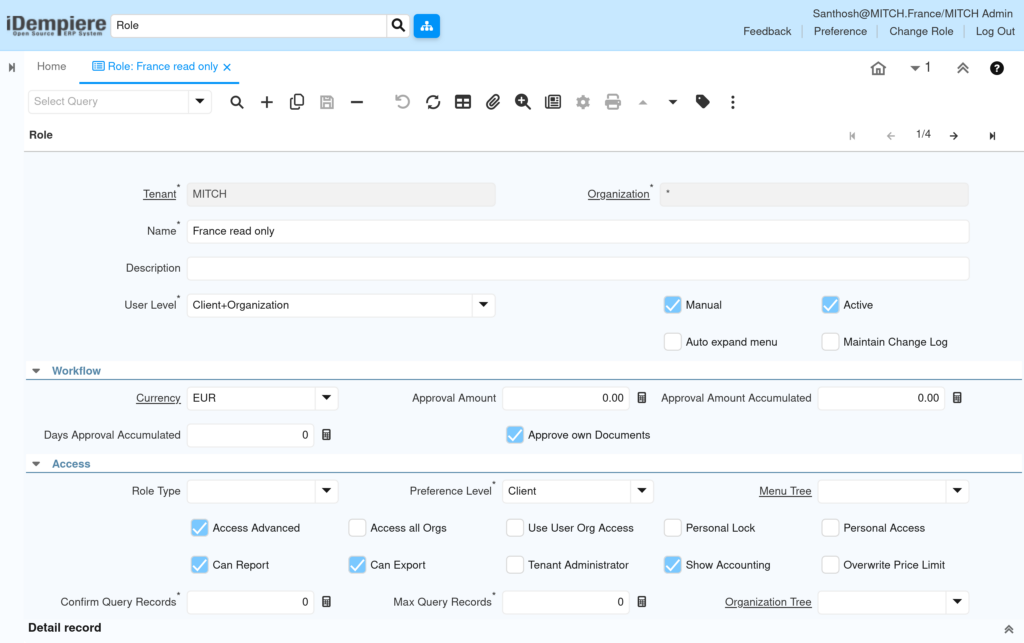
The window displays all existing roles. Review existing roles before creating a new one to avoid duplication.
Step 2: Create a New Role Record
Click the New Record (+) button in the toolbar. A blank form appears. Fill in all mandatory fields before saving.
Field Reference — Role Header
| Field | Sample Value | Description |
| Name | Store Cashier | Display name of the role. Appears on login screens and user assignment windows. |
| Description | POS operator — retail store | Internal description of the role’s purpose. |
| User Level | Client+Organization | Defines organizational scope: System (S), Client (C), Organization (O), or Client+Organization (CO). |
| Currency | INR | Currency used for approval amount thresholds. |
| Approval Amount | 0.00 | Maximum transaction value the role can approve. Set 0 for no limit. |
| Approval Amount Accumulated | 0.00 | Cumulative approval limit tracked within Days Approval Accumulated. |
| Days Approval Accumulated | 0 | Period in days over which the accumulated approval amount is measured. |
| Manual | Yes | When checked, access is managed manually via the access tabs. Recommended for all retail roles. |
| Active | Yes | When unchecked, the role is unavailable for login and user assignment. |
| Auto Expand Menu | No | When checked, the menu tree auto-expands on login. |
| Maintain Change Log | No | When checked, every field-level change made by this role is logged for audit purposes. |
| Approve Own Documents | No | When checked, users can approve their own transactions. Disable for audit compliance. |
Step 3: Enable or Disable the Role
The Active checkbox on the Role header controls whether the role is available for login and user assignment.
- Check Active to make the role available. All assigned users can log in under this role.
- Uncheck Active to immediately suspend the role. All assigned users lose access at their next login attempt.
- The role record is retained when deactivated — deactivate rather than delete to preserve historical records.
- If a user is assigned to multiple roles and one is deactivated, they retain access through their remaining active roles.
| Field | Sample Value | Description |
| Active | Yes / No | Yes = role is live and available. No = role is suspended. Change takes effect at the user’s next login. |
Step 4: Configure Access Control Flags
The Access section of the Role form contains check boxes that govern what the role can see and do across iDempiere. Configure each flag based on the operational profile of the role.
Approve Own Documents
- Enable: Users in this role can approve transactions they created themselves.
- Disable: Approval of self-created documents is blocked — recommended for audit compliance in retail.
Overwrite Price Limit
- Enable: The role can override price floor and ceiling controls on sales orders.
- Disable: Price limit controls are enforced. Recommended for cashier roles.
Maintain Change Log
- Enable: Every field-level change made by users in this role is recorded in the system change log. Use for manager and finance roles to maintain a complete audit trail.
- Disable: No change log entries are created for this role.
Show Accounting
- Enable: Accounting columns (account code, debit, credit, balance) are visible within transaction windows.
- Disable: Accounting columns are hidden. Recommended for cashier, POS, and warehouse roles.
Access All Orgs
- Enable: The role has visibility across all organizations in the tenant. Use only for head-office or system administrator roles.
- Disable: The role is restricted to the organizations explicitly listed in the Org Access tab.
Use User Org Access
- Enable: Data visibility is determined by the organizations listed on the individual user’s profile, overriding role-level settings.
- Disable: Organization access is governed by the role’s Org Access tab entries.
Can Report
- Enable: The role can run and generate reports, including printing receipts and operational summaries.
- Disable: Report generation is blocked. Apply to cashier roles where reporting is not required.
Can Export
- Enable: The role can export data to CSV or Excel files.
- Disable: Data export is blocked. Recommended for cashier roles to prevent unauthorised data extraction.
Personal Lock
- Enable: Only the user who created a record can edit it. Other users with the same role see the record as read-only.
- Disable: Any user with this role and window access can edit records created by others.
Personal Access
- Enable: Users can apply their own personal access restrictions to records they own.
- Disable: Personal record-level access restrictions cannot be applied.
Field Reference — Access Flags
| Field | Sample Value | Description |
| Approve Own Documents | No | Allows users to approve transactions they created. Disable for audit compliance. |
| Overwrite Price Limit | No | Allows overriding price floor and ceiling controls on sales orders. |
| Maintain Change Log | No | Records every field change made by this role in the system change log. |
| Show Accounting | No | Displays accounting columns in transaction windows. Enable for finance roles only. |
| Access All Orgs | No | Grants visibility across all organizations in the tenant. |
| Use User Org Access | No | Restricts data to organizations listed on the individual user’s profile. |
| Can Report | Yes | Permits report generation and printing. Required for receipt printing. |
| Can Export | No | Permits data export to CSV or Excel. |
| Personal Lock | No | Restricts record editing to the record’s creator. |
| Personal Access | No | Allows users to apply personal access restrictions to their own records. |
Step 5: Configure Allow Info Account
The Allow Info Account flag controls whether users in this role can open the Account Info inquiry screen. This screen shows chart of accounts data and account balances directly from within a transaction window.
- Enable: The role can open the Account Info window from within transactions. Enable for finance and accounting roles.
- Disable: The Account Info window is not accessible. Recommended for cashier, POS, and warehouse roles where accounting data should not be visible.
| Field | Sample Value | Description |
| Allow Info Account | No | When checked, the Account Info inquiry screen is accessible from within transaction windows. |
Step 6: Save the Role Record
After entering all required values and configuring all flags, save the record.
The system validates mandatory fields. If any are missing, a validation error identifies the incomplete field. Correct and save again.
| SUCCESS: On successful save, the role record is created and immediately available for access tab configuration and user assignment. |
Step 7: Configure Role Access — User Assignment
The User Assignment sub-tab links specific user accounts to this role. This is the Role Access configuration that grants users the permissions defined in the role. A user with no role assignment cannot log in.

- Click the User Assignment tab within the Role window.
- Click New Record (+) to add a new user assignment entry.
- Select the User/Contact to assign. Set Active to Yes.
- A user can be assigned to multiple roles. iDempiere merges all permissions from each active role.
- Uncheck Active on a User Assignment entry to suspend that specific user’s access without removing the assignment record.
Field Reference — User Assignment Tab
| Field | Sample Value | Description |
| Tenant | MITCH | Auto-populated with the current tenant. |
| Role | Store Cashier | Auto-populated from the parent role. |
| Organization | France | The organization scope for this user assignment. |
| User/Contact | SuperUser | The user account being assigned to this role. |
| Active | Yes | When unchecked, the assignment is suspended and the user loses this role’s permissions at next login. |
Configuration Example
| User/Contact | Organization | Active | Role Purpose |
| store.cashier1 | Main Store | Yes | POS cashier — main store |
| store.manager | Main Store | Yes | Store manager |
| warehouse.op1 | Warehouse | Yes | Goods receipt and dispatch |
| finance.user | * | Yes | Finance and accounting |
Step 8: Configure Window Access
The Window Access sub-tab controls which iDempiere screens (windows) the role can open. Each row grants access to one window. When the Manual flag is enabled on the role, only explicitly listed windows appear in the user’s menu.

- Enable: Add a Window Access entry with Active = Yes and Read Write = Yes (or No for read-only). The window becomes accessible in the user’s menu.
- Disable: Remove the Window Access entry or set Active = No. The window is not accessible.
- Read Write = Yes: User can create and edit records in this window.
- Read Write = No: User can view records but cannot create or edit.
Field Reference — Window Access Tab
| Field | Sample Value | Description |
| Tenant | MITCH | Auto-populated with the current tenant. |
| Role | Store Cashier | Auto-populated from the parent role. |
| Organization | France | The organization scope for this window access entry. |
| Window | Menu | The iDempiere window being granted access. |
| Active | Yes | Enables or disables this window access entry. |
| Read Write | Yes | When checked, user can create and edit records. When unchecked, read-only. |
| NOTE: If the role’s Manual flag is enabled, only windows explicitly listed in this tab will appear in the user’s menu. Unlisted windows are not accessible. |
Step 9: Configure Process Access
The Process Access sub-tab controls which background processes and reports the role can execute. Processes include inventory calculations, document posting, cost updates, and scheduled operations.
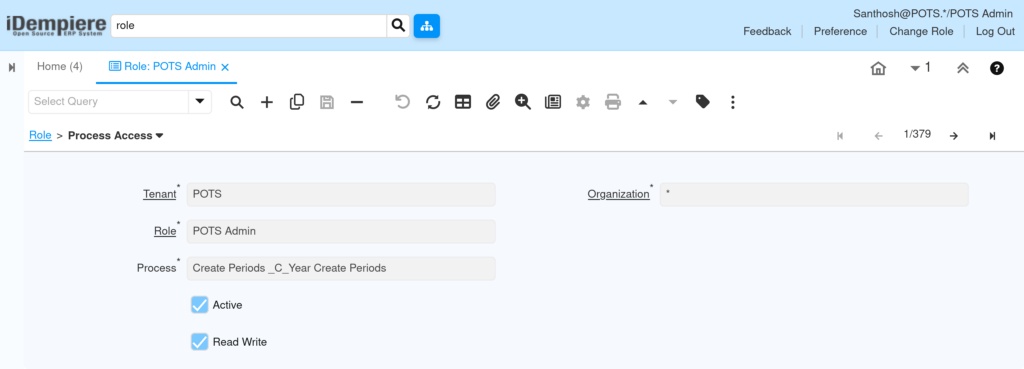
- Enable: Add a Process Access entry with Active = Yes. The role can execute this process.
- Read Write = Yes: The role can run (execute) the process.
- Read Write = No: The role can view the process but cannot execute it.
- Disable: Set Active = No or remove the entry. The role cannot access this process.
Field Reference — Process Access Tab
| Field | Sample Value | Description |
| Tenant | MITCH | Auto-populated with the current tenant. |
| Role | Store Cashier | Auto-populated from the parent role. |
| Organization | * | Set to * to apply across all organizations. |
| Process | Inventory Valuation | The process or report being granted access. |
| Active | Yes | Enables or disables this process access entry. |
| Read Write | Yes | When checked, the role can execute the process. |
Configuration Example
| Process | Read Write | Active | Purpose |
| Inventory Valuation Report | Yes | Yes | View stock value report |
| Reorder Report | Yes | Yes | Identify products needing reorder |
| Storage Detail Report | Yes | Yes | View locator stock levels |
| Open/Close Period | No | Yes | Finance role only — period management |
Step 11: Configure Form Access
The Form Access sub-tab controls access to Special Forms — custom UI screens built outside the standard window framework. This includes the POS terminal, Payment Allocation screen, and Bank Statement Matcher.
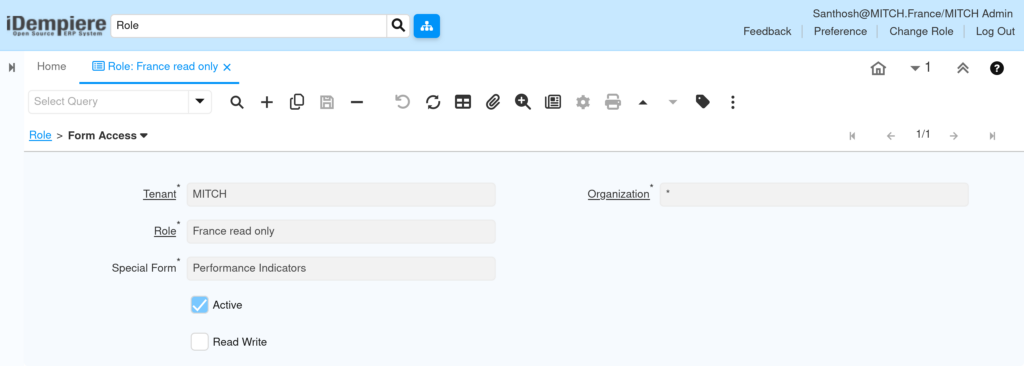
- Enable: Add a Form Access entry with Active = Yes. The form becomes accessible to users in this role.
- Read Write = Yes: The role can fully interact with the form.
- Read Write = No: The role can view the form but cannot perform actions within it.
- Disable: Set Active = No or remove the entry. The form is not accessible.
Field Reference — Form Access Tab
| Field | Sample Value | Description |
| Tenant | MITCH | Auto-populated with the current tenant. |
| Role | France read only | Auto-populated from the parent role. |
| Organization | * | Set to * to apply across all organizations. |
| Special Form | Performance Indicators | The special form being granted access. |
| Active | Yes | Enables or disables this form access entry. |
| Read Write | No | When checked, the role can interact with the form. When unchecked, view-only. |
Step 12: Configure Workflow Access
The Workflow Access sub-tab controls which iDempiere workflows the role can initiate or participate in. Workflows automate multi-step processes such as purchase order approval chains and document routing.

- Enable: Add a Workflow Access entry with Active = Yes. The role can trigger or act on this workflow.
- Read Write = Yes: The role can initiate and act on the workflow steps.
- Read Write = No: The role can view workflow status but cannot trigger or advance it.
- Disable: Set Active = No or remove the entry. The workflow is not accessible to this role.
Field Reference — Workflow Access Tab
| Field | Sample Value | Description |
| Tenant | MITCH | Auto-populated with the current tenant. |
| Role | France read only | Auto-populated from the parent role. |
| Organization | * | Set to * to apply across all organizations. |
| Workflow | Project Setup and Use | The workflow being granted access. |
| Active | Yes | Enables or disables this workflow access entry. |
| Read Write | No | When checked, the role can trigger and act on the workflow. |
Step 13: Configure Task Access
The Task Access sub-tab controls access to OS-level and system tasks defined in iDempiere. Tasks include cache resets, data imports, or system-level operations that can be triggered from within the application.

- Enable: Add a Task Access entry with Active = Yes. The role can execute this task.
- Read Write = Yes: The role can execute the task.
- Read Write = No: The role can view the task but cannot execute it.
- Disable: Set Active = No or remove the entry. The task is not accessible to this role.
Field Reference — Task Access Tab
| Field | Sample Value | Mandatory | Description |
| Tenant | MITCH | Yes | Auto-populated with the current tenant. |
| Role | Store Manager | Yes | Auto-populated from the parent role. |
| Organization | * | Yes | Set to * to apply across all organizations. |
| OS Task | Cache Reset | Yes | The OS-level or system task being granted access. |
| Active | Yes | Yes | Enables or disables this task access entry. |
| Read Write | Yes | No | When checked, the role can execute this task. |
| NOTE: Task Access grants system-level execution rights. Restrict task access to System Administrator roles only. Do not assign task access to cashier, warehouse, or standard operational roles. |
Step 14: Configure Document Action Access
The Document Action Access sub-tab controls which document status transitions the role is permitted to perform. This determines whether a role can Complete, Void, Reverse, Close, or Reactivate specific document types.
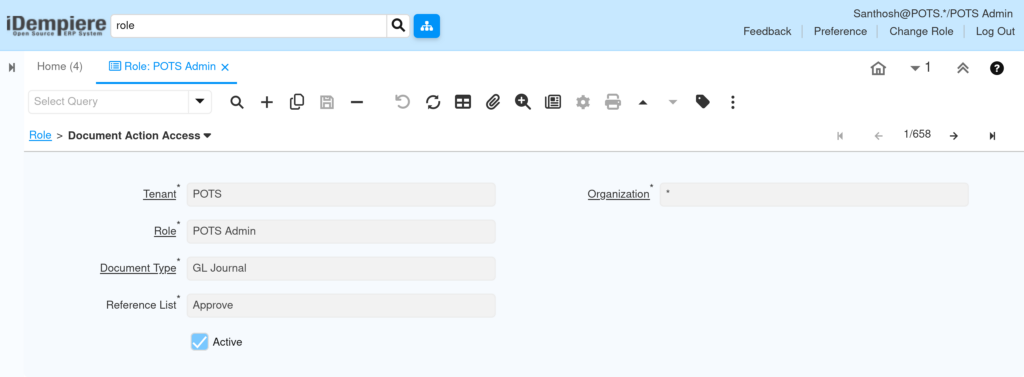
- Enable: Add a Document Action Access entry with Active = Yes. The role is permitted to perform this status transition on the specified document type.
- Disable: Set Active = No or remove the entry. The role cannot perform this action on the document type.
- If no Document Action Access entries are configured, the role inherits all document actions permitted by the window access.
- Use this tab to enforce separation of duties — for example, preventing cashiers from voiding invoices while allowing store managers to do so.
Field Reference — Document Action Access Tab
| Field | Sample Value | Description |
| Tenant | MITCH | Auto-populated with the current tenant. |
| Role | Store Cashier | Auto-populated from the parent role. |
| Organisation | * | Set to * to apply across all organizations. |
| Document Base Type | AR Invoice | The category of document this access rule applies to. |
| Document Action | Complete | The status transition this role is permitted to perform (e.g. Complete, Void, Reverse, Close). |
| Active | Yes | Enables or disables this document action access entry. |
Configuration Example
| Document Base Type | Document Action | Role Purpose |
| Customer Shipment | Complete | Warehouse can complete shipments |
| Material Movement | Complete | Warehouse can complete stock moves |
| Sales Order | Close | Sales can close fulfilled orders |
| AR Invoice | Void | Finance role only — cashier cannot void invoices |
| AP Invoice | Complete | Finance role only |
Configuration Summary
| Configuration Item | Purpose |
| Role Header | Defines role name, user level, approval settings, and top-level flags. |
| Active Flag | Enables or disables the role for login and user assignment. |
| Approve Own Documents | Controls whether users can approve their own transactions. |
| Overwrite Price Limit | Controls whether the role can override sales order price limits. |
| Maintain Change Log | Enables field-level change audit logging for users in this role. |
| Show Accounting | Controls visibility of accounting columns in transaction windows. |
| Access All Orgs | Grants visibility across all organizations in the tenant. |
| Use User Org Access | Applies user-profile-level organization restrictions. |
| Can Report | Permits report generation and printing. |
| Can Export | Permits data export to CSV or Excel. |
| Personal Lock | Restricts record editing to the record’s creator. |
| Personal Access | Allows users to apply personal restrictions to their own records. |
| Allow Info Account | Controls access to the Account Info inquiry screen. |
| User Assignment Tab | Links user accounts to this role. |
| Window Access Tab | Grants access to specific iDempiere windows. |
| Process Access Tab | Grants permission to execute specific processes and reports. |
| Dynamic Report Access Tab | Grants access to specific dynamic (Jasper/custom) reports. |
| Form Access Tab | Grants access to special UI forms (POS terminal, payment screens). |
| Workflow Access Tab | Grants permission to trigger and participate in workflows. |
| Task Access Tab | Grants permission to execute system-level tasks. |
| Document Action Access Tab | Controls which document status transitions the role can perform. |
Business Flow Overview
1. Administrator creates a Role record with the required name, user level, and flag settings.
2. Active is set to Yes to make the role available for assignment and login.
3. Access flags (Approve Own Documents, Overwrite Price Limit, Maintain Change Log, Show Accounting, Can Report, Can Export, etc.) are configured for the role’s operational profile.
4. Access tabs are configured: User Assignment, Window Access, Process Access, Dynamic Report Access, Form Access, Workflow Access, Task Access, and Document Action Access.
5. Users are assigned to the role via the User Assignment tab.
6. Users log in and are presented with only the menus, windows, and forms permitted by the role.
7. Transactions are processed within the access and document action boundaries defined in the role.
8. If Maintain Change Log is enabled, all field-level changes are recorded and available for audit review.
9. Reports and exports are available only to roles with Can Report and Can Export enabled.
Common Issues and Resolutions
| Issue | Cause | Resolution |
| User cannot log in after role assignment. | Role is inactive or the User Assignment entry is inactive. | Check the Active flag on the Role record and on the User Assignment tab entry. |
| User does not see expected menu items. | Manual flag is enabled but Window Access entries have not been configured. | Add the required windows to the Window Access tab and perform a Cache Reset. |
| Changes to access tabs are not reflected for logged-in users. | System cache has not been refreshed. | Perform Cache Reset: Menu → System Admin → General Rules → Cache Reset. |
| User can see all organizations’ data unexpectedly. | Access All Orgs flag is enabled. | Uncheck Access All Orgs on the Role record and save. |
| User cannot run reports. | Can Report flag is disabled. | Enable Can Report on the Role record and perform a Cache Reset. |
| User cannot export data to Excel. | Can Export flag is disabled. | Enable Can Export on the Role record and perform a Cache Reset. |
| Accounting columns not visible in transaction windows. | Show Accounting is disabled. | Enable Show Accounting on the Role record for finance roles. |
| User can approve their own transactions unexpectedly. | Approve Own Documents is enabled. | Disable Approve Own Documents to enforce separation of duties. |
| User cannot void an invoice. | Document Action Access entry for Void is missing or inactive. | Add a Document Action Access entry for the document type and Void action with Active = Yes. |
| Role record cannot be deleted. | Role has active user assignments or historical records. | Deactivate the role instead of deleting it to preserve historical data. |
Best Practices
- Always enable the Manual flag for retail roles. This ensures only explicitly configured windows and processes are accessible.
- Follow a consistent naming convention: STORE-CASHIER, STORE-MANAGER, WH-OPERATOR, FINANCE-USER.
- Disable Can Export and Can Report for cashier roles to prevent unauthorized data extraction.
- Enable Maintain Change Log for all manager and finance roles to support audit requirements.
- Never enable Tenant Administrator on operational retail roles. Reserve this for IT system administrators only.
- Perform a Cache Reset after every change to access tabs to ensure logged-in users receive updated permissions immediately.
- Use Document Action Access to enforce separation of duties — prevent cashiers from voiding invoices while permitting store managers to do so.
- Restrict Task Access to System Administrator roles only. Never assign task execution rights to operational roles.
- Deactivate roles instead of deleting them to preserve audit history and historical records.
- Review role configurations periodically as the business adds new stores, warehouses, or staff functions.
Next Steps
After completing Role configuration in iDempiere, proceed with:
- User Window — Assign completed roles to individual user accounts and verify login access.
- Price List — Configure price lists and price limit rules that interact with the Overwrite Price Limit flag.