How to Create and Process Return to Vendor without Material Receipt in iDempiere for Retail
Overview
This is the simplest, fastest way to create a Return to Vendor in iDempiere for Retail. You need:
- NO Material Receipt link required
- NO Vendor RMA required
- NO Purchase Order linkage required
- Just: Vendor + Product + Quantity + Locator
Perfect for retail with 100+ vendors and fast return processing.
The Simplified Workflow
1. Create Return to Vendor Header
(Business Partner, Warehouse, Dates)
↓
2. Add Return Lines Manually
(Product, Quantity, Locator)
↓
3. Complete Return to Vendor
(Stock reduces, GL posts)
Prerequisites
- Vendor must be configured as Business Partner
- Products must be created with valid UOM
- Warehouse/Locator must be configured
- User must have access to Organization
- Return to Vendor document type must be configured
Navigation
Menu → Returns → Return to VendorStep 1: Create Return to Vendor Header
Instructions:
- Navigate to Menu → Returns → Return to Vendor
- Click New Record
- Fill in header fields:
- Business Partner: Select vendor
- Organization: Select branch
- Warehouse: Select source warehouse
- Movement Date: Date of return
- Account Date: GL posting date
- Order Reference: Optional (vendor’s/PO ref number)
- Description: Optional (reason for return)
- Save the header
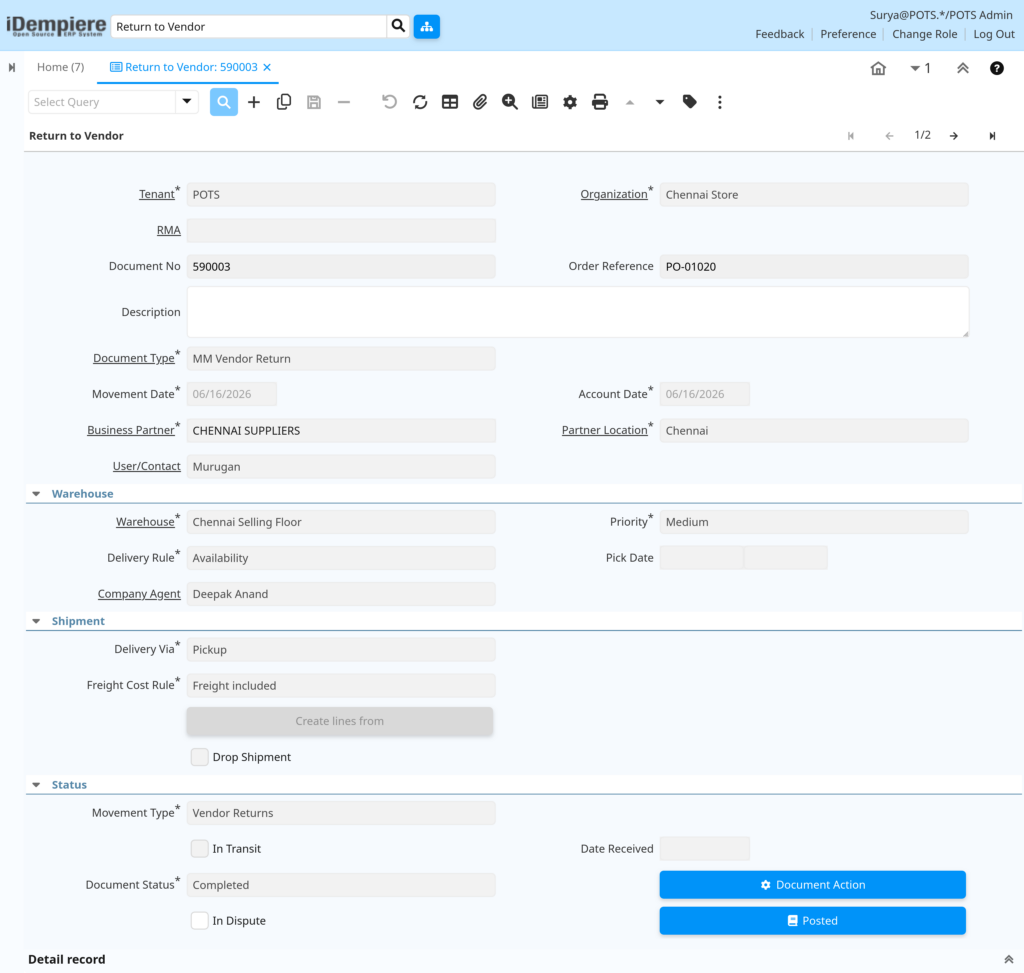
RTV Header Fields – Key Information
| Field | Description | Sample Value |
| Tenant | Company/legal entity | POTS |
| Organization | Business unit or branch | Chennai Store |
| Document No | Auto-generated RTV identifier | 590003 |
| RMA | Associated Vendor RMA if applicable | [Leave Empty] |
| Order Reference | Use: Original purchase order reference | PO-01020 |
| Description | Notes about the return | Defective units return |
| Document Type | RTV document type | MM Vendor Return |
| Movement Date | Date return is being processed | 06/16/2026 |
| Account Date | Date for GL posting | 06/16/2026 |
| Business Partner | The vendor | CHENNAI SUPPLIERS |
| Partner Location | Vendor location/address | Chennai |
| User/Contact | Vendor contact person | Murugan |
| Warehouse | Source warehouse for return | Chennai Selling Floor |
| Priority | Return priority | Medium |
| Delivery Rule | Delivery timing rules | Availability |
| Pick Date | Date items were picked for return | 2024-06-14 |
| Company Agent | Procurement officer | Deepak Anand |
| Delivery Via | Delivery method (pickup/ship) | Pickup |
| Freight Cost Rule | Freight charge method | Freight included |
| Create lines from | Button to generate lines from source | (Button) |
| Generate Invoice from Receipt | Button to create credit memo (in toolbar) | (Button) |
| Movement Type | Type of movement (read-only) | Vendor Returns |
| Create Confirmation | Button to create confirmations [present in the tool bar settings button] | (Button) |
| In Transit | Is movement in transit? | No |
| Date Received | Date goods were received back | (Not yet) |
| Document Status | Current RTV status | Draft |
| Document Action | Button to complete RTV | (Button) |
| In Dispute | Is document disputed? | No |
| Posted | GL Posting Status | No |
Step 2: Add Return Lines Manually
Now add the products being returned.
Instructions:
- In the Return to Vendor Line tab, click Add Row
- Fill in:
- Product: Select the item being returned
- Quantity (QtyEntered): Enter the quantity
- Locator: Select warehouse storage location
- Description: Optional (item notes)
- Movement Quantity: Enter quantity to return
- UOM (from Product)
- Repeat for each item to return
- Save the Return to Vendor line
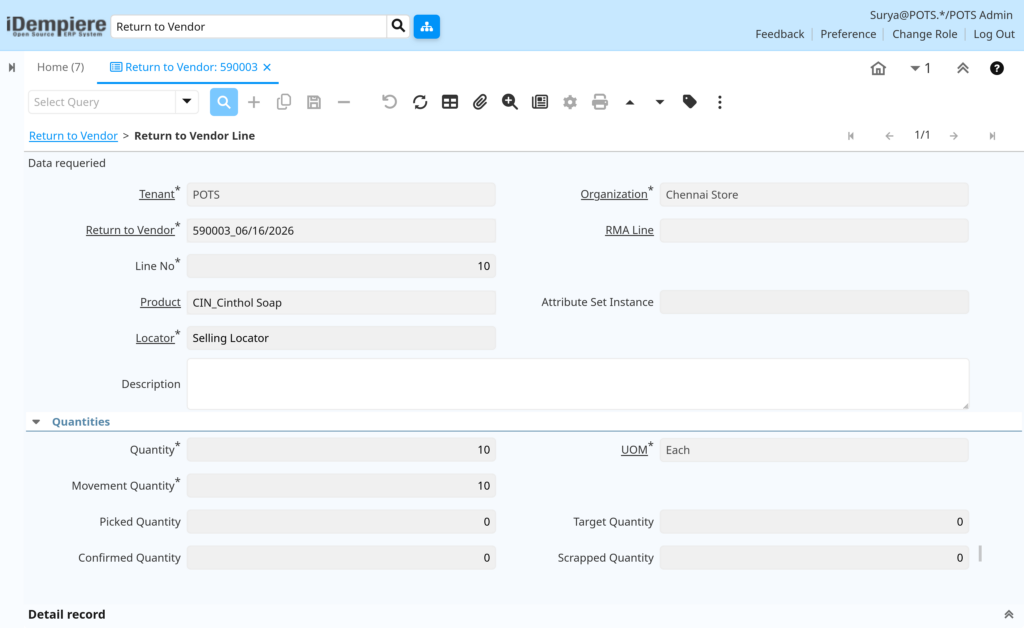
RTV Line Fields – Manual Entry
| Field | Description | Sample Value |
| Tenant | Company/legal entity | POTS |
| Organization | Business unit | Chennai Store |
| Return to Vendor | Parent RTV document | 590003_06/16/2026 |
| RMA Line | Associated RMA line (if applicable) | [Leave Empty] |
| Line No | Unique line sequence number | 10 |
| Product | Item being returned | CIN_Cinthol Soap |
| Attribute Set Instance | Product attributes (serialized items) | (None) |
| Locator | Warehouse storage location | Selling Locator |
| Charge | Additional charge type | (None) |
| Description | Line notes/return reason | Defective units |
| Quantity (QtyEntered) | Quantity being returned | 10 |
| UOM | Unit of Measure | EACH |
| Movement Quantity | Qty to move out of inventory (auto) | 10 |
| Picked Quantity | Qty picked for shipment | 0 |
| Target Quantity | Target quantity for return | 0 |
| Confirmed Quantity | Confirmed qty after verification | 0 |
| Scrapped Quantity | Qty marked as scrap | 0 |
Step 3: Complete Return to Vendor
Process the return and reduce inventory.
Instructions:
- Verify all line items are correct
- Click Document Action button
- Select Complete
- System processes:
- Validates all fields
- Reduces inventory (stock moves out of selected locator)
- Posts GL entries
- Changes Document Status to Completed
- Document Status now shows Completed
Stock Reduction – What Happens
When you complete RTV, inventory is automatically reduced.
- Product selected in RTV line
- Quantity specified in line
- Locator specified in line
Stock is REDUCED in that specific locator by that quantity
✓ Stock reduction is automatic and immediate upon completion. No separate inventory adjustment needed.
Real Retail Example
Scenario: Found 10 units of Cinthol Soap damaged during inventory count. Need to return to vendor CHENNAI SUPPLIERS.
Process:
- Create RTV Header
- Business Partner: CHENNAI SUPPLIERS
- Organization: Chennai Store
- Warehouse: Chennai Selling Floor
- Movement Date: 06/16/2026
- Add Line
- Product: CIN_Cinthol Soap
- Quantity: 10
- Locator: Selling Locator
- Complete RTV
- Result:
- Stock reduced by 10 units
- GL posted
- RTV completed and documented
- Ready for credit memo generation (if needed)
Comparison: With vs Without RMA
| Workflow | Steps | Speed | Complexity | Best For |
| WITH RMA & MR | MR → RMA → RTV | Slower | High | Tracked, linked returns |
| RTV ONLY (This) | RTV only | Fastest | Low | Fast retail returns, 100+ vendors |
Validation Rules
- Business Partner must exist
- Organization must be accessible to user
- Warehouse must be valid
- Product must exist
- Locator must be valid
- Quantity must be positive
- Dates must be valid
Common Issues and Resolutions
| Issue | Cause | Resolutions |
| Cannot save RTV header | Required field missing | Check Business Partner, Organization, Warehouse, Dates are filled |
| Cannot add line – Product not selectable | Product may be inactive | Ensure Product is marked Active |
| Cannot select Locator | Locator doesn’t exist or inactive | Verify Locator is configured and Active |
| RTV won’t complete | Validation error on lines | Verify Product, Qty, Locator filled for all lines |
| Stock didn’t reduce | RTV status not Completed | Check Document Status field – must be Completed |
| No GL posting appears | Check GL configuration | Verify GL accounts configured for product/org |
Best Practices for Retail
- Use this workflow for fast, simple returns
- Enter clear descriptions (reason for return)
- Verify locator selection (correct warehouse)
- Complete RTV promptly (don’t leave in Draft)
- Use Order Reference for vendor’s reference number
- Monitor GL posting to verify accounts
- Perfect for managing 100+ vendor returns