How to Create Return to Vendor with Material Receipt in iDempiere for Retail
In iDempiere, creating a Return to Vendor (RTV) from a Material Receipt requires a mandatory intermediate step: creating a Vendor RMA (Return Material Authorization) document first. The RMA serves as the bridge between the Material Receipt and the Return to Vendor, ensuring proper linkage and maintaining complete audit trail.
The Material Receipt defines the receipt of product from a Vendor. When items need to be returned, you create a Vendor RMA linked to that Material Receipt, add the return lines, and then create a Return to Vendor document from the completed RMA. This three-tier structure ensures data integrity and vendor accountability.
This process is essential for retail operations managing product returns due to defects, overstock, or quality issues.
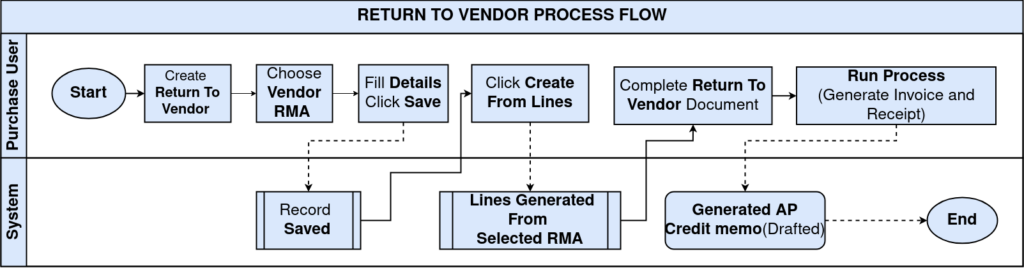
Process Flow Diagram
Business Rules
The following business rules apply to Return to Vendor processing with Material Receipt in iDempiere:
- Vendor RMA MUST be created first and linked to Material Receipt
- RMA lines are populated from Material Receipt lines using the ‘Create lines from’ button in the Vendor RMA window
- Vendor RMA must be completed/processed before creating a Return to Vendor
- Return to Vendor is created second, linked to the completed Vendor RMA
- RTV lines are created from RMA lines (via ‘Create lines from’ button that only accepts RMA as source)
- Return to Vendor Line tab has ‘RMA Line’ field which links each RTV line to its corresponding RMA line
- Return Quantity cannot exceed Material Receipt received quantity
- Return to Vendor status flows: Draft → Completed
- Process Shipment button moves products out of inventory
- Optional Confirmations can verify actual returned quantities
Prerequisites
Before creating a Return to Vendor linked to a Material Receipt:
- Purchase Order must be created and completed
- Material Receipt must be created from Purchase Order and completed
- Products must be defined with valid Units of Measure
- Vendor must be configured as Business Partner
- Warehouse locations must be configured
- User must have access to Organization
- Vendor RMA document type must be configured
- Return to Vendor document type must be configured
Navigation
For Vendor RMA:
Menu → Returns → Vendor RMAFor Return to Vendor:
Menu → Returns → Return to Vendor
For Material Receipt:
Menu → Requisition-to-Invoice (Purchasing) → Material Receipt
The Return to Vendor Workflow
1. Purchase Order Created
↓
2. Material Receipt Completed
↓
3. CREATE VENDOR RMA (Mandatory)
[ Link to Material Receipt – Use ‘Create lines from’ button to add MR lines – Complete RMA ]
↓
4. CREATE RETURN TO VENDOR
[ Link to Completed RMA – Use ‘Create lines from’ button to add RMA lines – Process Return to Vendor ]
↓
5. Vendor Credit Memo Generated
↓
6. Accounts Payable Reconciliation
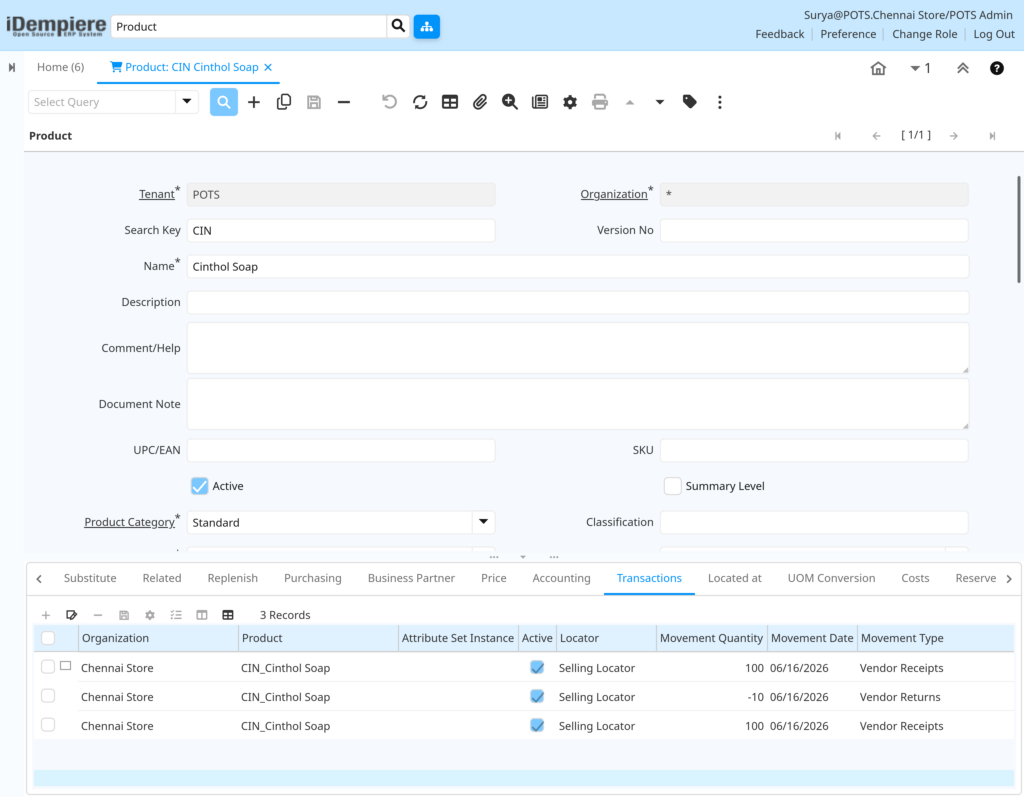
Step 1: Access the Returning Product Transaction
Navigate to:
Menu → Material Management and Pricing → Material Management Rules → ProductSelect the specific Product and go to the Transaction Tab to view all movement transactions.
Locate the completed Material Receipt transaction (Movement Type = “Vendor Receipts”) and record:
- Receipt Document Number (from Transaction)
- Vendor name (Business Partner)
- Received quantity (Movement Quantity – shown as positive for receipts)
- Storage locator (Warehouse location)
- Related Purchase Order number
- Movement Date (date of receipt)
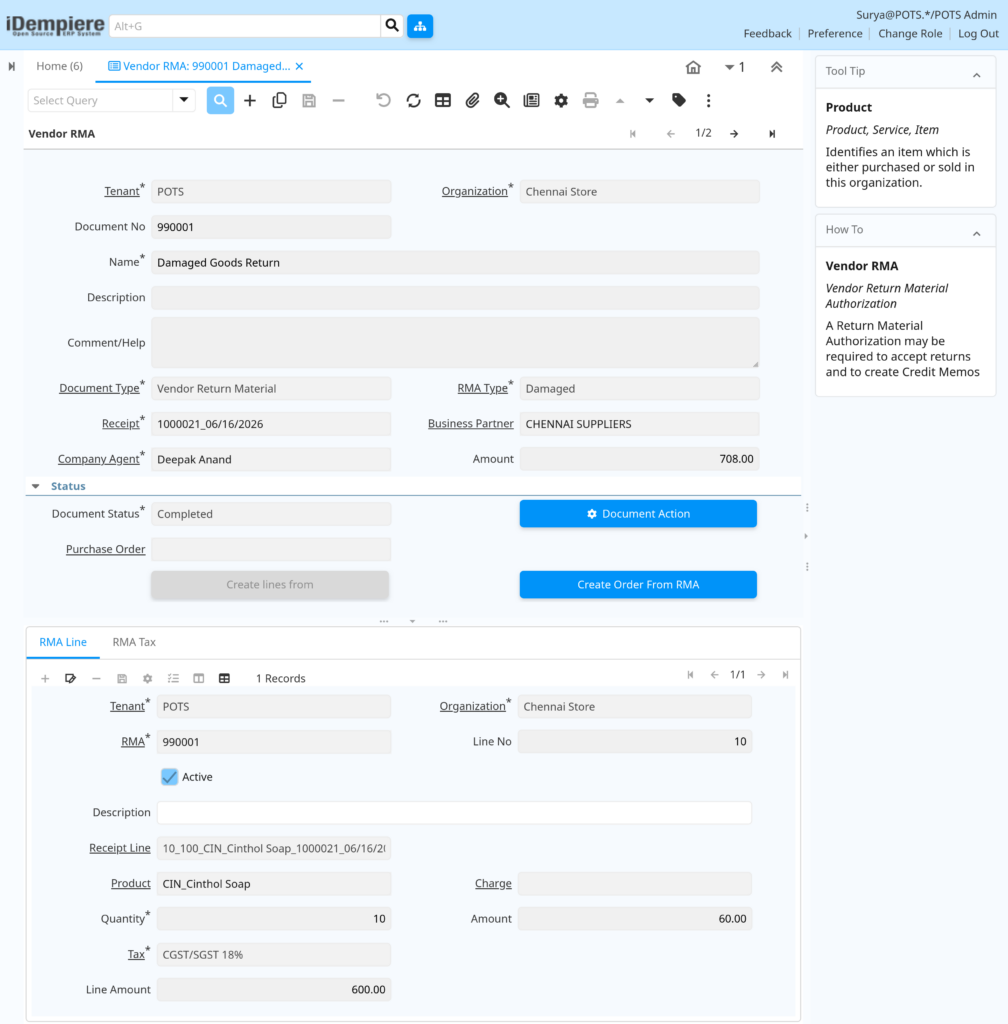
Step 2: Create Vendor RMA
This step is NOT optional. Vendor RMA MUST be created before creating Return to Vendor.
Instructions:
- Navigate to Menu → Returns → Vendor RMA
- Click New Record
- Fill in RMA header:
- Select Business Partner (the vendor)
- Select Receipt (the Material Receipt from Step 1) – MANDATORY
- Enter optional Description
- RMA Type – Select from predefined types (Defective, Overstock, Wrong Item, etc.)
- Save the RMA header
- Click Create lines from button
- Select Receipt as source
- Select specific Material Receipt line items to return
- Click Create
- Verify quantities in RMA Line tab
- Click Document Action button -> Complete
- Document Status changes to ‘Completed’
Vendor RMA Header Fields
| Field | Description | Sample Value |
|---|---|---|
| Business Partner | The vendor | CHENNAI SUPPLIERS |
| Receipt | Material Receipt being returned | 1000021_06/16/2026 |
| Document No | Auto-generated RMA ID | 990001 |
| Name | RMA name/identifier | Damaged Goods Return |
| Description | Notes about return | Defective items |
| RMA Type | Category of return | Damaged |
| Document Type | RMA document type | Vendor Return Material |
| Purchase Order | Optional PO reference | PO-5432 |
| Company Agent | Procurement officer | Deepak Anand |
| Amount | Total RMA amount | 708.00 |
| Organization | Business unit | Chennai Store |
| Document Status | Current RMA status | Completed |
Vendor RMA Line Fields
| Field | Description | Sample Value |
|---|---|---|
| Line No | Unique line number | 10 |
| Receipt Line | Material Receipt line | 10_100_CIN_Cinthol Soap_1000021_06/16/2026 |
| Product | Item being returned | CIN_Cinthol Soap |
| Quantity | Return quantity | 10 |
| Description | Line notes | Damaged in transit |
| Amount | Line total | 600.00 |
| Active | Enable/disable line | Yes |
Step 3: Create Return to Vendor from Completed RMA
Now that the RMA is completed, create the Return to Vendor document linked to it.
Instructions:
- Navigate to Menu → Returns → Return to Vendor
- Click New Record
- Fill RTV header fields:
- Select Business Partner (vendor) & Select Organization
- Select RMA (the completed RMA from Step 2) – Mandatory
- Select Warehouse (source warehouse)
- Enter Movement Date (return date)
- Enter Account Date (GL date)
- Save the RTV header
Return to Vendor Header Fields
| Field | Description | Sample Value |
|---|---|---|
| Tenant | Company/legal entity | POTS |
| Organization | Business unit or branch | Chennai Store |
| Document No | Auto-generated RTV identifier | 590001 |
| RMA | Associated Vendor RMA if applicable | 990001 |
| Order Reference | Use: Original purchase order reference | PO-01020 |
| Description | Notes about the return | Defective units return |
| Document Type | RTV document type | MM Vendor Return |
| Movement Date | Date return is being processed | 06/16/2026 |
| Account Date | Date for GL posting | 06/16/2026 |
| Business Partner | The vendor | CHENNAI SUPPLIERS |
| Partner Location | Vendor location/address | Chennai |
| User/Contact | Vendor contact person | Murugan |
| Warehouse | Source warehouse for return | Chennai Selling Floor |
| Priority | Return priority | Medium |
| Delivery Rule | Delivery timing rules | Availability |
| Pick Date | Date items were picked for return | 2024-06-14 |
| Company Agent | Procurement officer | Deepak Anand |
| Delivery Via | Delivery method (pickup/ship) | Pickup |
| Freight Cost Rule | Freight charge method | Freight included |
| Create lines from | Button to generate lines from source | (Button) |
| Generate Invoice from Receipt | Button to create credit memo (in toolbar) | (Button) |
| Movement Type | Type of movement (read-only) | Vendor Returns |
| Create Confirmation | Button to create confirmations [present in the tool bar settings button] | (Button) |
| In Transit | Is movement in transit? | No |
| Date Received | Date goods were received back | (Not yet) |
| Document Status | Current RTV status | Draft |
| Document Action | Button to complete RTV | (Button) |
| In Dispute | Is document disputed? | No |
| Posted | GL posting status | No |

Step 4: Create Return to Vendor Lines from RMA
Now populate the Return to Vendor with lines from the RMA. This is where the RMA-RTV link is finalized.
Purpose: Specify which products and quantities are being returned.
You can add lines in two ways:
- Option 1: Use Create lines from button (automatic) – recommended
- Option 2: Manually add lines one by one
Instructions:
- In the saved RTV header, click Create lines from button
- The pop-up dialog appears showing available RMA records
- The RMA you referenced in the RTV header is already filtered/shown
- Select the RMA Lines and click OK
- All selected RMA lines are automatically added to Return to Vendor Line tab
- Each RTV line now has:
- RMA Line reference
- Product
- Quantity
- Locator
- UOM
- Verify all line items
- Save the Return to Vendor
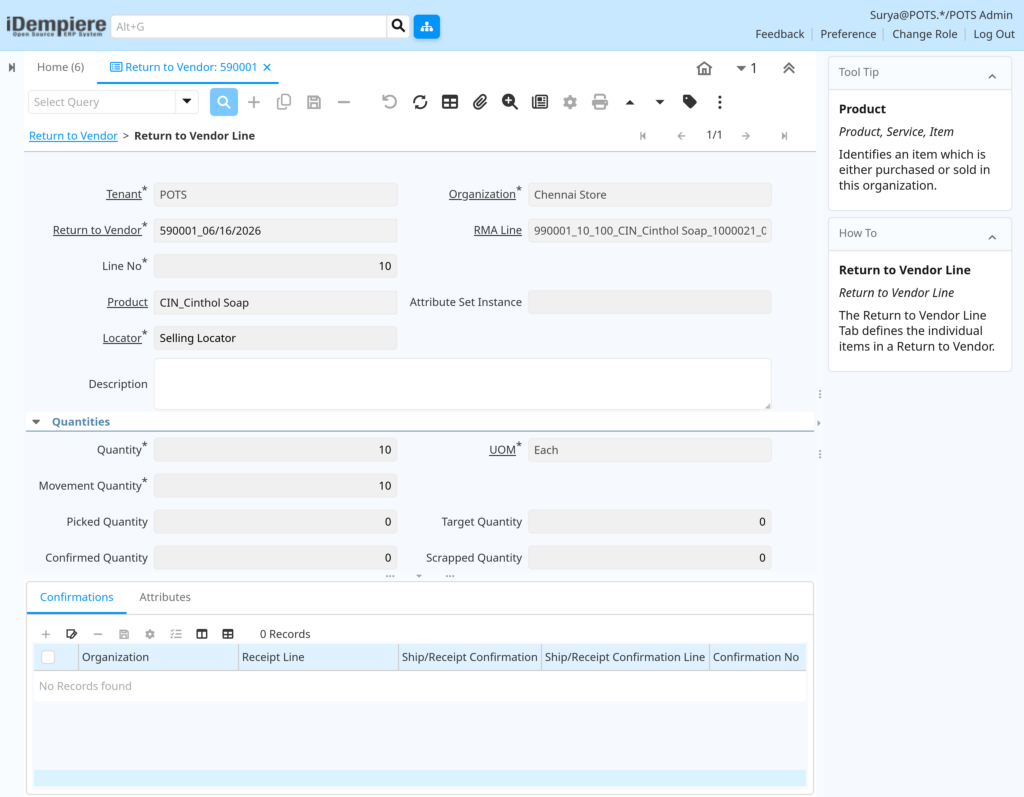
Return to Vendor Line Fields
| Field | Description | Sample Value |
|---|---|---|
| Tenant | Company/legal entity | POTS |
| Organization | Business unit | Chennai Store |
| Return to Vendor | Parent RTV document | 590001_06/16/2026 |
| RMA Line | Associated RMA line (if applicable) | 990001_10_100_CIN_Cinthol Soap_1000021_06/16/2026 |
| Line No | Unique line sequence number | 10 |
| Product | Item being returned | CIN_Cinthol Soap |
| Attribute Set Instance | Product attributes (serialized items) | (None) |
| Locator | Warehouse storage location | Selling Locator |
| Charge | Additional charge type | (None) |
| Description | Line notes/return reason | Defective units |
| Quantity (QtyEntered) | Quantity being returned | 10 |
| UOM | Unit of Measure | EACH |
| Movement Quantity | Qty to move out of inventory (auto) | 10 |
| Picked Quantity | Qty picked for shipment | 0 |
| Target Quantity | Target quantity for return | 0 |
| Confirmed Quantity | Confirmed qty after verification | 0 |
| Scrapped Quantity | Qty marked as scrap | 0 |
Step 5: Create Confirmations (Optional)
If your QA or warehouse process requires verification of returned quantities before shipment:
- Click Create Confirmation button in RTV header
- Navigate to Confirmations tab
- Enter Confirmed Quantity for each line
- Save confirmation records
Step 6: Complete Return to Vendor
Complete the Return to Vendor document and execute inventory movements.
Instructions:
- Verify all RTV lines are complete
- Click Document Action button -> Complete
- System validates and processes:
- Updates inventory, reducing stock by returned quantities
- Changes Document Status to ‘Completed’
- Records Movement Date
- RTV is now ready for shipment to vendor
Step 7: Generate Vendor Credit Memo
Create an AP credit memo for the returned goods.
Instructions:
- Open the completed RTV record
- Click Generate Invoice from Receipt button
- A Purchase Invoice (Credit Memo) is created
- Review and post to Accounts Payable
- Reconcile with vendor’s credit memo when received
Common Issues and Resolutions
| Issue | Cause | Resolution |
|---|---|---|
| Cannot create RTV lines – Create lines from button not working | RMA field in RTV header is empty | Reference the completed RMA in the RTV header ‘RMA’ field first |
| Create lines from pop-up shows no RMA records | No RMA exists, or RMA is not Completed status | Go back and create/complete a Vendor RMA first |
| In RTV Line, RMA Line field is empty | Lines were not created using Create lines from button | Delete lines and use Create lines from button instead |
| Return Quantity exceeds Material Receipt quantity | Invalid quantity in RMA or RTV | Reduce quantity to match Material Receipt Movement Quantity |
| Cannot save RTV header | Mandatory field missing | Ensure Mandatory fields are filled |
| Inventory not reducing after Completing Shipment | RTV still in Draft status | Check Document Status; click Docment Action button -> Complete Shipment again |
| Cannot reference Material Receipt directly in RTV | User trying to use non-existent feature | Use Vendor RMA as intermediate document; create RMA first from MR |