Auto Purchase Replenishment in iDempiere for Retail
Step-by-step guide to configure Auto Purchase Replenishment in iDempiere for retail stock control, replenishment rules, scheduler setup, and PO generation.
Introduction
Auto Purchase Replenishment in iDempiere automatically monitors product stock and generates a Purchase Order whenever inventory falls below a configured minimum.
In retail operations, it is set up at the product-warehouse level to maintain shelf availability without manual stock monitoring.
Once triggered by the scheduler, the system calculates the required quantity and creates a draft Purchase Order, directly impacting inventory planning and procurement workflow.
Prerequisites
- Vendor Master configured with Purchase Price List and Payment Term.
- Product Master configured as Active, Stocked, and Purchased.
- Product Purchasing tab configured with vendor and PO Price.
- Warehouse and Locator setup completed.
- Tax Category assigned to the product.
- Replenishment rule configured on the Product Replenish tab.
- Scheduler configured to run the Replenish Report process.
Business Rules
- Product must be Active, Stocked, and Purchased to qualify for replenishment.
- Vendor purchasing configuration is mandatory for automatic PO generation.
- Replenishment setup must exist for the product and warehouse combination.
- Replenishment triggers only when Available Quantity drops below Minimum Level.
- If Available Quantity equals Minimum Level, replenishment is not triggered.
- Maximum Level defines the target stock quantity after replenishment.
- Purchase quantity is calculated automatically as Maximum Level minus Available Quantity.
- Scheduler execution is required to trigger replenishment processing.
- Source Warehouse must remain blank for Purchase Order replenishment.
- If Source Warehouse is configured, the system creates an Inventory Transfer instead.
- Automatically generated Purchase Orders are created in Drafted status.
- Generated Purchase Orders must be searched manually after scheduler execution.
Navigation
Product Replenishment Setup
Menu → Material Management → Product → Replenish TabScheduler Execution
Menu → System Admin → SchedulerPurchase Order Verification
Menu → Requisition-to-Invoice (Purchasing) → Purchase OrderEach window opens to a list of existing records. The Replenish tab is configured per product, the Scheduler window runs the replenishment process, and the Purchase Order window is used to verify auto-generated documents.
Step-by-Step Configuration
Step 1: Configure Product Master for Replenishment
The product must be correctly flagged before it can be evaluated by the replenishment engine.
- Open the Product window and confirm the product is Active, Stocked, and Purchased.
- Assign the correct Product Category, UOM, and Tax Category.
| Field | Sample Value | Mandatory | Description |
| Search Key | BRI-GDBC-200 | Yes | Unique identifier for the product |
| Product Category | Biscuits & Cookies | Yes | Groups the product for reporting |
| Tax Category | GST 18% | Yes | Determines tax applied on procurement and sales |
| UOM | Each | Yes | Base unit of measure for the product |
| Product Type | Item | Yes | Identifies the product as a stocked inventory item |
| Stocked | Enabled | Yes | Allows inventory tracking for the product |
| Purchased | Enabled | Yes | Allows the product to be procured from a vendor |
| Sold | Enabled | Yes | Allows the product to be sold to customers |

Step 2: Configure Vendor Purchasing Information
The Purchasing tab supplies the vendor and pricing details used when the system auto-generates a Purchase Order.
- Open the Purchasing tab on the Product window and add a vendor line.
- Set the PO Price, UOM, and order quantities, and mark the vendor as Current Vendor.
| Field | Sample Value | Mandatory | Description |
| Business Partner | Britannia Distributor – Chennai | Yes | Vendor used for replenishment procurement |
| Currency | INR | Yes | Procurement currency |
| List Price | 66.00 | No | Standard catalog price from the vendor |
| PO Price | 60.00 | Yes | Price used on the auto-generated Purchase Order |
| Last PO Price | 55.00 | Auto | Price from the most recent Purchase Order |
| UOM | Each | Yes | Procurement unit of measure |
| Minimum Order Qty | 12 | No | Smallest quantity the vendor will fulfill |
| Order Pack Qty | 12 | No | Procurement pack size for rounding order quantity |
| Partner Product Key | BRIT-GD200-TN | No | Vendor-side product code |
| Current Vendor | Enabled | No | Marks this vendor as the default for procurement |

Step 3: Verify the Vendor Business Partner Record
The vendor must be flagged correctly and carry settlement terms for the auto-generated Purchase Order to process.
- Open the Business Partner window for the vendor.
- Confirm the Vendor flag is enabled and that Payment Rule, PO Payment Term, and Purchase Price List are set.
| Field | Sample Value | Mandatory | Description |
| Search Key | Britannia_Distributor_CHN | Yes | Unique identifier for the Business Partner |
| Business Partner Group | Standard | Yes | Groups the partner for accounting defaults |
| Vendor | Enabled | Yes | Identifies the partner as a procurement vendor |
| Payment Rule | On Credit | Yes | Vendor settlement method |
| PO Payment Term | Weekly Settlement | Yes | Settlement schedule for purchase invoices |
| Purchase Price List | Purchase Price List | Yes | Default pricing structure for this vendor |
Step 4: Configure the Product Replenishment Rule
The Replenish tab defines the warehouse-level reorder logic that the scheduler evaluates.
- Open the Replenish tab on the Product window.
- Select the Warehouse and Locator, set Replenish Type to Reorder below Minimum Level, and enter Minimum and Maximum Level.
| Field | Sample Value | Mandatory | Description |
| Warehouse | Chennai Selling Floor | Yes | Warehouse monitored for replenishment |
| Locator | Selling Locator | Yes | Inventory locator within the warehouse |
| Replenish Type | Reorder below Minimum Level | Yes | Logic used to evaluate replenishment |
| Minimum Level | 10.00 | Yes | Stock threshold that triggers replenishment |
| Maximum Level | 50.00 | Yes | Target stock quantity after replenishment |
| Source Warehouse | Blank | No | Must remain blank for Purchase Order replenishment |
| Qty Batch Size | 12 | No | Rounds the calculated order quantity into batches |
If Source Warehouse is set to another warehouse, such as CDC Godown, iDempiere generates an Inventory Transfer instead of a Purchase Order for that replenishment rule.

Step 5: Configure the Replenishment Scheduler
The scheduler executes the replenishment evaluation at a defined interval and is required for automatic PO generation.
- Open the Scheduler window and create or select a process.
- Set the Process to the replenishment report, define the run Schedule, and start the scheduler.
| Field | Sample Value | Mandatory | Description |
| Name | Daily Replenishment | Yes | Identifies the scheduled process |
| Process | Replenish Report_RV_T_Replenish_Production | Yes | Process executed by the scheduler |
| Report Output Type | No | Output format for the process log/report | |
| Schedule | 10 Minutes | Yes | Frequency at which the process runs |
| Supervisor | PotsAdmin | Yes | User account that owns the scheduled process |
| Days to keep Log | 7 | Yes | Retention period for scheduler log entries |
| Scheduler State | Scheduler Started | Yes | Confirms the scheduler is actively running |

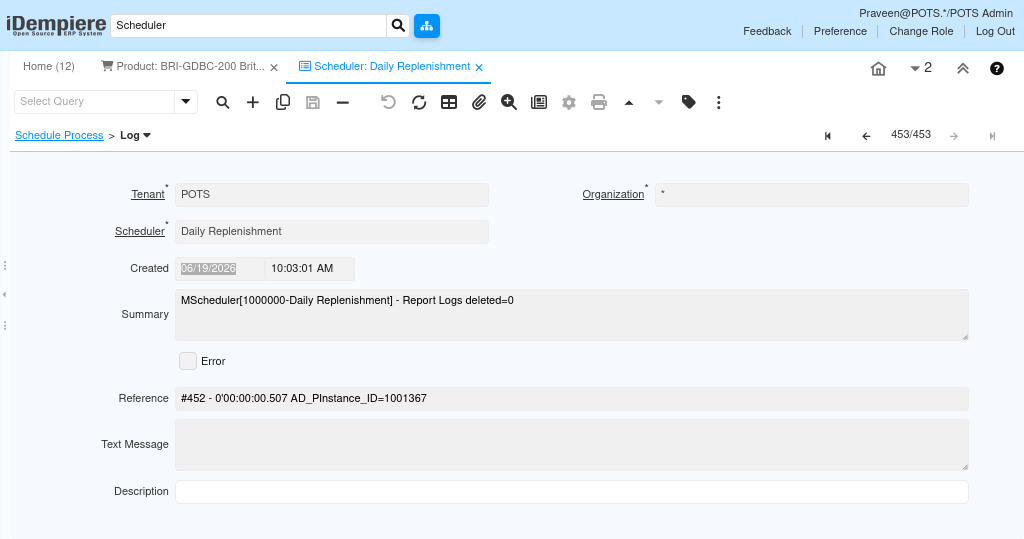
Step 6: Monitor Scheduler Execution Log
The Log tab confirms whether each scheduled run completed without errors.
- Open the Log tab on the Scheduler window after each run.
- Review the Summary and confirm the Error checkbox is unchecked for a clean execution.
| Field | Sample Value | Description |
| Created | 06/19/2026 10:03:01 AM | Timestamp of the scheduler run |
| Summary | MScheduler[1000000-Daily Replenishment] – Report Logs deleted=0 | System-generated execution summary |
| Error | Unchecked | Indicates the run completed without technical errors |
| Reference | AD_PInstance_ID reference | Internal process instance reference for traceability |
Step 7: Validate Stock Position Using the Storage Detail Report
Confirms the actual Available Quantity that determines whether replenishment is triggered.
- Run the Storage Detail report for the product.
- Review On Hand Qty, Reserved Qty, Ordered Qty, and Qty Available against the configured Minimum and Maximum Level.
| Column | Description |
| On Hand Qty | Physical quantity currently in the locator |
| Reserved Qty | Quantity committed to open Sales Orders |
| Ordered Qty | Quantity on open Purchase Orders awaiting receipt |
| Qty Available | Net quantity available for replenishment evaluation |
Step 8: Verify the Auto-Generated Purchase Order
Confirms the scheduler produced a Purchase Order with the correct vendor, warehouse, and quantity.
- Open the Purchase Order window and search recent Drafted documents.
- Verify Vendor, Warehouse, and Generated Qty, then review the order before completing it manually.
| Field | Sample Value | Description |
| Document Status | Drafted | Auto-generated POs are created in Drafted status, not Completed |
| Vendor | Britannia Distributor – Chennai | Vendor derived from the product’s Current Vendor |
| Warehouse | Chennai Selling Floor | Warehouse from the matching Replenish rule |
| Generated Qty | Maximum Level − Qty Available | Quantity calculated automatically by the replenishment engine |
The generated Purchase Order number is not displayed directly in the scheduler log.

Source Warehouse Behavior
Source Warehouse Blank
When Source Warehouse is blank:
System creates Purchase OrderUsed for vendor procurement replenishment.
Source Warehouse Configured
When Source Warehouse contains a warehouse value:
System creates Inventory TransferUsed for internal warehouse replenishment.
Common Issues and Resolutions
| Issue | Cause | Resolution |
| Replenishment not triggering | Available Qty is not below Minimum Level | Verify the current stock quantity using the Storage Detail report. |
| Purchase Order not generated | Vendor purchasing setup is missing | Configure the Purchasing tab with a Current Vendor and PO Price. |
| Scheduler completed but no PO visible | PO not searched manually | Open the Purchase Order window and search for recent Drafted documents. |
| Incorrect replenishment quantity | Minimum or Maximum Level configured incorrectly | Verify the Replenish tab values for the product and warehouse. |
| Inventory Transfer generated instead of PO | Source Warehouse field is configured | Leave Source Warehouse blank for Purchase Order replenishment. |
| Product not considered for replenishment | Product is inactive or not Stocked | Enable the Active, Stocked, and Purchased flags on the product. |
| No stock reduction after sales | Shipment not completed | Complete the Shipment document to update Available Qty. |
| Scheduler not running | Scheduler State is not Started | Open the Scheduler window and confirm Scheduler State is Started. |
Next Steps
Configure additional Replenish rules for other product-warehouse combinations.
- Complete the auto-generated Purchase Order to proceed with procurement.
- Generate Material Receipt (GRN) once goods arrive from the vendor.
- Generate Vendor Invoice for supplier billing against the receipt.
- Review replenishment levels periodically against seasonal demand.