How to Configure Product Deactivation & Discontinuation in iDempiere for Retail
Introduction
Product deactivation and discontinuation are critical operations in retail inventory management. When products reach end-of-life, slow down, or are replaced by newer variants, retailers must prevent accidental ordering and selling while maintaining historical records for audit purposes. In iDempiere, the Active field controls product availability across all transactions, while the Discontinued checkbox tracks when products are formally removed from your product catalog.
- Deactivating products (making them unavailable for selection in orders and transactions).
- Discontinuing products (formally marking them as no longer available, with date tracking).
Both operations are essential for retail businesses managing seasonal inventory, supplier changes, and product line consolidations.
The configuration affects multiple areas of your retail operations—from warehouse stock movements to POS checkout systems, purchasing orders, and vendor management.
Business Rules
- A product can only be deactivated (Active field set to No) if it has ZERO quantity on-hand, on-order, and reserved across all warehouses. If stock exists, the system blocks deactivation until inventory is cleared.
- Deactivated products remain visible in historical reports and audit trails but are NOT available for selection in new Sales Orders, Purchase Orders, or Invoices.
- The Discontinued checkbox is independent of the Active field. A product can be Discontinued but still Active, or vice versa. Both flags control different aspects of product behavior.
- When the Discontinued checkbox is checked, the Discontinued At Date field automatically becomes enabled, allowing retailers to record the exact date when a product was removed from the catalog.
- Discontinued products are automatically filtered out from POS (Point-of-Sale) checkout systems. Cashiers cannot select discontinued products during customer transactions.
- Deactivated/Discontinued products can still be referenced in existing completed transactions (Sales Orders, Invoices, Purchase Orders). The system preserves historical accuracy; only NEW transactions are blocked.
- In the Product Purchasing tab, each vendor can have an independent “Discontinued” flag and “Discontinued At Date,” allowing you to track when individual vendors discontinued supply of a product, separate from when your company discontinued it.
Prerequisites
Ensure the following configurations are completed before configuring Product Deactivation & Discontinuation:
- Product Master Data Created: All products must exist in the system with complete details (Product Category, UOM, Product Type, pricing).
- Warehouse & Stock Locations Configured: Define all warehouses, locators, and storage locations where inventory is tracked.
- Vendor/Business Partner Records Created: If using vendor-specific discontinuation tracking, vendor records must exist in the system.
- User Roles & Permissions Configured: Define which users can deactivate/discontinue products and which can override POS restrictions (if applicable).
- Price Lists Created: Price lists should be in place before discontinuing products, as discontinued products may need to be excluded from price list versions.
Navigation
Menu → Material Management and Pricing → Material Management Rules → Product
The Product window displays all existing product records. Use the search bar to locate products by Value, Name, or UPC/EAN code.
Step-by-Step Configuration
Step 1: Open the Product Window and Locate the Product
Navigate to the Product Window using the menu path above. The window displays a list of all products in your system.
Purpose
This step allows you to search for and select the product you intend to deactivate or discontinue.
Instructions
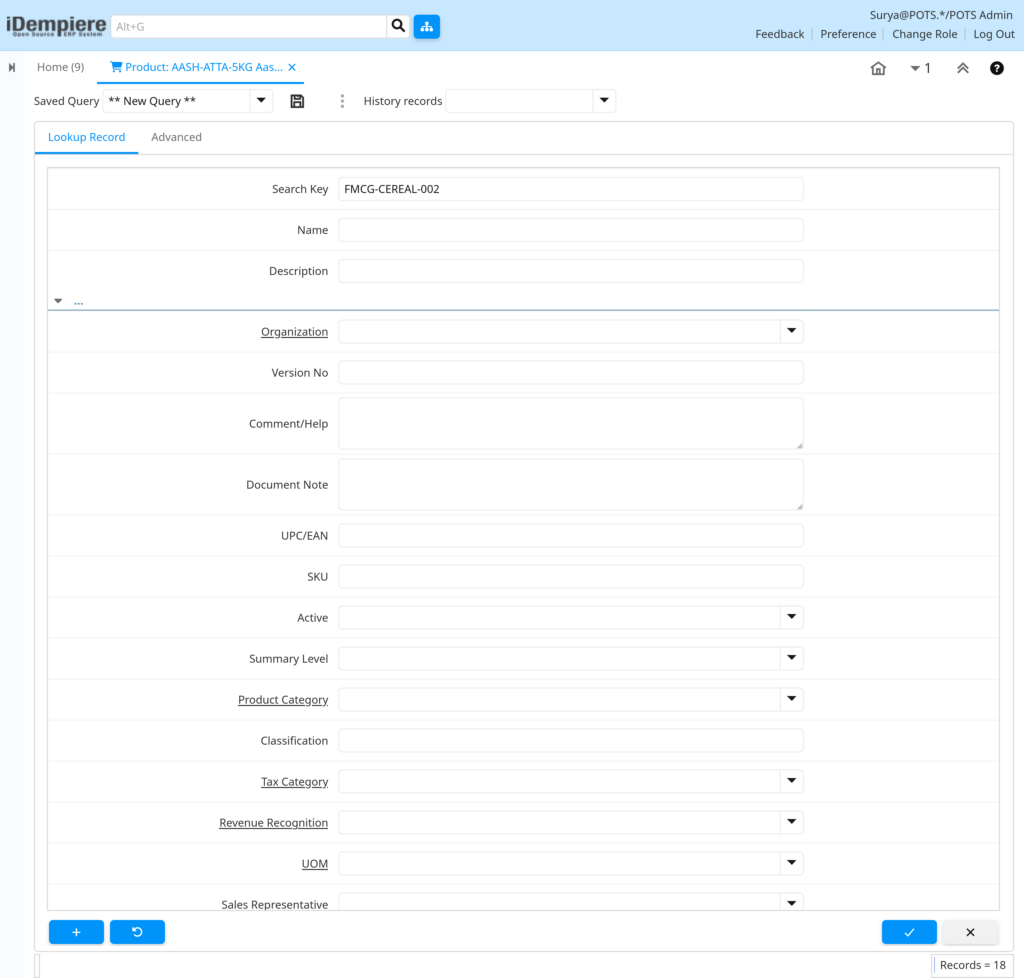
- Click on the search bar at the top of the Product grid
- Enter the product Value, Name, or UPC/EAN to find the product
- Select the product from the search results
- The Product window opens, displaying all tabs and fields for that product
Example
Search for “FMCG-CEREAL-002” (Cold Cereal Box, seasonal variant) to locate it before deactivation.
Step 2: Check Current Stock Levels Before Deactivation
Before deactivating a product, verify that all on-hand, on-order, and reserved quantities are ZERO across all warehouses.
Purpose
The system prevents deactivation of products with active inventory. You must clear all stock first.
Instructions
- With the product selected, navigate to the “Located At” tab in the Product window.
- Review the Quantity On Hand (Qty on Hand) for each warehouse location.
- Check the “Product Info” panel (if available) to view: On Hand Quantity, Reserved Quantity (stock allocated to open orders), Ordered Quantity (stock on incoming Purchase Orders).
Field Reference
| Field | Sample Value | Description |
| On Hand Quantity | 0 | Physical inventory in warehouse/locator |
| Reserved Quantity | 0 | Stock allocated to open sales orders |
| Ordered Quantity | 0 | Stock on incoming purchase orders |
Example: For the Cold Cereal Box (seasonal variant), verify On Hand Quantity = 0, Reserved Quantity = 0, Ordered Quantity = 0 across all warehouse locations before proceeding to deactivation.

Step 3: Execute Inventory Clear-Down Workflow
If inventory exists, you must clear it before deactivation. Choose one of these approaches based on your retail scenario.
Purpose
Remove all active stock from the system so the product can be deactivated.
Option A: Clear Stock via Sales (Sell-Through)
When to use:
For slow-moving FMCG items (e.g., Shampoo Bottle with discontinued scent). Sell remaining stock at discount.
Instructions
- Create a Sales Order for the product.
- Specify the warehouse location and quantity to clear.
- Complete the Sales Order workflow (Pick → Ship → Invoice).
- The system reduces Qty On Hand automatically.
- Repeat until Qty On Hand = 0.
- Example: Retail store has/ 24 units of Shampoo Bottle 250ml (discontinued scent). Create a Sales Order for all 24 units, mark as promotional discount, complete the shipment. Qty On Hand becomes 0.
Option B: Clear Stock via Inventory Adjustment (Write-Off)
When to use:
For damaged, obsolete, or unsaleable inventory. Write off as loss.
Instructions
- Navigate to Physical Inventory
- Click New Record (+)
- Enter the following mandatory fields:
- Organization: Select your retail organization
- Warehouse: Select the warehouse location where the product is stored
- Inventory Date: Enter today’s date (or the date of the physical count)
- In the Inventory Count Line tab, click New Line
- Enter the following details:
- Product: Select the product you want to write off
- Locator: Select the specific storage location (bin/shelf) if using locator-level tracking
- Expected Qty (Quantity Book): System auto-populates this from current on-hand inventory
- Counted Qty (Quantity Count): Enter 0 (indicating zero physical count)
- Save the Physical Inventory record (Alt+S)
- Complete the Physical Inventory document
- Click the Complete button or action menu
- System validates the count differences
- iDempiere creates an Inventory Movement automatically
- The system adjusts inventory:
- If Counted Qty (0) < Book Qty (actual stock) → Inventory is reduced by the difference
- The variance is recorded as a loss/write-off in the Inventory Movement
Summary Table: Inventory Clear-Down Methods
| Method | Use Case | Impact | Time |
| Sales Order | Sell-Through (clearance sales) | Generates revenue, reduces Qty On Hand | Medium (requires order fulfillment) |
| Physical Inventory Adjustment | Write-Off (obsolete/damaged stock) | Records loss, reduces Qty On Hand | Short (one-time adjustment) |
After clearing inventory using any method, proceed to Step 4.
Step 4: Mark Product as Discontinued
Once stock is cleared, mark the product as Discontinued and record the discontinuation date.
Purpose
This formally removes the product from your active catalog and prevents it from appearing in POS and new order selections.
Instructions
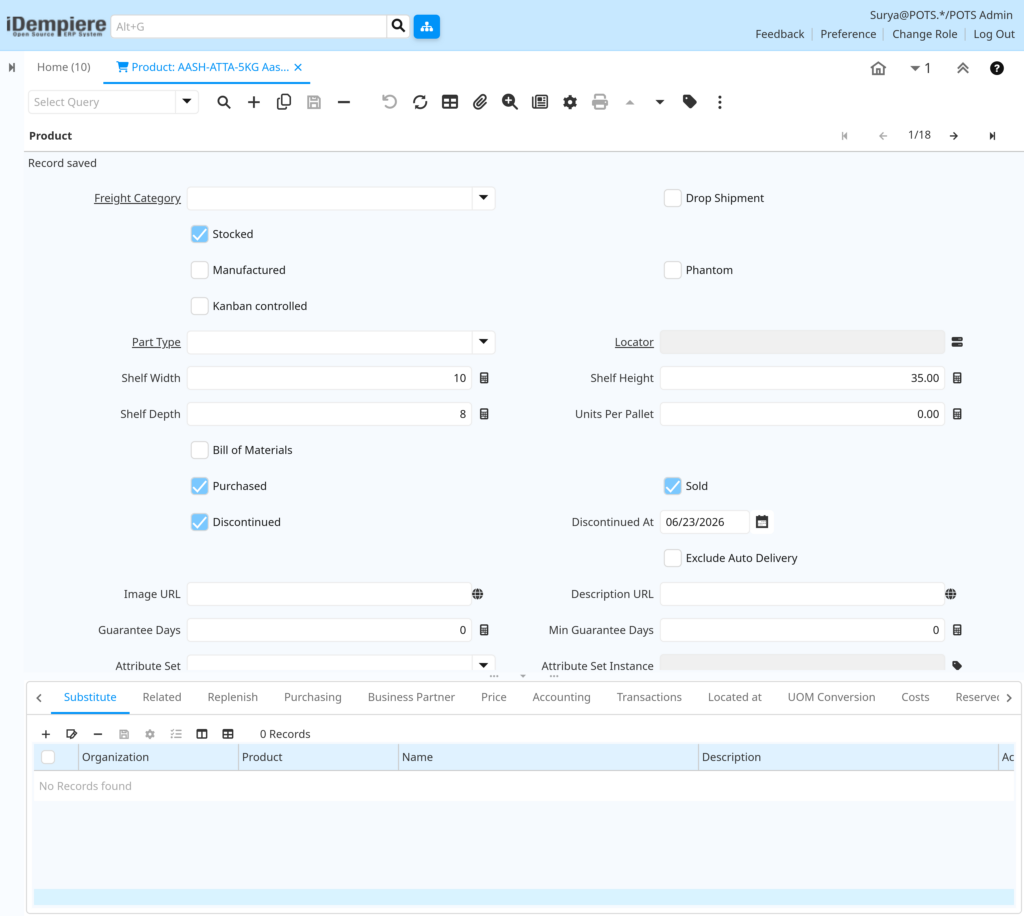
- In the Product tab (main tab), locate the “Discontinued” checkbox
- Check the Discontinued checkbox
- The “Discontinued At Date” field automatically becomes enabled
- Enter the discontinuation date (typically today’s date or the date you want to mark it as discontinued)
- Save the record (Alt+S or click Disk icon on the toolbar)
Field Reference
| Field | Sample Value | Description |
| Discontinued | checked | Check this box to mark product as discontinued |
| Discontinued At Date | 2025-01-15 | Date when product was formally discontinued |
Example: Mark Shampoo Bottle 250ml as Discontinued on 2025-01-15 (date of formal removal from catalog).
Step 5: Deactivate the Product (Set Active = No)
After discontinuing, deactivate the product to prevent it from appearing in any transaction lookups.
Purpose
Deactivation removes the product from active selection in Sales Orders, Purchase Orders, and Invoices, while preserving historical audit records.
Instructions
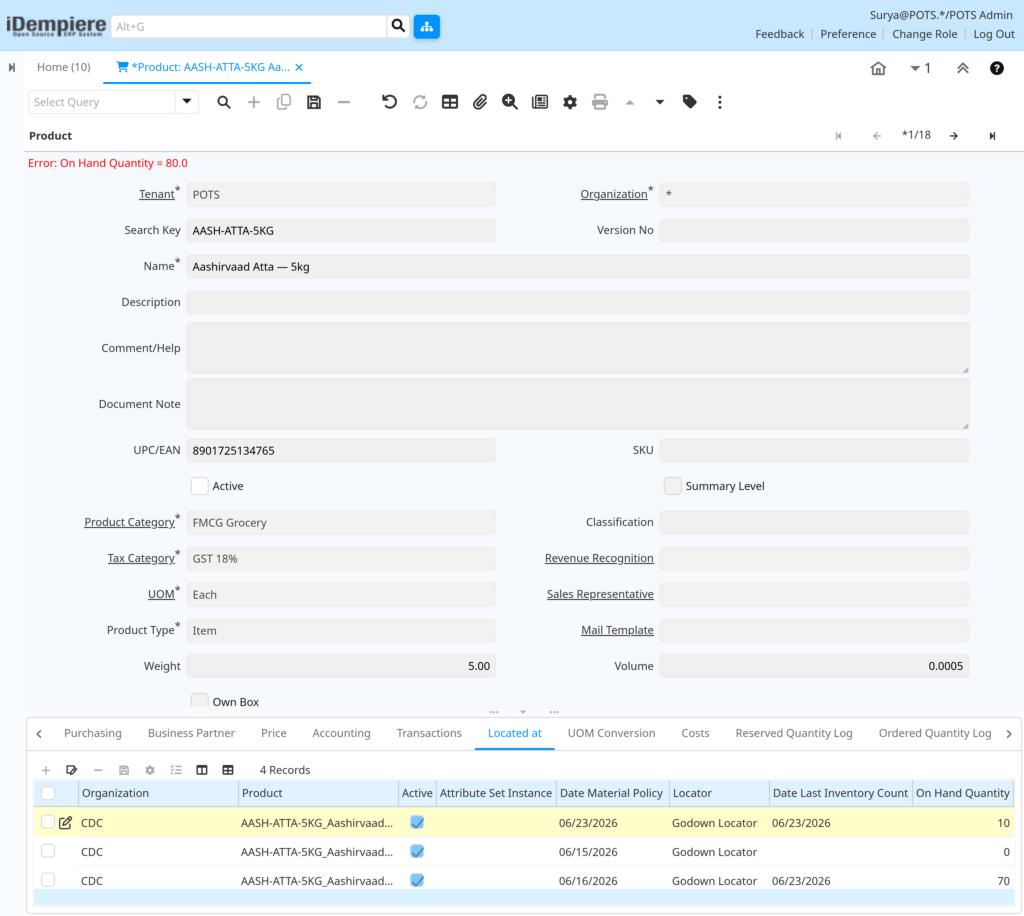
- In the Product tab, locate the “Active” checkbox at the top right of the form
- Uncheck the Active checkbox/
- Save the record (Alt+S)
- Important: Ensure Qty On Hand = 0 before unchecking Active. If stock exists, the system will display an error: “Error: On Hand Quantity > 0”
Field Reference
| Field | Sample Value | Description |
| Active | unchecked | Uncheck to deactivate product from all transactions |
Example: Deactivate Cold Cereal Box (seasonal variant) after marking it Discontinued.
Business Flow Overview
PRODUCT SELECTED FOR DISCONTINUATION
↓
CLEAR INVENTORY (Stock = 0)
↓
MARK AS DISCONTINUED (Set Discontinued = Yes, Enter Date)
↓
DEACTIVATE PRODUCT (Set Active = No)
↓
UPDATE VENDOR RECORDS (Set Vendor Discontinued if applicable)
↓
VALIDATE IN POS & TRANSACTIONS (Confirm product is hidden)
↓
HISTORICAL RECORDS PRESERVED FOR AUDIT & REPORTING
Numbered Business Flow
- Retail manager identifies product to discontinue (e.g., Shampoo Bottle seasonal scent)
- Warehouse team clears remaining inventory via Sales Order (clearance) or Adjustment (write-off)
- Product manager marks product as Discontinued and enters discontinuation date
- Salespeople cannot select product in new Sales Orders
- Purchasing team cannot order product in new Purchase Orders
- Existing transactions (completed invoices, historical orders) remain intact for audit
- Reports show product history and discontinuation date for business intelligence
Common Issues and Resolutions
| Issue | Cause | Resolution |
| “Cannot deactivate product with on-hand inventory” | Product has Qty On Hand > 0 | Use Physical Inventory Adjustment or Sales Order to clear all stock to 0. Verify all warehouses show 0 quantity. |
| Cannot select product in Sales Order after deactivating | Active field is unchecked (product is deactivated) | If you need to sell remaining stock, keep Active = Yes but only set Discontinued = Yes. This allows sales but hides from future orders. |
| Historical sales report shows deactivated product, but current sales order cannot include it | Correct behavior: deactivated products visible in reports but not in active transactions | This is expected. Deactivated records remain in reports for audit trail. Do NOT reactivate product unless you plan to sell it again. |
| Discontinued product is marked in Product Purchasing tab but Discontinued date is wrong | User entered incorrect date or vendor updated after initial discontinuation | Edit the vendor record in Purchasing tab, correct the Discontinued At Date, and save. Each vendor record can be edited independently. |
| Need to reactivate a discontinued product | Business requirements changed; product is back in stock or vendor resumed supply | Open product, uncheck Discontinued checkbox, uncheck Active checkbox and re-check it, save. The product will be available for new transactions again. |