How to Process Warehouse Stock Transfer in iDempiere for Retail
Introduction
Warehouse stock transfer is the movement of inventory from one storage location (warehouse) to another within the same retail organization. This process is essential for managing stock levels across multiple locations, such as moving inventory from a central warehouse to retail points of sale.
iDempiere provides two integrated documents for managing warehouse transfers: the Inventory Move window initiates the transfer, and the Move Confirmation window confirms receipt at the destination. Together, these documents ensure accurate tracking and accountability at each location.
Prerequisites
Ensure the following are configured in iDempiere before processing warehouse stock transfers:
- Two or more warehouses created and assigned to the organization
- Warehouse locators (storage locations) configured for both source and destination warehouses
- Products created with inventory tracking enabled
- User permissions granted for Inventory Move and Move Confirmation windows
- Stock on hand in source warehouse locator
Business Rules for Stock Transfer
- Inventory moves are initiated as Draft documents and must be In Progress state to process stock.
- Stock movement from source warehouse to destination warehouse occurs only when Move Confirmation is completed.
- All transfers are logged with user reference and timestamps for audit trail and compliance
- Only active warehouses and locators can participate in inventory movements
- Transfer quantities cannot exceed available stock in source warehouse locator
- Scrapped quantities and difference quantities trigger Physical Inventory creation in respective warehouses
- Move Confirmation can be voided, which returns the Inventory Move to voided status
- Move Confirmation is auto-generated when the document type of the movement indicates In Transit.
Navigation
To access warehouse stock transfer functions in iDempiere:
Menu → Material Management and Pricing → Inventory Move
Step-by-Step: Process Warehouse Stock Transfer
Step 1: Open Inventory Move Window
Navigate to:
Material Management and Pricing → Inventory Move.The window displays all existing stock movement records with their current document status.
This is the central hub for creating and tracking inter-warehouse stock movements. Users can filter or search for specific transfers by warehouse, date, or document number.
Step 2: Create New Inventory Move Document
Click the New Record (+) button to create a new Inventory Move. The system opens a blank form for entering stock transfer details.
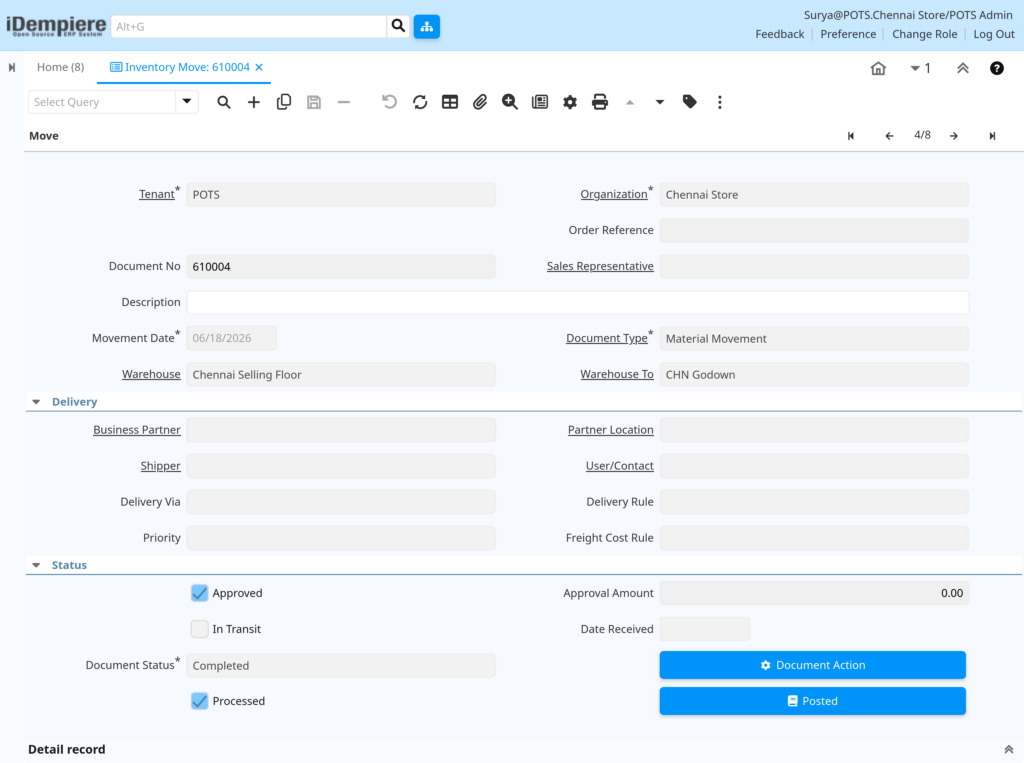
Header Tab – Field Reference
| Field Name | Sample Value | Description |
| Organization | Chennai Store | Legal entity or department for this transfer |
| Warehouse | Chennai Selling Floor | Source warehouse (location transferring stock FROM) |
| Warehouse To | CHN Godown | Destination warehouse (location transferring stock TO) |
| Movement Date | 06/18/2026 | Date when stock physically moves between locations |
| Document No | 610004 | Unique identifier for this transfer (system-generated if blank) |
| Document Type | Material Movement | Type of inventory movement (defines workflow rules) |
| Description | – | Business reason for transfer (e.g., Floor Replenishment, Stock Rebalance) |
| Order Reference | – | External reference if transfer relates to purchase/sales order |
| Sales Representative | – | Optional person responsible for transfer |
| Business Partner | – | Optional if transfer involves external partner |
| Priority | – | Priority level (High, Medium, Low) |
| Shipper | – | Method of transport if applicable |
| Approved | Yes | Indicates if document requires approval workflow |
| In Transit | – | Read-only – Populated when document is completed |
| Date Received | – | Populated by system when Move Confirmation is completed |
| Document Status | Completed | Current status: Draft, In Progress, Completed, Voided |
| Processed | Yes | Indicates document processing status |
Key field guidance: Select the source warehouse in “Warehouse” field and destination warehouse in “Warehouse To” field. Movement Date should reflect the actual date stock is transferred. Document Type must be set to enable proper workflow (check with system administrator if not visible).
Step 3: Add Stock Movement Lines
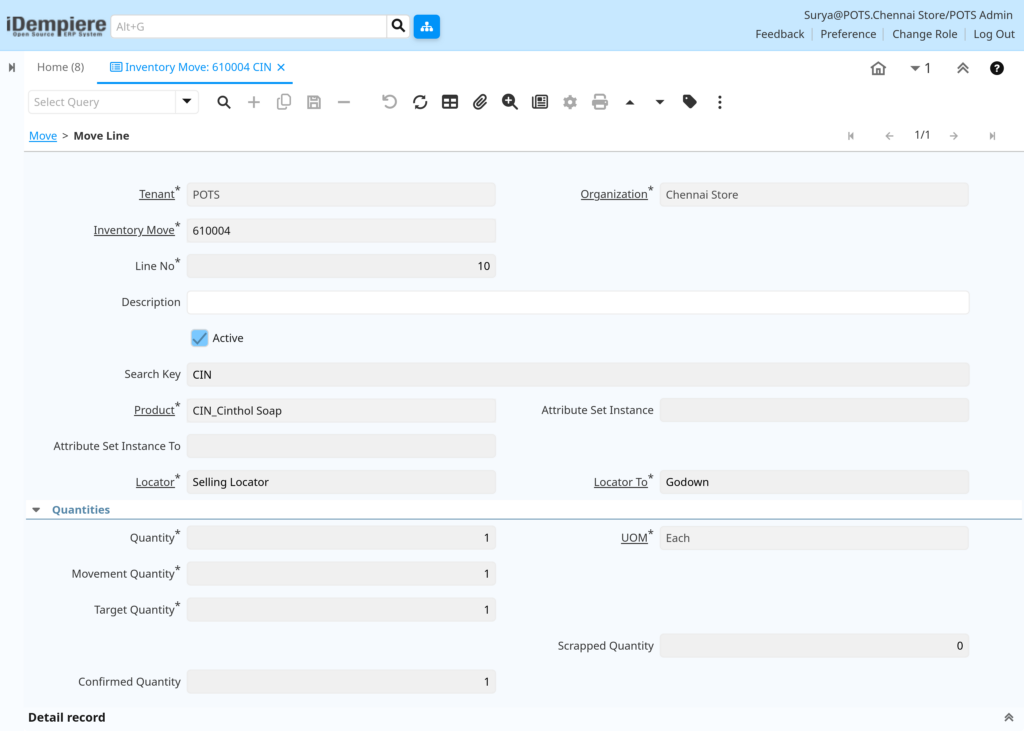
After saving the header, navigate to the Move Line tab to add specific products being transferred. Each line represents one product SKU with its quantity and storage locations.
Move Line Tab – Field Reference
| Field Name | Sample Value | Description |
| Line No | 10 | Sequential line number (system-generated) |
| Product | CIN_Cinthol Soap | Item being transferred (enter SKU or product code) |
| Description | Optional notes for this line item (e.g., “Summer Stock”, “Promo Items”) | |
| Locator | Selling Locator | Source storage location/bin (warehouse FROM) |
| Locator To | Godown | Destination storage location/bin (warehouse TO) |
| Quantity | 1 | Quantity in product’s default unit of measure (UOM) |
| UOM | Each | Unit of Measure (each, box, carton, etc.) |
| Movement Quantity | 1 | Quantity converted to storage UOM (system-calculated) |
| Target Quantity | 1 | Expected quantity to be received (same as Movement Qty) |
| Confirmed Quantity | 1 | Quantity confirmed at destination (populated by Move Confirmation) |
| Scrapped Quantity | 0 | Damaged/rejected quantity (entered in Move Confirmation) |
| Attribute Set Instance | – | Product variant/lot tracking (if applicable) |
| Attribute Set Instance To | – | Target variant/lot at destination |
| Active | Yes | Checkbox – Record is active in system |
Enter the quantity to be transferred in “Quantity” field. Select the source locator (locator field) and destination locator (locator To) from the warehouse configuration. The system prevents transfers exceeding available inventory.
Step 4: Process Stock Transfer (Change to In Progress)
Once all line items are entered and saved, process the Inventory Move by clicking the “Process Inventory Movements” button or using the Document Action dropdown to select “In Progress” or “Complete”.
Expected Behavior When processing
- Document status changes from Draft to In Progress
- Move Confirmation record is automatically generated (if document type requires confirmation)
- Stock remains in source warehouse (NOT reserved or reduced yet)
- All line items are locked from editing (quantities cannot be changed)
- System validates all mandatory fields and warehouse/locator availability

Step 5: Access Move Confirmation (Destination Warehouse)
Once Inventory Move is activated, the destination warehouse receives a Move Confirmation record. Access this document to verify and confirm receipt:
Menu → Material Management and Pricing → Move Confirmation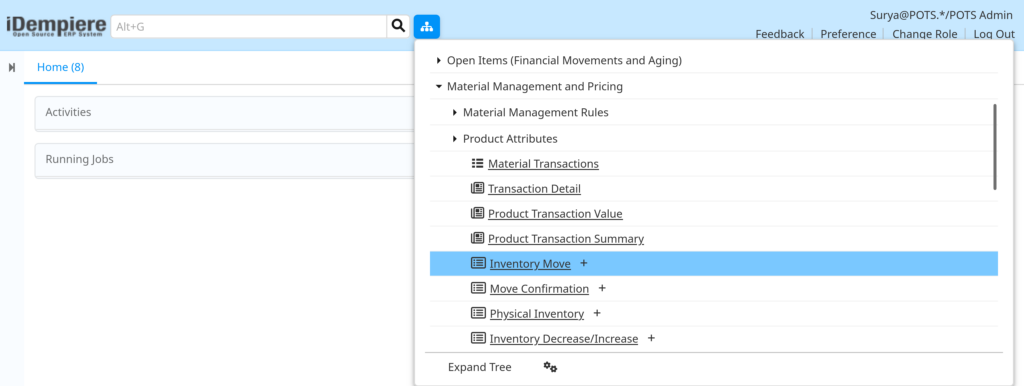
The Move Confirmation window displays pending transfer confirmations linked to completed Inventory Move documents. Filter by warehouse destination or document date to locate the specific transfer.
Step 6: Verify and Confirm Receipt
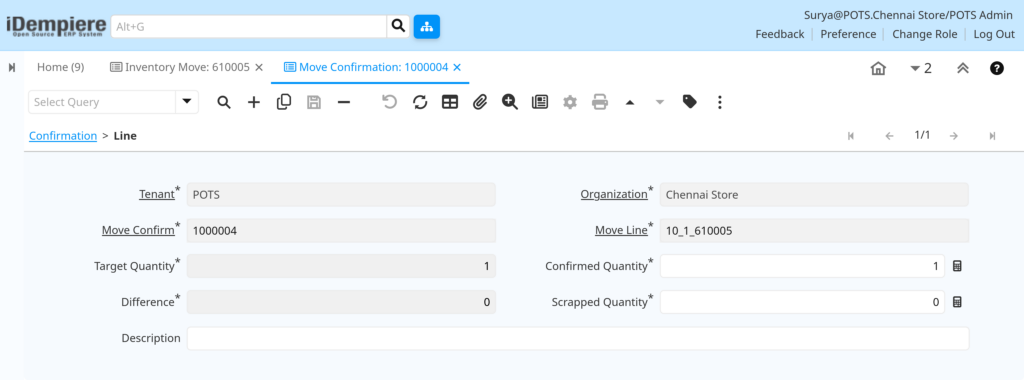
Open a Move Confirmation record. The Confirmation tab displays the source Inventory Move reference and overview information. Navigate to the Line tab to verify and confirm each product received.
Confirmation Tab – Header Fields
| Field Name | Sample Value | Description |
| Document No | 1000004 | Unique identifier for this confirmation (system-generated) |
| Inventory Move | 610005 | Links to the source Inventory Move document |
| Organization | Chennai Store | Destination organization/warehouse |
| Description | – | Notes about the confirmation (e.g., “Partial Receipt – Damage noted”) |
| Document Status | Drafted | Current status: Draft, In Progress, Completed, Voided |
| Approved | No | Indicates approval status |

Line Tab
| Field Name | Sample Value | Description |
| Move Line | 10_1_610005 | Links to source Inventory Move line item |
| Target Quantity | 1 | Expected quantity from source transfer |
| Confirmed Quantity | 1 | Actual quantity received and confirmed |
| Difference Quantity | 0 | Auto-calculated (Target – Confirmed – Scrapped) |
| Scrapped Quantity | 0 | Damaged or rejected items (deducted from transfer) |
| Description | – | Notes about this line (e.g., “2 units damaged”, “Shortage due to count variance”) |
Physically inspect incoming items. Enter the actual quantity received in “Confirmed Quantity”. If items are damaged or missing, enter the damaged quantity in “Scrapped Quantity” and add notes in Description. The Difference Quantity is auto-calculated and will trigger Physical Inventory creation if non-zero.
Step 7: Complete Confirmation (Finalize Stock Movement)
Click the “Process Confirmation” button to complete the Move Confirmation record. This is the critical step that executes the actual stock movement.
What Happens When Confirmation is Completed
- Confirmed Qty is deducted from source warehouse
- Confirmed Qty is added to destination warehouse locator
- Scrapped Qty is removed from transfer (loss/damage adjustment)
- Difference Qty (variance) triggers Physical Inventory creation for source and/or destination warehouse
- Inventory Move status changes to Completed
- Document Status changes to Completed
- Date Received is populated with current date
- Stock levels in both warehouses are updated in real-time
- Accounting entries are created (if configured in document type)
Business Process Flow
End-to-End Stock Transfer Process
Step 1: Create Inventory Move (Draft)
↓
Step 2: Add Products & Locators
↓
Step 3: Process to In Progress
↓
Step 4: Auto-Generate Move Confirmation
↓
Step 5: Destination Confirms Receipt
↓
Step 6: Complete Confirmation
↓
Step 7: Stock Moved (Reduced Source, Increased Destination)
↓
Step 8: Update Inventory & Financial Reports
Sequential Tasks by Role
- Source Warehouse (Initiator): Identify stock transfer need based on destination demand
- Source Warehouse: Create Inventory Move document with products, quantities, and locators
- Source Warehouse: Process document (move to In Progress) to trigger Move Confirmation generation
- Source Warehouse: Pick and prepare items for transport
- Destination Warehouse: Receive notification of incoming Move Confirmation
- Destination Warehouse: Access Move Confirmation and verify each line item
- Destination Warehouse: Enter confirmed quantities and note any damage/shortages
- Destination Warehouse: Complete Confirmation to finalize stock movement
- Both Warehouses: Stock levels updated; reports reflect new inventory
- Accounting: Journal entries posted (if enabled in document type)
Common Issues and Solutions
| Issue | Cause | Resolution |
| Insufficient Stock Error | Source warehouse lacks requested quantity | Verify source locator stock; reduce transfer qty; split into multiple transfers |
| Move Confirmation Not Appearing | Document not processed or not set to generate confirmation | Check Inventory Move status; verify document type configuration |
| Partial Receipt Creates Variance | Confirmed Qty < Target Qty | Document Physical Inventory for difference; investigate root cause (shrinkage/damage/count error) |
| Cannot Complete Confirmation | Missing required confirmation line data | Verify all Target Qty fields are populated; ensure Confirmed + Scrapped ≤ Target |
| Warehouse Locators Missing | Destination locator not created | Create missing locators in Locator window; assign to correct warehouse |
| User Cannot Access Move Confirmation | Insufficient window permissions | Grant user role with Move Confirmation window access |
| Duplicate Stock Movement | Confirmation processed twice | Verify document status; never re-complete; only void if error |
| Cannot Reverse Transfer | Completed documents cannot be edited | Create new Inventory Move in reverse direction to return stock |