How to Configure the Vendor Payment Window in iDempiere for Retail
Configure supplier and customer payments in iDempiere’s Payment and Receipt window to manage AP/AR transactions across retail store locations.
Introduction
The Payment and Receipt window in iDempiere is the central point for recording all money movements between your retail business and its suppliers or customers. It handles both outgoing payments to vendors (AP Payments) and incoming payments from buyers (AR Receipts) within a single interface.
In retail operations, this window is used every time a store pays a supplier for stock replenishment, collects payment from a wholesale buyer, processes a customer advance, or deposits daily cash into a bank account. It works across multiple store organizations under the same tenant.
Business Rules
- An AP Payment reduces the outstanding balance owed to a supplier; an AR Receipt reduces the balance owed by a customer.
- Document Type must be set correctly — AP Payment for supplier outflows, AR Receipt for customer inflows — before saving.
- The Bank Account field must match the actual bank or cash account used for the transaction.
- A payment can be linked directly to a specific invoice at entry time or left unallocated and matched later.
- Prepayment flag is used when payment is made before an invoice exists; iDempiere holds it as an open credit.
- Over/Under Payment must be explicitly enabled if the payment amount differs from the invoice amount.
- Once a payment is Completed and Posted, it cannot be edited; reversal is required to correct it.
- The Allocated flag is automatically checked by the system once the payment is matched to one or more invoices.
- Write-off Amount can be used to close small differences without creating a credit note.
- Discount Amount may be applied when a supplier offers an early-payment discount per agreed terms.
Prerequisites
- Vendor or Customer Business Partner configured and active.
- Bank Account configured and linked to the correct organization.
- Document Type configured: AP Payment for vendors, AR Receipt for customers.
- Organization (store or head office) created and active.
- Chart of Accounts and accounting schema set up.
- Open supplier invoice or customer invoice available if payment is to be directly allocated.
- Currency (INR or applicable) configured in the system.
Navigation
Menu → Open Items (Financial Movements and Aging) → Payment and Receipt
When the window opens, it displays the Payment header with sections for Reference, Amounts, Document details, and Status. Users can create a new record using the ‘+’ button or search existing payments using the query bar. The record counter (e.g., 2/2) shows the current position among all retrieved records.
Configuration Steps
Step 1: Create a New Payment Record
Every supplier payment or customer receipt starts with a new record. Setting the correct Document Type at this stage determines the accounting behaviour of the entire transaction.
Instructions
Click the ‘+’ (New Record) button in the toolbar. The system auto-generates a Document No. Fill in the following header fields:
| Field | Sample Value | Description |
| Tenant | POTS | Auto-populated. The legal entity running the retail business. |
| Organization | Chennai Store | Select the store or branch making or receiving the payment. |
| Document No | 1000001 | System-generated. Used for reference and audit. |
| Document Type | AP Payment | Select AP Payment for supplier or AR Receipt for customer. |
| Transaction Date | 06/16/2026 | Date the payment is made or received. |
| Account Date | 06/16/2026 | Accounting period date. Usually same as Transaction Date. |
| Description | Payment for June stock delivery | Optional internal note for the payment. |
Step 2: Set the Reference – Business Partner and Invoice
Linking the payment to the correct business partner and invoice ensures the open balance is reduced and the payment is properly allocated. If no invoice exists yet (advance payment), leave the Invoice field blank and check Prepayment.
Instructions
Scroll to the Reference section and fill in:
| Field | Sample Value | Description |
| Business Partner | HAVELLS INDIA MART | Select the supplier or customer being paid. |
| Invoice | 1000006_06/16/2026_14602.50 | Select the open invoice to allocate this payment against. |
| Bank Account | Vendor Payment_Vendor Payment_123456 | Bank or cash account from which payment is made. |
| Receipt | (unchecked) | Check this only for customer receipts (AR). |
| Prepayment | (unchecked) | Check if payment is made before an invoice is raised. |
| Order | (blank) | Link to a purchase or sales order if needed. |
| Charge | (blank) | Use for bank charges or other non-invoice charges. |

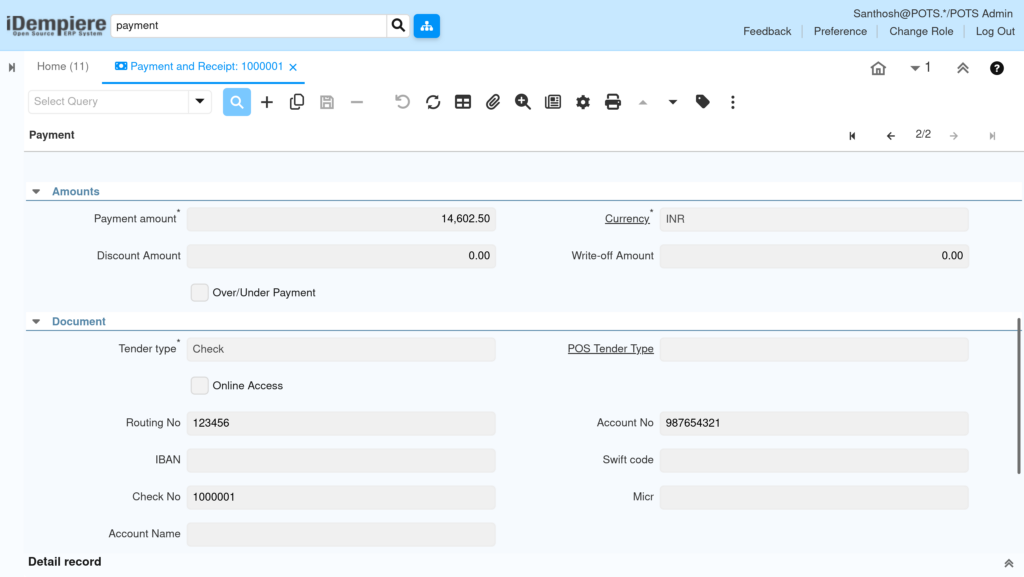
Step 3: Enter Payment Amount and Currency
The payment amount must match the invoice or the intended advance. Currency must align with the business partner’s currency configuration. Discount and Write-off fields are used when closing invoices with a small variance.
Instructions
Scroll to the Amounts section and enter:
| Field | Sample Value | Description |
| Payment Amount | 14,602.50 | Total amount being paid to the supplier or received from customer. |
| Currency | INR | Currency of the transaction. Defaults from business partner. |
| Discount Amount | 0.00 | Enter early-payment discount if applicable. |
| Write-off Amount | 0.00 | Enter small rounding difference to close the invoice fully. |
| Over/Under Payment | (unchecked) | Enable if paying more or less than the invoice total. |
Step 4: Fill in the Document (Tender) Details
The Document section captures how the payment was made — by cheque, bank transfer, cash, or other means. For cheque payments, the cheque number and bank routing details are required for bank reconciliation.
Instructions
Scroll to the Document section and complete:
| Field | Sample Value | Description |
| Tender Type | Check | Mode of payment — Check, Electronic Transfer, Cash, etc. |
| Check No | 1000001 | Cheque number issued to the supplier. |
| Routing No | 123456 | Bank routing number for the issuing bank. |
| Account No | 987654321 | Bank account number from which cheque is drawn. |
| IBAN | (blank) | Required for international bank transfers. |
| Swift Code | (blank) | Used for overseas wire transfers. |
| Online Access | (unchecked) | Check if payment was processed through an online banking portal. |
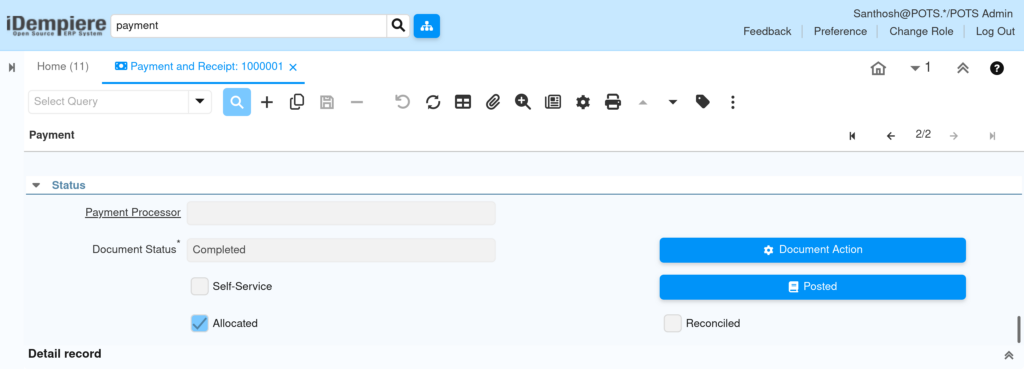
Step 5: Complete and Post the Payment
Completing the payment changes the document status to Completed, reduces the open balance of the business partner, and creates the accounting journal entry. Posting confirms the entry in the general ledger.
Instructions
Save the record first using the save icon. Then click Document Action and select Complete. The Document Status will change to Completed. Click Posted to confirm the accounting entry in the ledger. After completion, the Allocated checkbox will be checked automatically once the payment is matched to an invoice.
| Field | Sample Value | Description |
| Document Status | Completed | Confirms payment is finalised and cannot be edited. |
| Allocated | (checked) | Auto-checked once the payment is matched to an invoice. |
| Reconciled | (unchecked) | Checked after bank reconciliation confirms the payment cleared. |
| Payment Processor | (blank) | Used for automated online payment gateways. |
| Self-Service | (unchecked) | Indicates if the payment was entered through a customer portal. |
Common Issues and Resolutions
| Issue | Cause | Resolution |
| Invoice not appearing in the Invoice lookup | Invoice is already fully paid, voided, or belongs to a different business partner. | Verify the invoice status in the Invoice (Vendor) window. Ensure the business partner matches. |
| Payment amount does not match invoice – cannot complete | Over/Under Payment checkbox is unchecked but amounts differ. | Check the Over/Under Payment box or adjust the payment amount to match the invoice exactly. |
| Cannot edit a Completed payment | Completed documents are locked in iDempiere. | Use Document Action to Reverse – Correct or Void the payment. Create a new corrected record. |
| Currency mismatch error on save | Payment currency differs from invoice currency without a conversion rate. | Set up a currency conversion rate in Currency Rate window for the applicable date. |
| Business Partner balance not updated | Payment was saved but not completed. | Locate the payment record and click Document Action > Complete to finalise. |
| Prepayment not visible on invoice allocation | Prepayment flag was not checked when the advance payment was created. | Reverse the payment, create a new one with Prepayment checked, then re-complete. |
Next Steps
- Use the Payment Allocation window to match unallocated payments to open invoices.
- Run Bank Statement processing to reconcile completed payments against bank records.
- Review Open Items report to verify outstanding supplier and customer balances.
- Configure Payment Terms on Business Partner records to enable early-payment discount automation.
- Set up the Dunning process for overdue customer invoices not yet paid.