How to Configure a Shipper in iDempiere
The Shipper window defines the carrier used to transport customer shipments, including freight rates, packaging, label formats, and pickup methods.
Shipper setup drives freight charges, package labeling, and carrier-specific options, and feeds the Shipper Configuration record used across all shipments for that carrier.
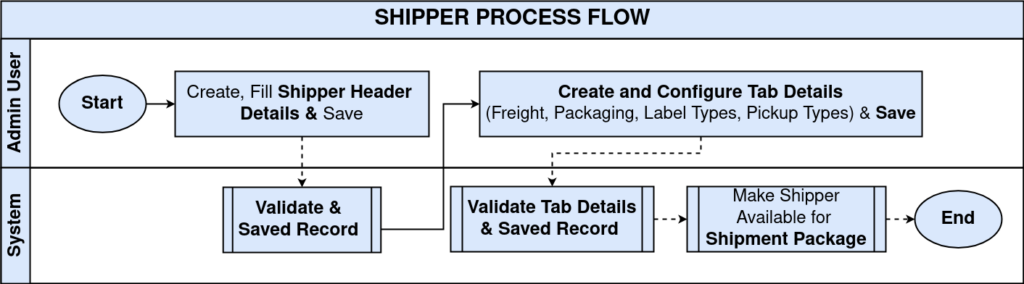
Process Flow
Business Rules
- A Shipper must be created before it can be selected in a Shipment Package.
- The Name field is mandatory on the Shipper record.
- Freight, Packaging, Label Type, and Pickup Types are entered as tabs under the Shipper.
- Multiple Freight records can be maintained for different destinations and freight categories.
- Running Shipper Create From generates or syncs the Shipper Configuration and its sub-records.
- The Shipper Configuration record stores broader carrier settings such as Online Access and Shipping Processor.
- Deactivating a Shipper prevents it from being selected for new Shipment Packages.
Configuration Steps
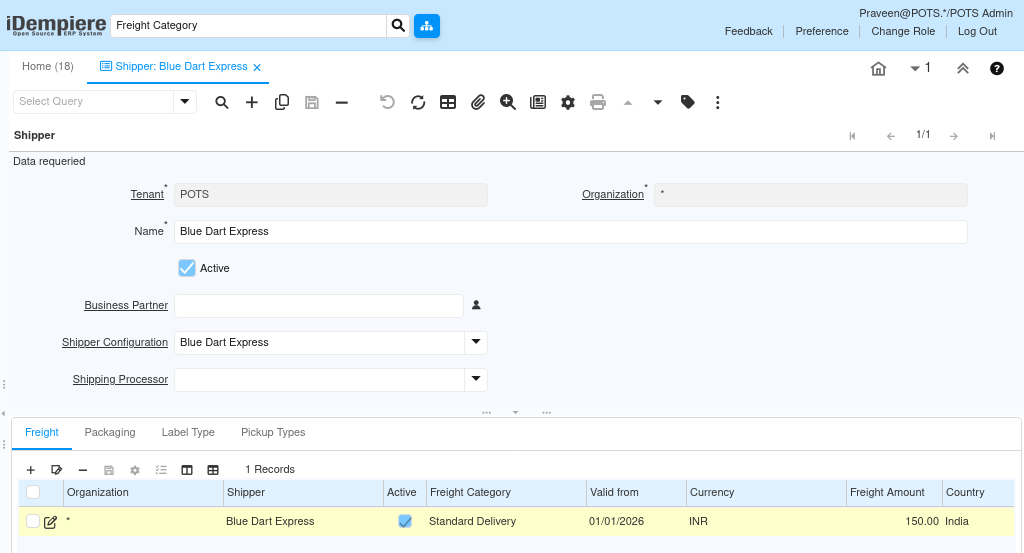
Step 1: Create the Shipper
Create a new Shipper record and enter the Name. Business Partner and Shipping Processor are optional depending on whether the carrier is billed or integrated online.
| Field | Sample Value | Description |
| Name | Blue Dart Express | Shipping carrier name; mandatory |
| Active | Yes | Enables the shipper for use |
| Business Partner | (Blank) | Business Partner representing the carrier, if billed directly |
| Shipper Configuration | Blue Dart Express | Linked configuration record generated for this shipper |
| Shipping Processor | (Blank) | Optional processor used by custom online integrations |
Step 2: Configure Freight
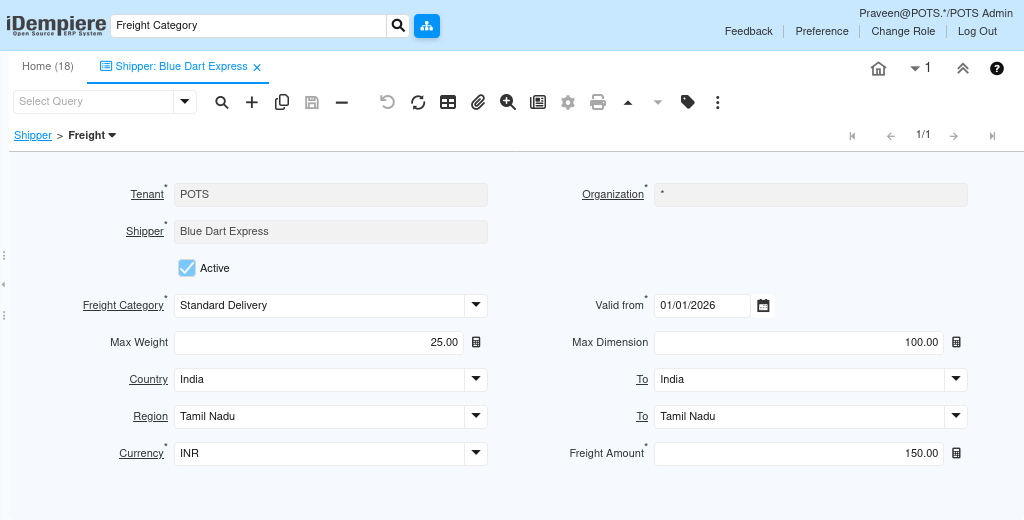
Open the Freight tab and add a record with the freight category, validity date, destination, and freight amount.
| Field | Sample Value | Description |
| Freight Category | Standard Delivery | Shipping service level |
| Valid from | 01/01/2026 | Effective date of this freight record |
| Country | India | Origin country |
| Region | Tamil Nadu | Origin region |
| To (Country) | India | Destination country |
| To (Region) | Tamil Nadu | Destination region |
| Currency | INR | Freight currency |
| Freight Amount | 150.00 | Shipping charge for this route |
| Max Weight | 25.00 | Maximum supported weight |
| Max Dimension | 100.00 | Maximum supported package dimension |
Step 3: Configure Packaging
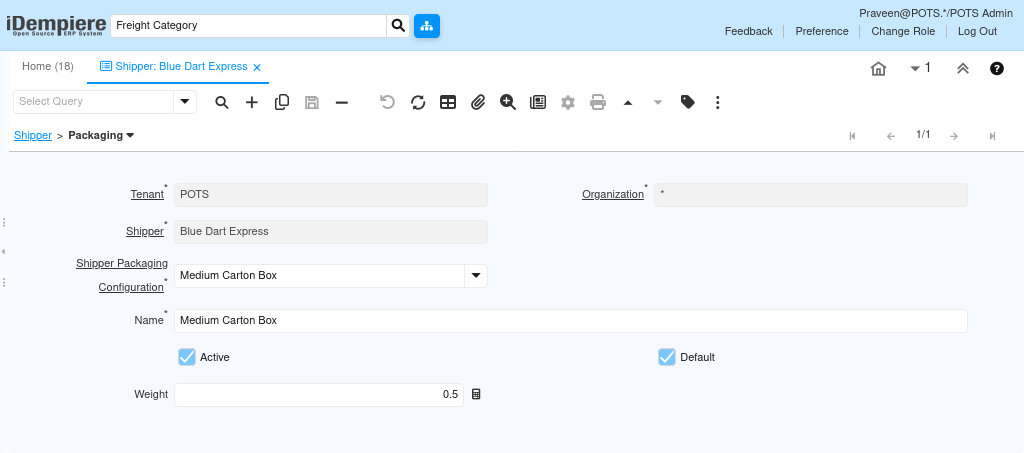
Open the Packaging tab, select or create a Shipper Packaging Configuration, then set the Name, Weight, and Default option.
| Field | Sample Value | Description |
| Shipper Packaging Configuration | Medium Carton Box | Linked packaging configuration record |
| Name | Medium Carton Box | Packaging type |
| Active | Yes | Enables this packaging option |
| Default | Yes | Used automatically when a package type is not specified |
| Weight | 0.5 | Empty package weight |
Step 4: Configure Label Type
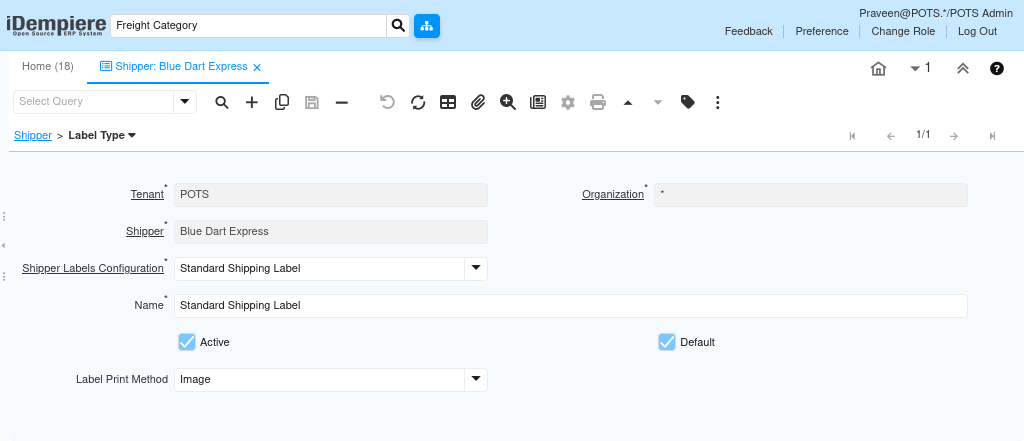
Open the Label Type tab, select or create a Shipper Labels Configuration, then set the Name, Label Print Method, and Default option.
| Field | Sample Value | Description |
| Shipper Labels Configuration | Standard Shipping Label | Linked label configuration record |
| Name | Standard Shipping Label | Label format name |
| Active | Yes | Enables this label type |
| Default | Yes | Used automatically when a label type is not specified |
| Label Print Method | Image | How the label is generated for printing |
Step 5: Configure Pickup Types
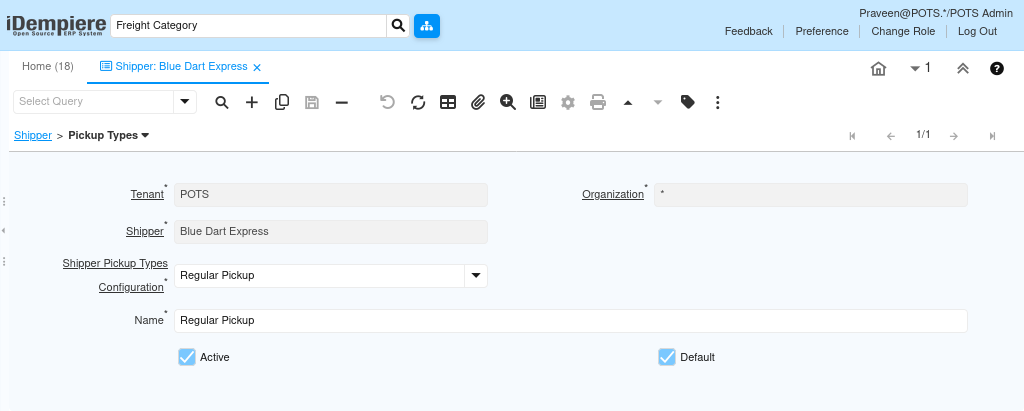
Open the Pickup Types tab, select or create a Shipper Pickup Types Configuration, then set the Name and Default option.
| Field | Sample Value | Description |
| Shipper Pickup Types Configuration | Regular Pickup | Linked pickup type configuration record |
| Name | Regular Pickup | Pickup method |
| Active | Yes | Enables this pickup type |
| Default | Yes | Used automatically when a pickup type is not specified |
Step 6: Generate the Shipper Configuration
Click the actions (gear) icon and select the Create From process. Confirm Do you want to start the Process?, optionally check Run as Job, then click OK.
| Note: After the process runs, the Shipper Configuration field on the Shipper header is highlighted, confirming it is now linked to the generated configuration. |
Step 7: Review the Generated Shipper Configuration
Open the Shipper Configuration record and check the header settings, then confirm the Pickup Types (and Packaging, Label Type) tabs show the expected records.
Step 8: Verify the Shipper Is Ready for Shipment Packages
Confirm the Shipper, Freight, Packaging, Label Type, and Pickup Types are all Active, and that Shipper Configuration is linked on the Shipper header.
Expected Result
- Shipper is available for selection in Shipment Package.
- Freight configuration exists for the required destinations.
- Packaging, Label Type, and Pickup Type options are configured and linked.
- Shipper Configuration is generated and synced with the Shipper.
Common Issues and Resolutions
| Issue | Cause | Resolution |
| Cannot save Shipper | Name not entered | Enter the mandatory Name |
| Shipper Configuration not generated | Create From process not run | Run the Create From process from the gear icon |
| Packaging, Label, or Pickup record won’t save | Configuration lookup field left blank | Select a Shipper Packaging, Labels, or Pickup Types Configuration before saving |
| No Freight available for a route | Freight record not created, or Valid from is a future date | Create a Freight record with a Valid from date on or before the shipment date |
| Shipper not available in Shipment Package | Shipper inactive | Activate the Shipper |
| Duplicate Packaging or Label entries | Same Configuration linked more than once | Reuse the existing linked record instead of creating a duplicate |
| Online tracking not working | Online Access unchecked or Tracking URL not set | Enable Online Access and configure the Tracking URL for the carrier |
Next Steps
- Configure Shipment Packages using this Shipper.
- Assign the Shipper during Package creation.
- Generate Package Lines.
- Process Shipment Confirmations.
- Dispatch customer shipments.