How to Process Shipment Packages in iDempiere
Introduction
The Shipment Package window groups one or more shipment lines into a physical parcel before dispatch, storing shipper, dimensions, weight, and tracking details.
It is used whenever a customer shipment travels through a carrier, keeping each parcel traceable back to the shipment lines it contains.
Package data drives labeling, tracking, and carrier billing, but does not affect inventory; the shipment itself still completes independently of package creation.
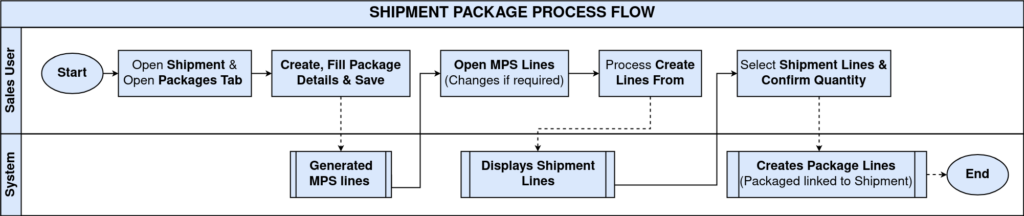
Process Flow Diagram
Business Rules
- A Shipment Package must belong to an existing Customer Shipment.
- A package can be created directly from the Shipment Packages tab or from Create Package on a completed Pick/QA Confirm.
- A Shipper is mandatory before a package can be saved, in either creation method.
- One shipment can contain multiple packages.
- Saving the Package Header automatically creates one Package MPS record.
- Shipment lines are not added automatically; they must be selected using Create Lines From inside Package MPS.
- Package Lines are generated only after shipment lines are selected and confirmed.
- Several fields (e.g. Duties Shipper Account, Partner Location) apply only to specific carriers such as FedEx or UPS.
- Package information does not affect inventory quantities.
Configuration Steps
Step 1: Create the Package Header
A package can be started two ways depending on where the warehouse team is in the process, but both need the same carrier information before they can be saved.
- Method A: Open Shipment (Customer) → Packages and add a new record.
- Method B: On a completed Pick/QA Confirm, click the actions (gear) icon → Create Package.
- Both require a Shipper before saving.
| Field | Sample Value | Description |
| Shipment/Receipt | 500009_07/06/2026 | Shipment the package belongs to |
| Shipper | Blue Dart Express | Shipping carrier; mandatory before saving |
| Shipper Packaging | Medium Carton Box | Physical packaging type used by the carrier |
| Shipper Pickup Types | Regular Pickup | Pickup method requested from the carrier |
| Latest Pickup Time | 2:00 PM | Cut-off time for the carrier to collect the package |
| Weight | 10 | Actual package weight |
| UOM for Weight | Kilogram | Unit of measure for weight |
| Length | 40 | Package length |
| Width | 30 | Package width |
| UOM for Length | Meter | Unit of measure for dimensions |
| Box Count | 1 | Number of boxes in this package |
| Note: Fields labelled “For FedEx only” or “For UPS only” (such as Duties Shipper Account or Partner Location) apply only when that specific carrier is selected as the Shipper. |

Step 2: Save the Package Header
Saving is what actually creates the package and its linked movement record; nothing is packed until this happens.
Click Save. The Package Number is generated and a Package MPS record is created automatically.
Expected Result
- Package Number generated, e.g. 1000000.
- Package MPS created automatically.
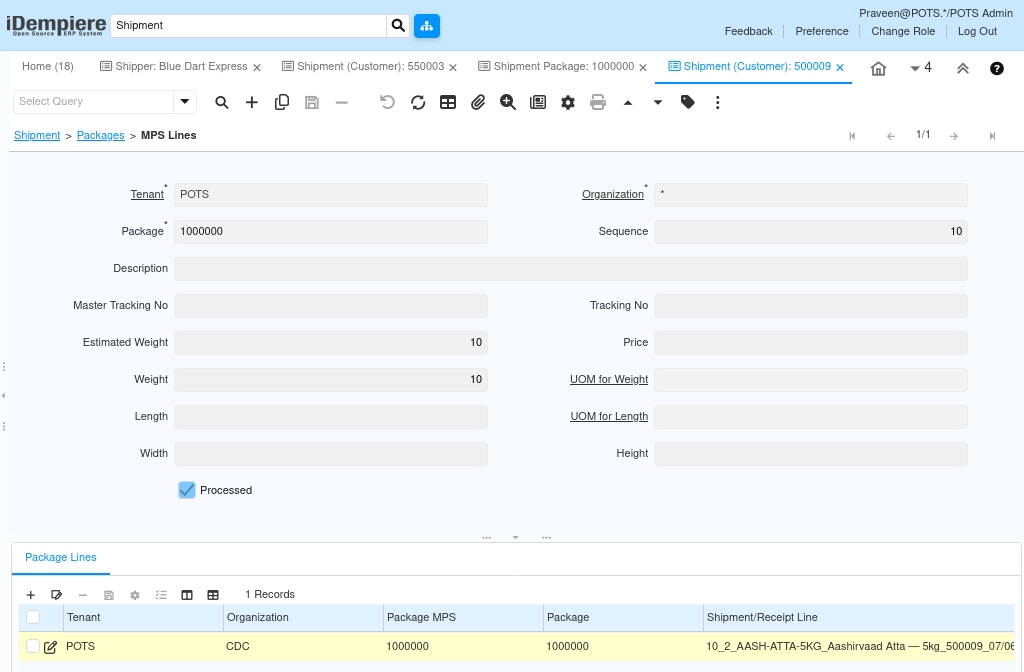
Step 3: Review the Auto-Generated Package MPS
Each package automatically contains one Package MPS record that stores movement and carrier processing details; no shipment lines exist on it yet.
Open Packages → MPS Lines and verify the Package reference, Sequence, and that Processed is still unchecked.
| Field | Sample Value | Description |
| Package | 1000000 | Generated Package Number this MPS record belongs to |
| Sequence | 10 | Default processing sequence |
| Processed | Unchecked | Whether this Package MPS has been processed |
Step 4: Generate Package Lines from the Shipment
Shipment lines are added into the package using Create Lines From so only the intended quantities are packed, rather than the whole shipment automatically.
From MPS Lines, click Create Lines From, select the shipment line, verify the quantity, then click OK.
| Field | Sample Value | Description |
| Line | 10 | Shipment line number available for packaging |
| Quantity | 2.00 | Quantity to be packed |
| Product | Aashirvaad Atta – 5kg | Product being packed |
| UOM | Each | Unit of Measure for the packed quantity |
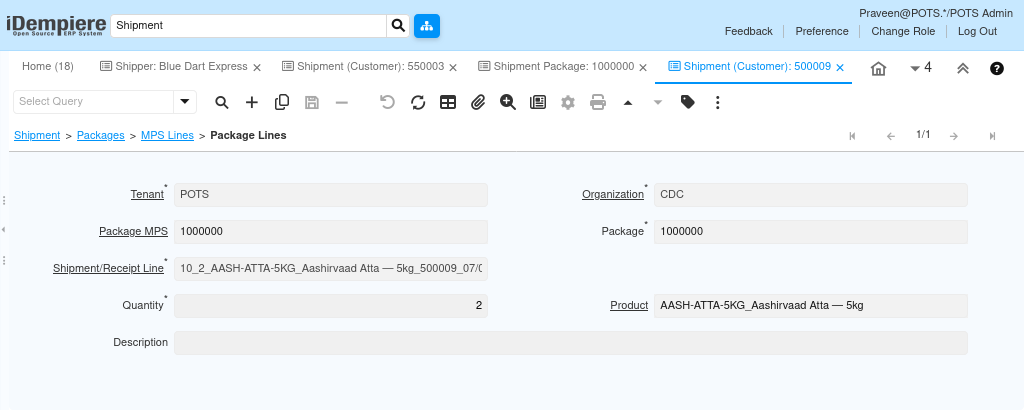
Step 5: Review the Generated Package Lines
Reviewing the package line confirms the correct shipment line and quantity were carried into the package before dispatch.
Open Package MPS → Package Lines and verify the Shipment/Receipt Line, Product, and Quantity.
| Field | Sample Value | Description |
| Package MPS | 1000000 | Parent Package MPS record |
| Package | 1000000 | Parent Package |
| Shipment/Receipt Line | 10_2_AASH-ATTA-5KG_Aashirvaad Atta – 5kg_500009_07/06/2026 | Linked shipment line |
| Product | AASH-ATTA-5KG_Aashirvaad Atta – 5kg | Product packed |
| Quantity | 2 | Packed quantity |
Step 6: Review Shipping and Tracking Details
Some carriers are integrated directly with iDempiere, so rate and tracking information can be retrieved online instead of entered manually.
Note : (Only if integrated) – On the Package Header, use Online Shipping Rate Inquiry to check the carrier rate, then Process Shipment Online to book the shipment and retrieve a tracking number.
| Field | Sample Value | Description |
| Price | 150.00 | Carrier rate for this package |
| Currency | INR | Currency of the freight price |
| Total Price | 150.00 | Price plus any surcharges |
| Tracking No | BDX240706000123 | Tracking number returned by the carrier |
| Tracking Info | Shipment booked with Blue Dart Express. | Status message returned by the carrier |
Step 7: Confirm Package Readiness for Dispatch
A final check confirms every part of the package is in place before it is handed to the carrier.
Verify the Package Header, Package MPS, and Package Lines are all complete, then release the package for pickup.
Common Issues and Resolutions
| Issue | Cause | Resolution |
| Cannot save Package | Shipper not selected | Select a valid Shipper before saving, in either creation method |
| Package MPS not available | Package Header not saved | Save the Package Header first |
| No shipment lines displayed | Shipment has no eligible lines, or lines already packaged | Verify unpackaged shipment lines exist before Create Lines From |
| Package Lines not generated | Create Lines From not executed in Package MPS | Run Create Lines From again inside MPS Lines |
| Wrong quantity packed | Incorrect quantity accepted during Create Lines From | Review and correct the quantity before clicking OK |
| Create Package option missing on Confirmation | Confirmation type is not Pick/QA Confirm, or not yet completed | Use Create Package only on a completed Pick/QA Confirm |
| Carrier-specific field has no effect | Field only applies to a specific carrier (e.g. FedEx or UPS only) | Confirm the field matches the selected Shipper before entering data |
| Tracking number not generated | Process Shipment Online not run, or carrier integration not configured | Configure the Shipping Processor and run Process Shipment Online |
Next Steps
- Print shipping labels, if configured for the selected carrier.
- Run Process Shipment Online to retrieve the carrier tracking number.
- Complete the Customer Shipment, if still pending.
- Dispatch the package through the selected carrier.