How to Process Vendor Payments Using Payment Selection in iDempiere for Retail
Payment Selection is the iDempiere process used to identify vendor invoices eligible for payment, group them into a batch, and generate vendor payments. In retail operations, it bridges Accounts Payable invoices and actual vendor settlement, supporting payment methods such as Check, Direct Deposit, and Direct Debit.
Once processed, the selected AP Invoice is automatically allocated against the generated payment and marked as Paid, directly impacting vendor balances and cash management.
Process Flow Diagram
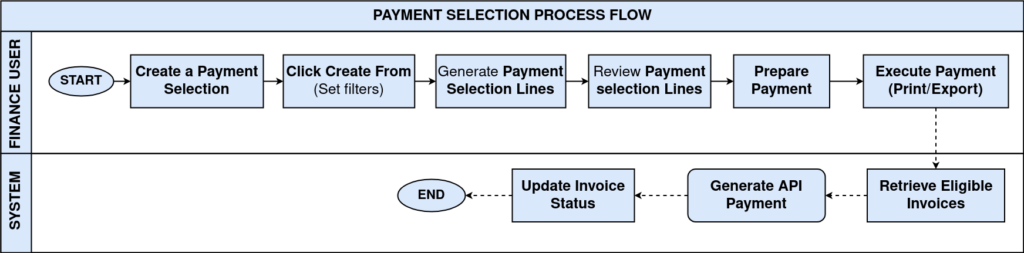
Business Rules
- AP Invoice must be Completed and Posted before it qualifies for payment.
- AP Invoice must have an outstanding balance to be selected.
- Invoice Payment Rule must match the Payment Selection Payment Rule.
- Payment Selection Lines are generated only for eligible invoices.
- Prepared Payments must be generated before Payment Print/Export.
- Check payments require a Bank Account Document configuration.
- Payment Print/Export creates the actual Payment records.
- Successful payment processing automatically updates the invoice Paid status.
- Processed Payment Selection Lines become read-only.
- One Payment Per Invoice creates a separate payment for each invoice.
Prerequisites
Ensure the following configurations are completed:
- Vendor (Business Partner) configured.
- Purchase Order completed.
- Material Receipt completed.
- AP Invoice completed and posted.
- Vendor Payment Rule configured.
- Bank Account configured.
- Payment Rule available for the selected Bank Account.
- Bank Account Document configured for Check payments.
Steps to Steps Configuration
Step 1: Create Payment Selection
Create a New Payment Selection document that will be used to collect and process vendor invoices for payment.
- Open the Payment Selection window and click New Record.
- Select Organization, Bank Account, and Payment Date, then save to generate the document
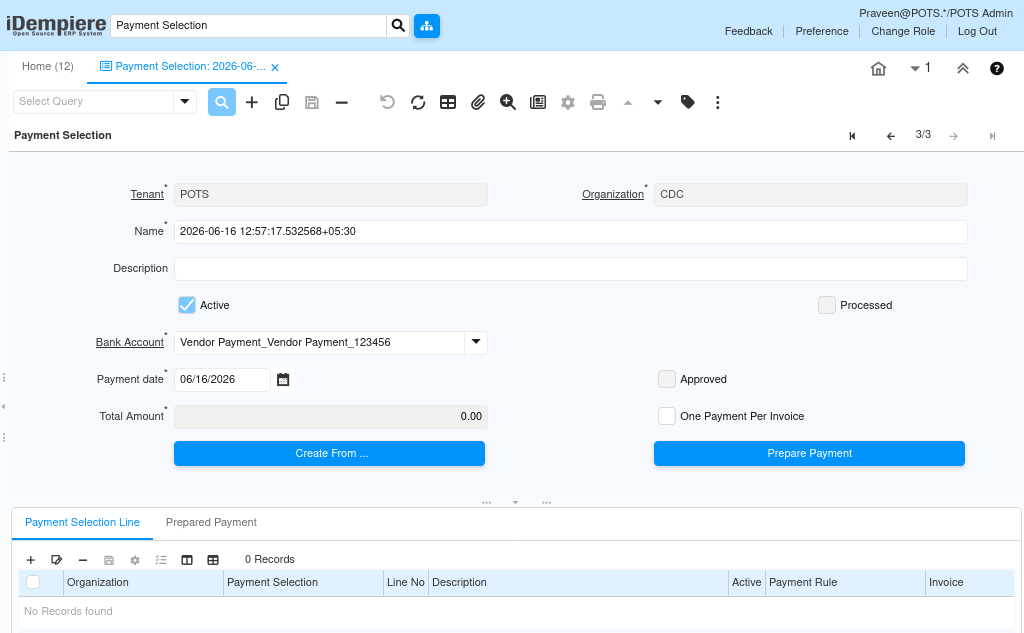
Header Configuration
| Field | Sample Value | Mandatory | Description |
| Organization | CDC | Yes | Organization processing the payment |
| Bank Account | Vendor Payment_123456 | Yes | Source account used for payment |
| Payment Date | 16-Jun-2026 | Yes | Date the payment batch is processed |
| One Payment Per Invoice | Unchecked | No | Creates a separate payment per invoice when enabled |
| Total Amount | Auto Calculated | Auto | Sum of selected invoice amounts |
Save the record.
A new Payment Selection document is successfully created.
Step 2: Generate Payment Selection Lines (Create From)
Create From retrieves vendor invoices that are eligible for payment based on the configured filters.
- Click Create From on the Payment Selection header.
- Set filters such as Only Due, Only Positive Balance, and Payment Rule, then click OK to pull eligible invoices.
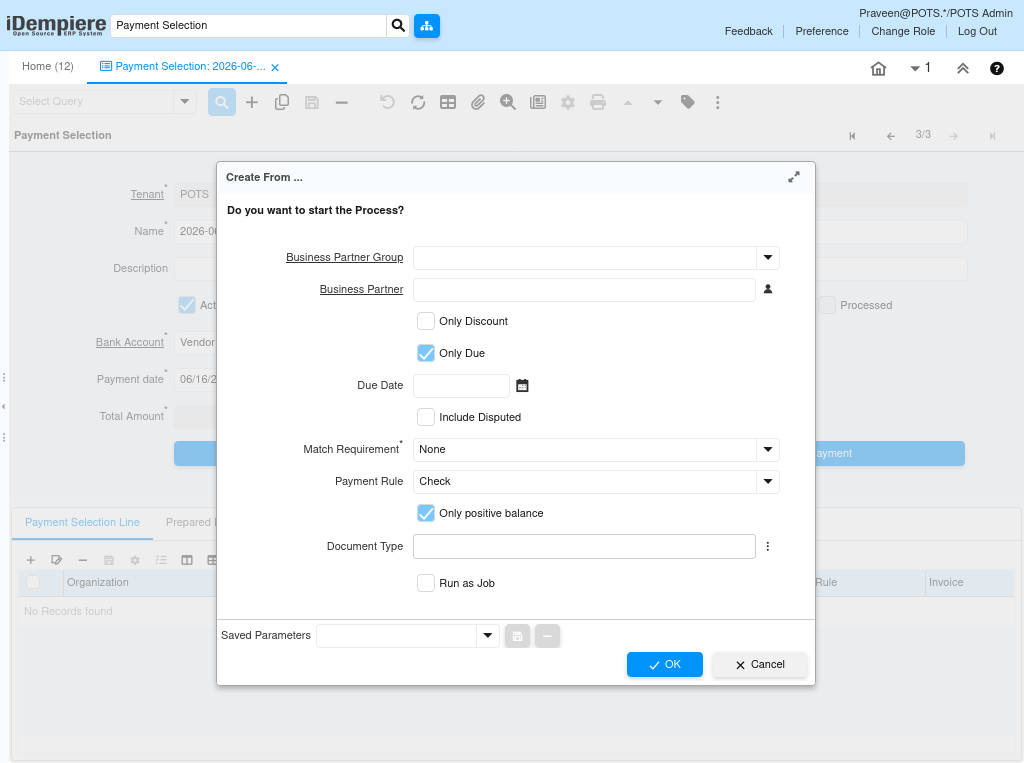
Create From Parameters
| Field | Sample Value | Description |
|---|---|---|
| Business Partner Group | Blank | Restrict vendor group |
| Business Partner | Blank | Restrict specific vendor |
| Only Discount | Unchecked | Select discount-eligible invoices only |
| Only Due | Checked | Select invoices currently due |
| Due Date | Current Date | Due date filter |
| Include Disputed | Unchecked | Include disputed invoices |
| Match Requirement | None | Invoice matching requirement |
| Payment Rule | Check | Invoice payment method |
| Only Positive Balance | Checked | Select invoices with balance due |
| Document Type | Blank | Restrict invoice document type |
| Run as Job | Unchecked | Background execution |
Eligible AP Invoice records are added as Payment Selection Lines.
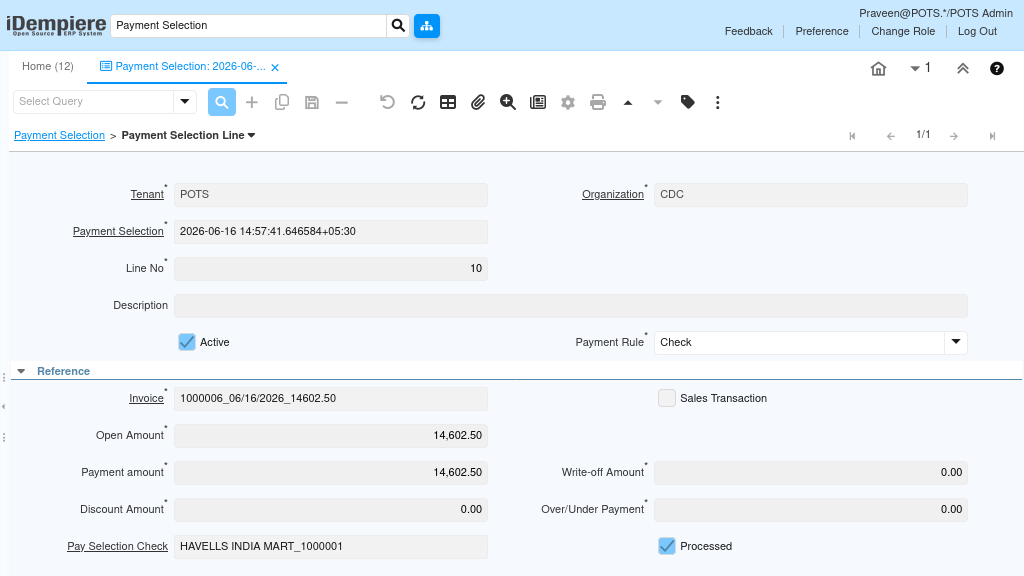
Step 3: Review Payment Selection Line
Reviewing the line confirms invoice and payment details before payment preparation.
- Open the generated Payment Selection Line and verify Invoice, Payment Rule, Open Amount, and Payment Amount before proceeding.
| Field | Sample Value | Mandatory | Description |
| Invoice | 1000006_06/16/2026_14602.50 | Auto | Selected invoice reference |
| Payment Rule | Check | Yes | Payment method applied to the line |
| Open Amount | 14,602.50 | Auto | Outstanding invoice amount |
| Payment Amount | 14,602.50 | Yes | Amount to be paid |
| Discount Amount | 0.00 | No | Discount applied to the payment |
| Write-off Amount | 0.00 | No | Amount written off, if any |
Step 4: Prepare Payments
Prepare Payment converts the selection line into a payment instruction prior to actual payment generation.
- Click Prepare Payment on the Payment Selection header.
- Leave Override Payment Rule blank unless changing the method, then click OK.
Prepare Payment Parameters
| Field | Sample Value | Mandatory | Description |
| Override Payment Rule | Blank | No | Replaces the invoice payment rule if set |
| Run as Job | Unchecked | No | Runs the process in the background |

The system creates Prepared Payment records.
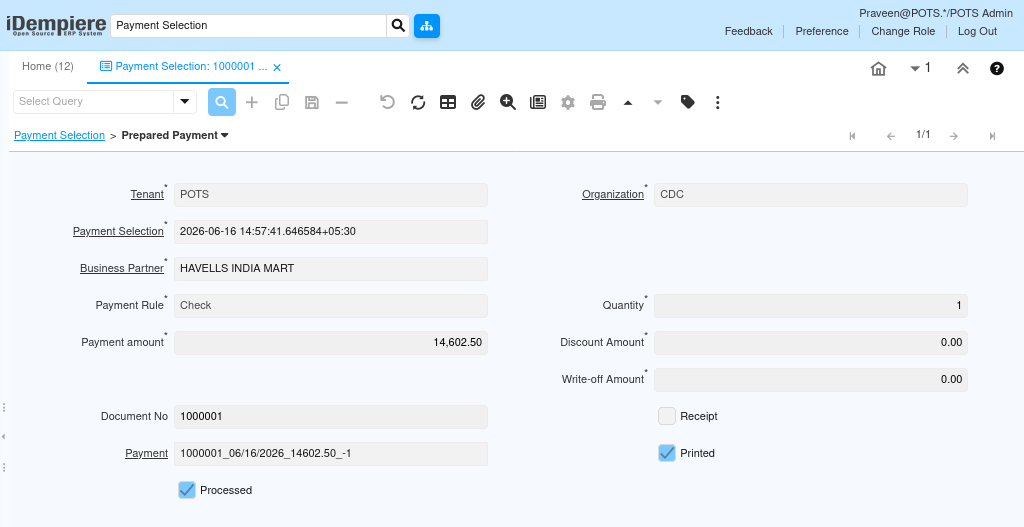
Step 5: Review Prepared Payment
The Prepared Payment confirms the payment instruction before the actual payment is generated.
- Open the Prepared Payment tab and verify Business Partner, Payment Rule, and Payment Amount.
- Processed and Printed remain unchecked at this stage.
| Field | Sample Value | Mandatory | Description |
| Business Partner | HAVELLS INDIA MART | Auto | Vendor receiving the payment |
| Payment Rule | Check | Auto | Payment method carried from the line |
| Payment Amount | 14,602.50 | Auto | Amount to be paid to the vendor |
| Document No | 1000000 | Auto | Prepared Payment reference number |
| Processed | Unchecked | Auto | Updates after Payment Print/Export |
At this stage, no actual payment exists yet. Prepared Payment exists and is awaiting payment generation.
Step 6: Configure Bank Account Document
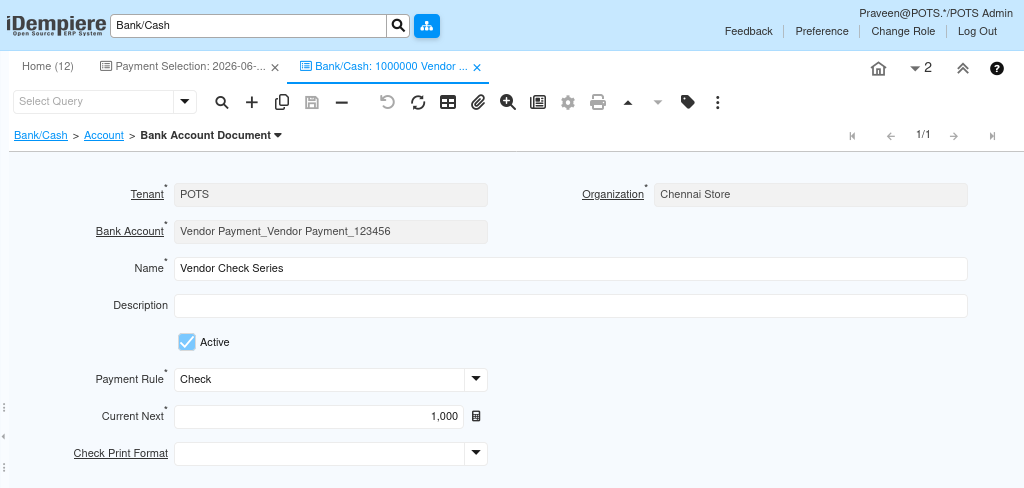
A valid check sequence must exist before checks can be generated for the bank account.
- Navigate to Bank Account Document under Cash Management.
- Create a record with Payment Rule set to Check and assign a Current Next number for the Bank Account.
| Field | Sample Value | Mandatory | Description |
| Name | Vendor Check Series | Yes | Identifies the check document series |
| Payment Rule | Check | Yes | Restricts the series to check payments |
| Current Next | 1000 | Yes | Next check number to be issued |
| Bank Account | Vendor Payment_123456 | Yes | Bank account linked to the series |
Step 7: Execute Payment Print/Export
This step generates the actual AP Payment from the Prepared Payment and assigns check numbers.
- Navigate to Payment Print/Export, select the Payment Selection, and confirm the prompt to create and complete payments.

| Field | Sample Value | Description |
| Prompt | Is the payment print correct? | Confirmation shown before payment creation |
| Action | Click Yes | Creates and completes the AP Payment |

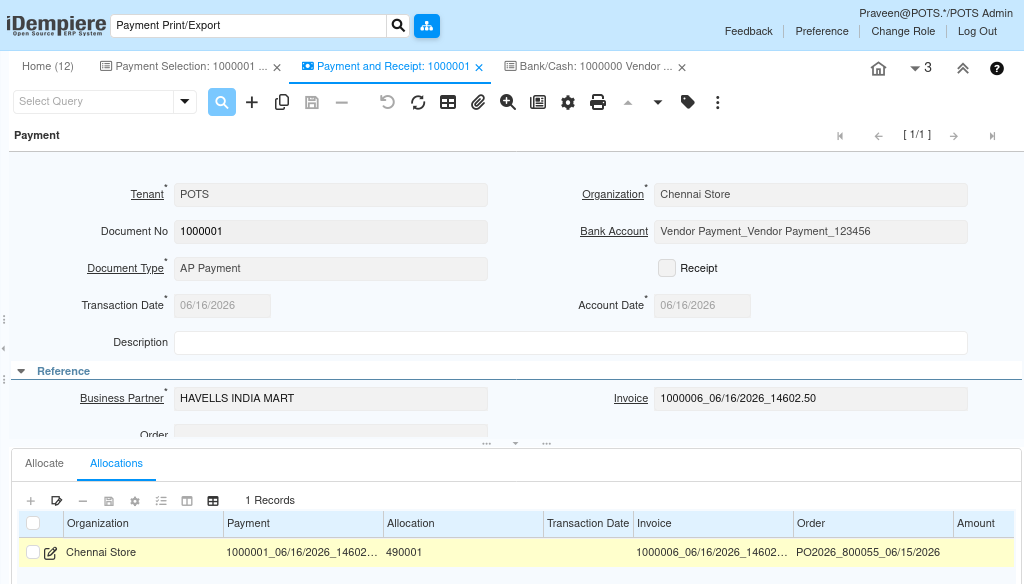
Step 8: Verify the Generated AP Payment
Confirms the payment document was created and posted correctly against the vendor.
- Open the generated Payment document and verify Document Type, Payment Amount, Tender Type, Check No, and Document Status.
| Field | Sample Value | Mandatory | Description |
| Document Type | AP Payment | Auto | Identifies the payment document type |
| Payment Amount | 14,602.50 | Auto | Amount paid to the vendor |
| Tender Type | Check | Auto | Payment method used |
| Check No | 1000001 | Auto | Generated check number |
| Document Status | Completed | Auto | Confirms the payment is finalized |
| Posted | Yes | Auto | Confirms accounting entries are posted |
Step 9: Verify AP Invoice Settlement
Confirms the invoice is fully settled once the payment has been allocated.
- Open the AP Invoice and confirm the Paid checkbox is enabled, with Document Status remaining Completed and Posted.
| Field | Sample Value | Mandatory | Description |
| Invoice | 1000006 | Auto | Settled invoice reference |
| Grand Total | 14,602.50 | Auto | Total invoice amount |
| Paid | Checked | Auto | Confirms the invoice is fully settled |
| Document Status | Completed | Auto | Confirms the invoice remains finalized |
The AP Invoice is fully paid and removed from outstanding payables.

Common Issues and Resolutions
| Issue | Cause | Resolution |
| No Payment Selection Lines generated | Invoice not eligible for payment | Verify invoice status, due date, balance, and payment rule. |
| Payment Selection Line not created | Payment Rule mismatch | Ensure Invoice Payment Rule matches Payment Selection Payment Rule. |
| Prepared Payment not generated | No Payment Selection Lines available | Generate Payment Selection Lines first. |
| “No Bank Account Documents (Checks)” error | Missing Bank Account Document configuration | Create a Bank Account Document with the Check payment rule. |
| Payment not created after Prepare Payment | Payment Print/Export not executed | Execute Payment Print/Export. |
| Invoice remains unpaid | AP Payment not completed or allocated | Verify the Payment document status and allocation. |
| Check number not assigned | Bank Account Document sequence exhausted | Update Current Next on the Bank Account Document. |
| Payment Selection Line is read-only | Line has already been processed | Create a new Payment Selection for additional invoices. |
Next Steps
Continue periodic payment processing using Payment Selection.
- Verify AP Payment accounting entries.
- Reconcile the payment with the bank statement.
- Review vendor account balances.
- Monitor and maintain Bank Account Document sequences.