How to Configure Bank/Cash in iDempiere
Introduction
The Bank/Cash window in iDempiere stores every bank and cash account a business uses to receive and pay funds.
Retail stores use it to record POS cash collections, bank deposits, and account details for each store location.
It supports card payment processing, statement loading, and accounting entries linked to sales and purchase transactions.
Process Flow

Business Rules
- Active accounts are available for use in transactions.
- Default account is used automatically when no account is specified.
- Each bank account requires a currency and a bank account type.
- Own Bank marks the account as belonging to the company, not an external bank.
- Document sequence settings assign receipt numbers automatically at save.
- Accounting values must be set per accounting schema before postings are made.
- Only one accounting record is required per bank account per schema.
- Payment processor details apply only when card payments are accepted.
Prerequisites
- Organization configured (e.g., CDC).
- Currency configured (e.g., INR).
- Accounting Schema configured.
- Document sequence naming convention defined.
- Payment Processor configured, if accepting card payments.
Navigation
Menu → System Admin → Organization Rules → Bank/Cash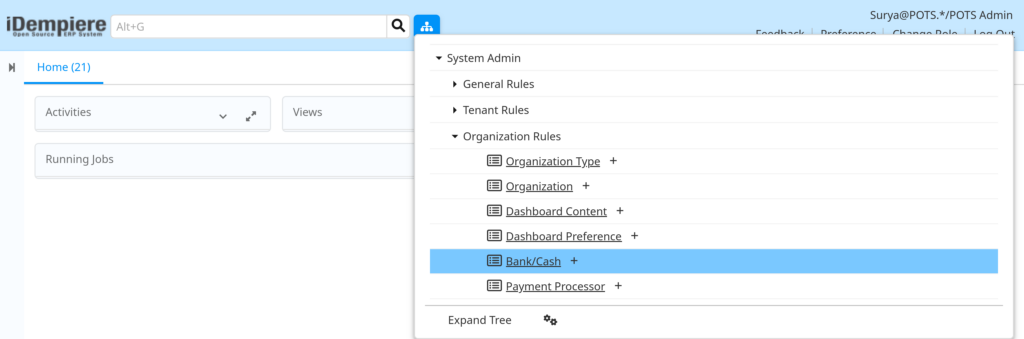
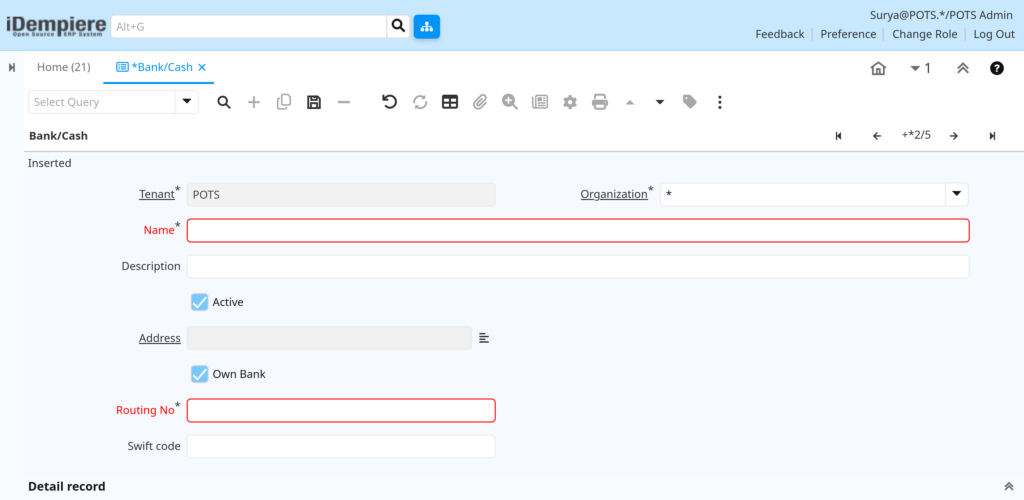
Opening the window shows the list of existing bank and cash accounts along with Tenant, Organization, Name, Description, Active status, Address, Own Bank, Routing No, and Swift code. The Account tab at the bottom lists the linked account records.
Configuration Steps
Step 1: Set Up the Bank Header
The header record identifies the bank or cash source before any account can be linked to it.
Instructions
Enter the bank name and description. Mark Active. Select Own Bank for internal cash sources such as a POS till. Add the Routing No, and Swift code if it is an external bank.
| Field | Sample Value | Description |
| Name | POS Cash | Identifies the bank or cash source. |
| Description | Cash collection account used for retail POS transactions | Explains the purpose of the source. |
| Active | Checked | Makes the record available for use. |
| Own Bank | Checked | Marks the source as company-owned cash, not an outside bank. |
| Routing No | 100001 | Identifies the bank or cash source for reference. |
| Swift code | Blank | Used only for international bank transfers. |

Step 2: Configure the Account Details
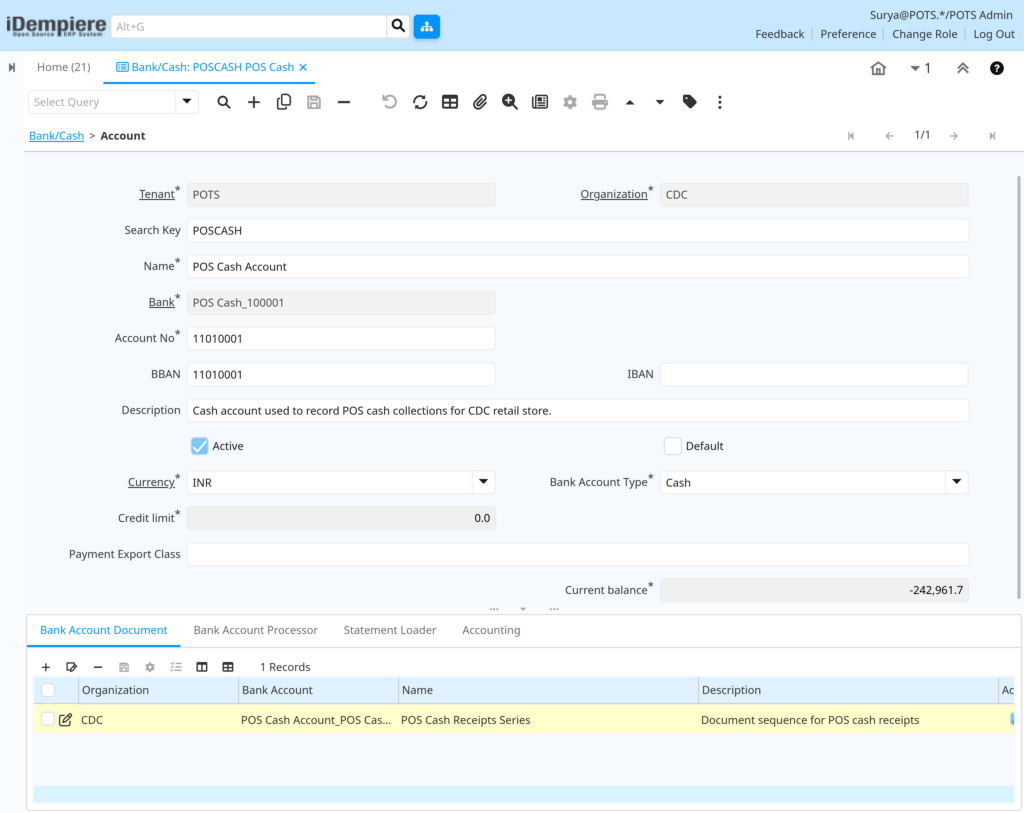
The account record defines the specific account used to record receipts and payments.
Instructions
Enter a Search Key and Name, select the parent Bank, and set the Account No. Choose the Currency and Bank Account Type. Mark Active, and set Default if this account should be selected automatically.
| Field | Sample Value | Description |
| Search Key | POSCASH | Short code used to find the account quickly. |
| Name | POS Cash Account | Full name of the account. |
| Bank | POS Cash_100001 | Bank or cash source this account belongs to. |
| Account No | 11010001 | Unique account number for the record. |
| Currency | INR | Currency used for all transactions on this account. |
| Bank Account Type | Cash | Identifies the account as cash, checking, or savings. |
| Credit limit | 0.0 | Maximum negative balance allowed on the account. |
| Current balance | System calculated | Running balance based on posted transactions. |
Step 3: Set Up the Document Sequence
A document sequence generates the receipt or payment numbers used each time this account is used.
Instructions
Add a Bank Account Document record. Enter a Name and Description, mark Active, choose the Payment Rule, and confirm the Current Next number.
| Field | Sample Value | Description |
| Name | POS Cash Receipts Series | Identifies the numbering series. |
| Description | Document sequence for POS cash receipts | Explains the purpose of the series. |
| Payment Rule | Cash | Type of payment this series applies to. |
| Current Next | 1,000 | Next number to be assigned to a new document. |
| Check Print Format | Blank | Print layout used for check documents, if applicable. |
Step 4: Configure the Payment Processor
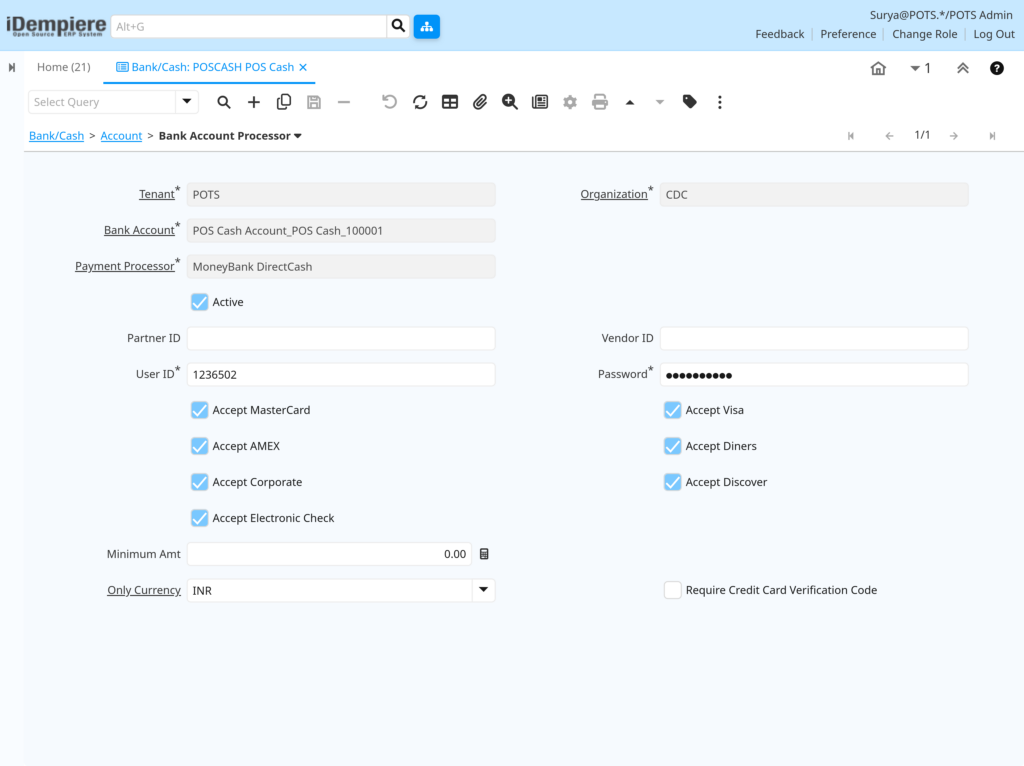
This step is required only when the account accepts card payments through a payment gateway.
Instructions
Select the Payment Processor, mark Active, and enter the User ID and Password supplied by the processor. Select the accepted card types and set a Minimum Amt and Only Currency if needed.
| Field | Sample Value | Description |
| Payment Processor | MoneyBank DirectCash | Service that authorizes card payments. |
| User ID | 1236502 | Login used to connect to the processor. |
| Password | Hidden | Password used to connect to the processor. |
| Accept MasterCard / Visa / AMEX / Diners / Corporate / Discover / Electronic Check | Checked | Card types this account will accept. |
| Minimum Amt | 0.00 | Smallest transaction amount allowed. |
| Only Currency | INR | Restricts processing to a single currency. |
| Require Credit Card Verification Code | Unchecked | Controls whether CVV entry is mandatory. |
Step 5: Set Up the Statement Loader (Optional)
The statement loader automatically brings in bank statement files so cash and bank entries can be matched and reconciled.
Instructions
Enter a Name for the loader, provide the Host Address and Host port, and add the File Name and Statement Loader Class supplied by the bank. Fill Date Format if the statement uses a specific date layout.
| Field | Sample Value | Description |
| Name | Required entry | Identifies the statement loader setup. |
| Host Address | Bank server address | Location the statement file is retrieved from. |
| Host port | 443 | Connection port used to reach the host. |
| File Name | Statement file name | Name of the file to be loaded. |
| Statement Loader Class | Loader routine | Determines how the statement file is read. |
| Date Last Run | System filled | Shows when the loader last ran. |
Step 6: Assign Accounting Details
Accounting values link the account to the ledger accounts used when transactions are posted.
Instructions
Select the Accounting Schema, mark Active, and confirm the Bank Asset, Bank In Transit, Payment Selection, Unallocated Cash, Bank Interest Expense, and Bank Interest Revenue accounts.
| Field | Sample Value | Description |
| Accounting Schema | POTS UN/38 Indian Rupee | Set of accounting rules this record follows. |
| Bank Asset | *-B_ASSET-_-_-_ | Account used to record the account balance. |
| Bank In Transit | *-B_INTRANSIT-_-_-_ | Account used for funds not yet cleared. |
| Payment Selection | *-B_PAYMENTSELECT-_-_-_ | Account used when payments are selected for processing. |
| Unallocated Cash | *-B_UNALLOCATEDCASH-_-_-_ | Account used for cash not yet applied to an invoice. |
| Bank Interest Expense | *-B_INTERESTEXP-_-_-_ | Account used for interest charges on the account. |
| Bank Interest Revenue | *-B_INTERESTREV-_-_-_ | Account used for interest earned on the account. |

Common Issues and Resolutions
| Issue | Cause | Resolution |
| Account does not appear during payment entry. | Active checkbox is unchecked. | Mark the account record Active and save. |
| Wrong currency error when entering a payment. | Account currency does not match the transaction currency. | Set the account Currency to match the transaction, or select the correct account. |
| Receipt numbers are not generated. | No Bank Account Document record exists. | Create a Bank Account Document entry with a Payment Rule and Current Next number. |
| Card payments fail at the register. | Payment Processor details are missing or incorrect. | Enter the processor User ID, Password, and accepted card types. |
| Accounting entries are missing after posting. | Accounting tab was not completed for the schema. | Fill in all required accounts on the Accounting tab and save. |
| Statement Loader does not import data. | Host Address, port, or file details are incorrect. | Verify the connection details supplied by the bank. |
| Two accounts look identical in search results. | Search Key naming is not distinct. | Use a clear, unique Search Key for each account. |
| Account balance shows an unexpected negative value. | Cash receipts or payments have not been reconciled. | Review and reconcile entries using the linked bank statement. |
Next Steps
- Configure the Payment window to record customer and vendor payments.
- Set up Cash Journal for daily cash count and closing.
- Complete Bank Statement Matching for reconciliation.
- Configure Document Types linked to this bank account.