How to Assign User Roles in Odoo
Managing user access is an essential part of maintaining security, accuracy, and smooth operations within the system. Every user can be assigned specific roles, and these roles determine what parts of the system they can access and what actions they are permitted to perform. With proper role assignment, organizations can create secure workflows, avoid unauthorized access, and ensure that users only interact with the areas relevant to their responsibilities.
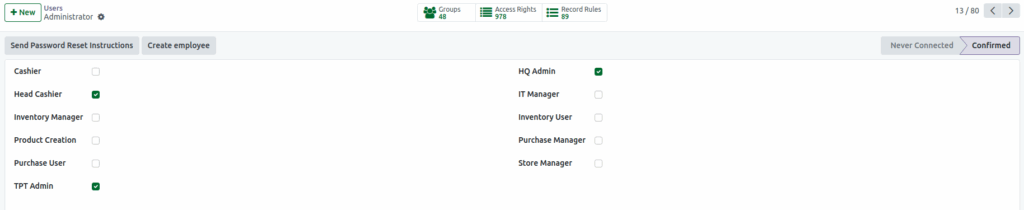
Navigating to the User Page
To begin assigning roles, first navigate to the User Page. This can be done by going to Settings, then Users & Companies, and selecting Users. Once you are inside the User Master, open the profile of the user whose permissions you want to update.
Assigning Cashier Role
Assigning the Cashier role is simple. Enable the Cashier checkbox in the Access Roles section and then select the appropriate terminal under the Point of Sale tab. The system will automatically assign Point of Sale access to the user under the Sales module.
Assigning Head Cashier Role
For the Head Cashier role, enable the Head Cashier checkbox in the Access Roles section. After enabling it, select all available terminals under the Point of Sale tab, and the Sales module will automatically assign the user to Point of Sale.
Assigning Purchase User Role
When assigning the Purchase User role, enable the Purchase User checkbox. The Inventory module will automatically grant the user access to both Inventory and Purchase. In the Accounting module, the system will automatically assign the user to Invoicing for billing purposes.
Assigning Purchase Manager Role
Assigning the Purchase Manager role follows the same process. Once the Purchase Manager checkbox is enabled, the user is automatically given access to both Inventory and Purchase under the Inventory module, and Invoicing access is set by default in Accounting.

Assigning Inventory User Role
To assign the Inventory User role, simply enable the Inventory User checkbox. The system will automatically grant the user access to both Inventory and Purchase under the Inventory module.
Assigning Inventory Manager Role
The Inventory Manager role functions similarly. After enabling the Inventory Manager checkbox, the user is automatically assigned access to both Inventory and Purchase.
Assigning HQ Admin Role
Assigning the HQ Admin role provides the user with elevated system-wide privileges. By enabling the HQ Admin checkbox, the system automatically assigns administrator access for Sales and Inventory. In the Accounting module, Billing Administrator access for Invoicing is set, and in the Administration module, Settings access is automatically granted.
Assigning TPT Admin Role
If the user needs to hold the TPT Admin role, enable both the TPT Admin and HQ Admin checkboxes. The system then assigns administrator rights for HHT Roles, Sales, and Inventory. Billing Administrator access for Invoicing is enabled in the Accounting module, and Settings access is granted in the Administration module.
Assigning IT Manager Role
To assign the IT Manager role, enable the IT Manager checkbox. The user will receive Point of Sale access under the Sales module and Administration Access Rights under the Administration module.
Assigning Store Manager Role
To assign the Store Manager role, enable the Store Manager checkbox. The user is then automatically given access to HHT Roles, Sales, and Inventory. In the Accounting module, billing access is assigned for Invoicing.

Assigning the right user roles in the system ensures each user has the appropriate access needed for their responsibilities. Whether it’s a cashier, purchasing team member, store manager, IT specialist, or administrator, the correct role setup improves efficiency while maintaining control across all system operations.
