How to Create a Credit Note for a GR Bill in Odoo
A Credit Note is automatically triggered when the Goods Receipt Bill quantity exceeds the
Purchase Order quantity.
Purchase Order Process
- Select the Vendor from the Vendor Field.
- Select the Product in the Product Field.
- After save the order, PO reference id is automatically generated.
- Click the Confirm Order to place the purchase order.
Validate the GR to Proceed
- Click the Receive Product you will be automatically redirected to the GR page.
- Enter the Inward Register Number as required.
- After entering the Inward Register Number, save it.
- Click the validate button.
How to Enter Bill Details in GR Bill
- Click GR Bill to be automatically redirected to the GR Bill screen.
- Enter the Vendor Bill Number in the Bill Number field.
- Enter the bill amount, taxable amount, and tax amount in their respective fields.
Automatic Credit Note Creation
Once the GR is validated, enter the bill amount in the GR Bill. You will then notice that the bill quantity exceeds the PO quantity, which usually happens due to a manual error.
Example
- PO quantity : 1
- Bill quantity : 3

Confirmation Step: After clicking the “Confirm” button on the GR Bill, a Credit Note pop-up appears.
Credit Note Pop-Up
- The user is prompted to enter a reason for the return (e.g., excess supply, damaged items, etc.).
- Upon clicking “Create Auto Credit Note”, the system:
- Automatically generates a Credit Note for the excess quantity.
- Issues a Vendor Return Bill.
- Finalizes the GR Bill with updated quantities.
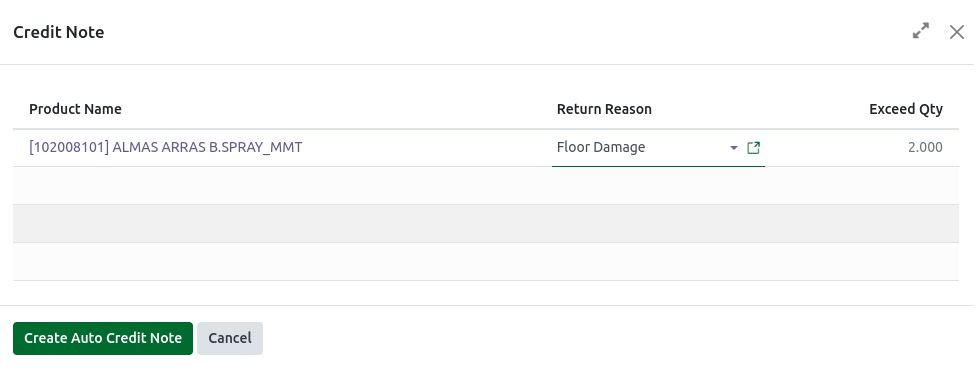
Create Auto Credit Note
Click Create Auto Credit Note. The exceeded quantity and bill amount will be returned to the vendor, and two GR Bills will be generated: a Return GR Bill and a Normal GR Bill.

Note: The Return Bill is generated in the following format: RBILL/YYYY/MM/XXXX (e.g., RBILL/2025/11/0001).
