How to Create a GR Bill from a Goods Receipt in Odoo
In Odoo, the GR Bill (Goods Receipt Bill) plays an important role in managing the purchasing and accounting workflow. It helps confirm that goods have been received accurately, ensures that invoices match received quantities, and supports efficient payment processing while maintaining accurate inventory and financial records.
Confirming the Receipt of Goods
Begin the process of confirming received goods by opening the Purchase module in Odoo and click ‘New’ to create a Request for Quotation (RFQ). After completing the Purchase Order (PO) and Goods Receipt (GR) process, validate the GR before proceeding.
Before creating a GR Bill, it is essential to confirm the Goods Receipt (GR). When the control policy is set to ‘On Received Quantities’ in a product master’s Purchase tab, the products and quantities received are used to generate a draft bill. A bill is created only after part of the order has been received.

The system will display a validation “Invalid Operation: There is no invoiceable line. If a product has a control policy based on received quantity, please make sure that a quantity has been received.” if a GR Bill creation is attempted without receiving any goods. Therefore, validation is a necessary step to ensure data accuracy and compliance within the workflow.
Creating the GR Bill
Once the Goods Receipt has been validated, you can begin the GR Bill creation process by clicking the ‘Create GR Bill’ button.
The GR Bill screen displays all key details related to the vendor and the transaction. The vendor name is automatically populated, and the system does not allow changes to the vendor. Attempting to modify the vendor will trigger a validation error “Vendor must match the purchase order vendor for all invoice lines”.
Each GR Bill has a unique Bill Number given by the vendor, which serves as an identifier for tracking and audit purposes. When the GR Bill field is left empty then system displays the alert “Invalid fields: Reference”
The Place of Supply field shows the location where the goods were supplied, while the GST Treatment field displays the vendor’s GST status.
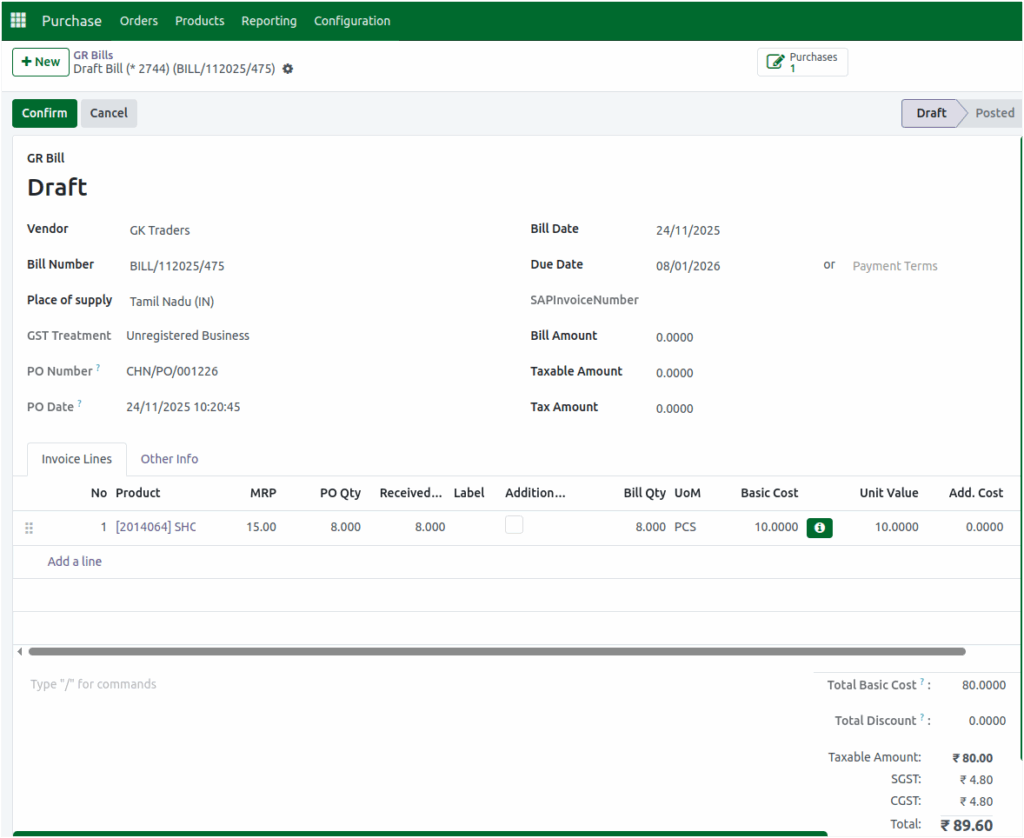
One common rule is related to the relationship between the Purchase Order (PO) date and the Goods Receipt (GR) bill date. If the bill date entered is earlier than the PO date, the system will automatically stop the process and display a message saying “Invalid Operation: Bill Date should not be less than PO Date.” This prevents inconsistencies and ensures that bills are always recorded only after the corresponding purchase order has been created.
Another important aspect in vendor management is the handling of payment terms. When payment terms are already defined for a vendor, the system not displays the due date date field. However, if no payment terms are selected for the vendor, then the user must provide a due date to ensure proper tracking of payments. This helps maintain smooth payment cycles and avoids delays or errors in vendor settlements.
Managing Products
The Invoice Lines tab in the GR Bill lists all the products received in the corresponding Goods Receipt. It displays product details, quantities, and prices, allowing users to verify that all received items are ready for billing.

Confirming the GR Bill
Once all details have been verified, the final step is to confirm the GR Bill. Enter the Bill Amount, Taxable Amount, and Tax Amount according to the vendor’s bill receipt and click the ‘Confirm’ button to complete the process. After confirmation, Odoo automatically generates a unique GR Bill document number, such as BILL/2025/11/0039. This number appears at the top of the GR Bill screen and serves as a permanent reference for tracking, reporting, and audits.

