How a Purchase Order is Triggered by an Automatically Reordering Rule in Odoo.
An automatic reordering rule helps manage stock levels by automatically reordering products.
The rule is triggered when stock falls below a predefined threshold. It ensures that stock is replenished
without manual intervention.
Configuring MBQ in Products
Open the Product Master in Inventory → Select Product. In the product’s MBQ tab, set Sales Classification, Company and Scheduled Days. Go to Settings → Technical → Scheduled Actions
and select MBQ Process. Run the scheduler manually or set it to run automatically. Verify
Min/Max Quantities in the product after running the scheduler.

Verifying Details Using Formulas
    • Average Sold Quantity per Day = Total Sold Quantity ÷ MBQ Days
    • Minimum Stock = Average Sold Quantity × Stock Holding Days
    • Maximum Stock = Average Sold Quantity × Reorder Level Days
    • Forecasted Stock = On Hand + Incoming − Outgoing
    • To Order Quantity = Maximum Stock − Forecasted Stock
Create Purchase Orders
- Go to the Replenishment screen in the Inventory module.
- All MBQ-configured products and their details will be displayed on that screen.
- Set the Trigger to Auto and edit the details if needed.
- Select Run Scheduler in Inventory → Operations.
- Click Run Scheduler.

A Purchase Order is generated automatically.
Verifying Purchase Orders
- Navigate to the Purchase module.
- In the RFQ screen, the POs generated automatically from MBQ will be displayed.

- If the selected products have the same vendor, only one PO is generated.
- If there are different vendors, separate POs are generated.
- When a PO is generated from MBQ, the RFQ screen’s source document field will display like OP/00011.
- Open the particular PO, verify the vendor, order quantity and product details.
- Continue to complete the PO.

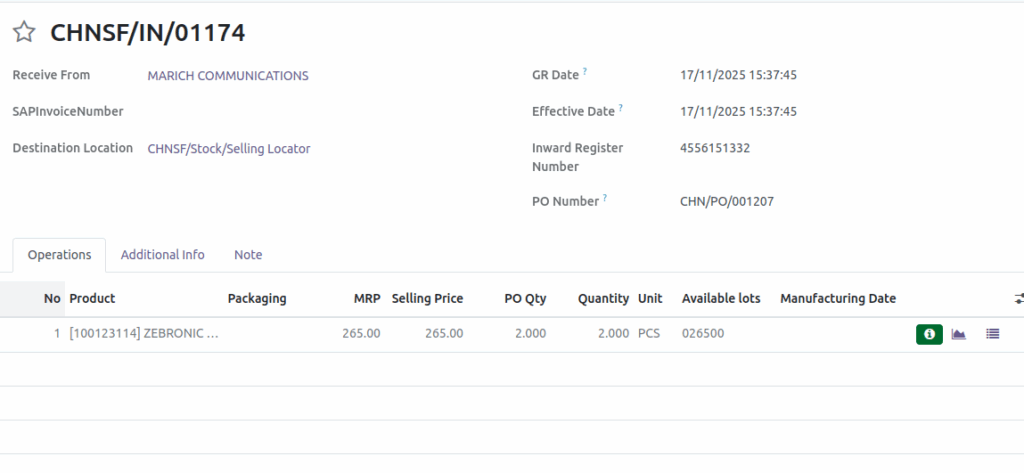
Verify Good Receipt in Automatic Reordering Rules
Once you click Receive Products, the system automatically opens the GR (Goods Receipt). In the GR, select the Destination Location as required. The user must enter the Inward Register Number before validating the GR. After that, verify the purchased product quantities and click Validate.
Verify Good Receipt Bill in Automatic Reordering Rules
In the GR Bill, the Bill No field is mandatory. You must also enter the bill amount, taxable amount, and tax amount. Once the GR Bill is confirmed, a GR Bill Number is generated.

