How the Invoicing Policy Works in Odoo Sales
In Odoo Sales, the Invoicing Policy is used in Sales to manage Invoicing requests for the payment for goods or service. It is a formal agreement between the buyer and the seller. There are two type of invoicing policy Ordered Quantity and Delivery Quantity.
How to Configure the Invoicing Policy
To configure the Invoicing policy go to Sales app ‣ Configuration ‣ Settings, and under the Invoicing heading, select an Invoicing Policy rule: Invoice what is ordered or Invoice what is delivered.

How to configure the Ordered Quantity and Delivery Quantity
To configure the Ordered or Delivery quantity, on the choose the specific product, in the general information Invoicing policy field will occur when click it drop down will occur Ordered quantities and Delivery Quantities
- Ordered Quantities – Invoice is generated based on the quantity ordered, even if the products are not delivered yet.
- Delivered Quantities – Invoice is generated only after the products are delivered.
Choose the Ordered Quantities
Choosing Ordered Quantities allows you to create invoices even before the delivery order is completed.

Once the configuration is done, go to the sales module to create a new quotations. Select the customer and then invoice and delivery address automatically filled. In the Order Lines choose the product and lot that will be delivered to customer. After checking all the details, click Confirm the Sales Order.

The delivery button will appear, but now we click ‘Create Invoice’, and the system allows us to create the invoice. Once you click it, a popup will open to create an invoice. Choose any payment term, and to create a draft invoice, click Create Draft Invoice.

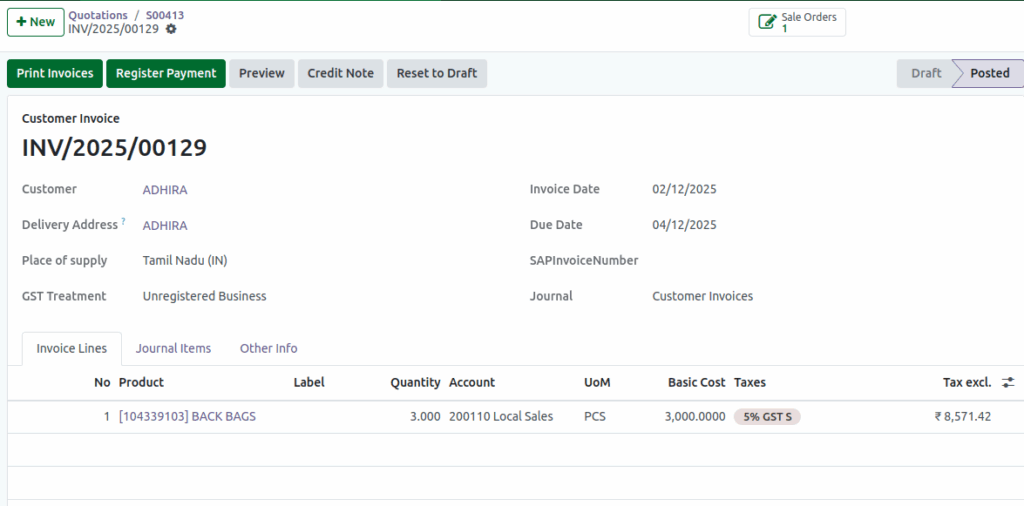
Once you click Confirm on the invoice page, the system generates the invoice. You can review all the details, including customer information, products, quantities, and payment terms. After verifying, the invoice is ready for processing or sending.
Choose the Delivered Order
Choosing delivered quantities allows you to create invoices even after the delivery order is completed.

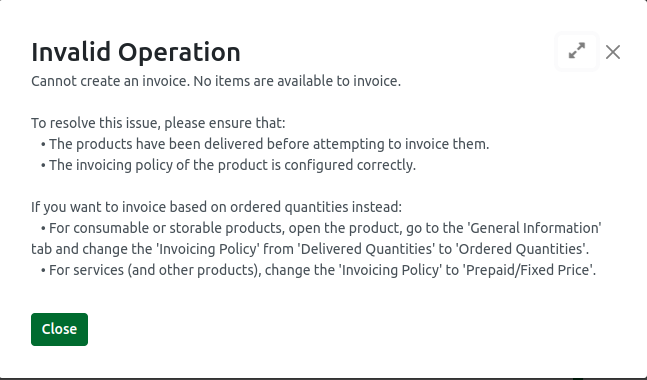
Once the configuration is done, go to the Sales module to create a new quotation. Select the customer, and the invoice and delivery addresses will be filled automatically. In the Order Lines, choose the product and lot that will be delivered to the customer. After verifying all the details, click Confirm on the Sales Order. The Delivery button will appear. If you click ‘Create Invoice’, an Invalid Operation error may occur, preventing the delivery order from being completed.
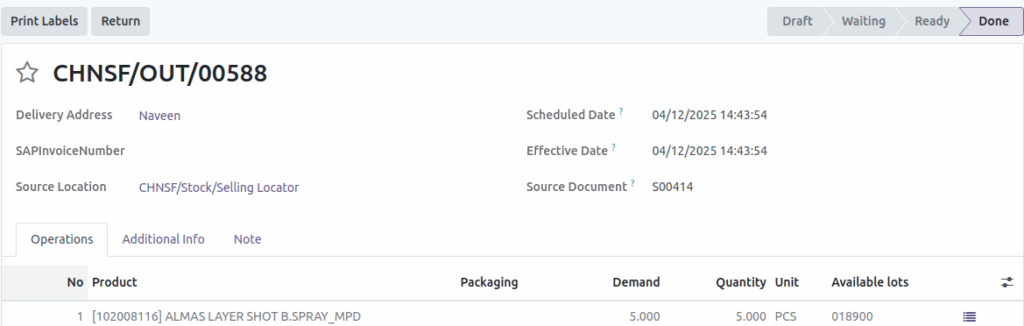
Once the Sales Order is confirmed, it becomes locked. Click Delivery to view the Delivery Order. Check the product availability. If the product is not available, you cannot proceed with completing the Delivery Order, and a validation error will occur.
Once you change the correct source location, the product availability will show as Available. The Source Document will also display correctly based on the Sales Order number (e.g., S00405). You can change the Scheduled Date, but it is not necessary. The Delivery Order ID will be generated automatically. In the Operations tab, you will see the product, quantity, and unit price pulled from the confirmed Sales Order. Once you Validate the Delivery Order, the product will be dispatched and delivered to the customer’s address.
Click Create Invoice. A popup will open to create the invoice. Choose any payment term, and to create a draft invoice, click Create Draft Invoice. Once you click Confirm on the invoice page, the system generates the invoice. You can review all the details, including customer information, products, quantities, and payment terms. After verification, the invoice is ready for processing or sending.

