How To Configure Custom POS features in Odoo?
Configuring custom POS features in Odoo depends on whether you are looking for simple no-code adjustments (via settings and apps) or technical code overrides (custom module development)
To configure custom POS features in Odoo:
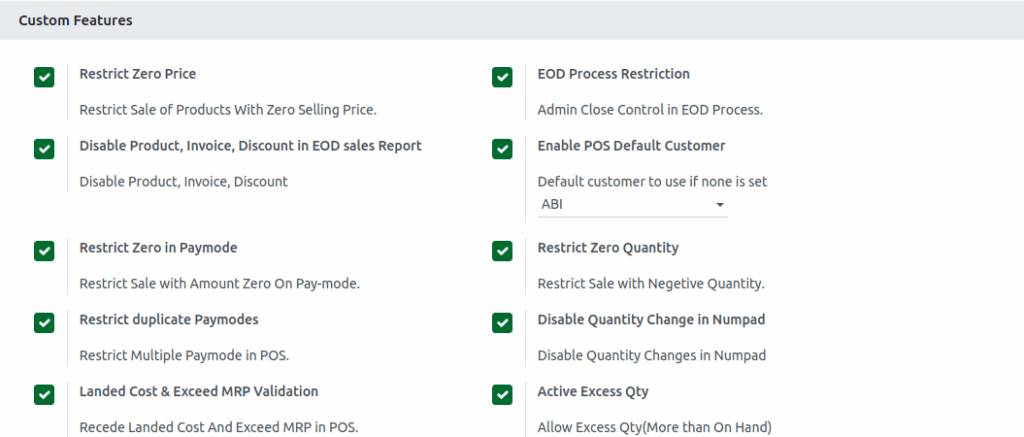
Open the Point of Sale module, click on the Configuration menu, and select Settings. Choose the specific terminal you want to configure in the Point of Sale field, and then navigate to the POS Extended Receipt section.

Configure the Exact Search Setting
What to enable?
Restrict Zero Price
What will happen?
The system blocks payment processing if the total amount due is zero to ensure proper transaction handling. This helps avoid errors by restricting payment actions when the sale amount is zero or invalid.
Configure Disable Product, Invoice, Discount in EOD sales Report
What to enable?
Disable Product, Invoice, Discount in EOD Sales Report
What will happen?
The system removes product, invoice, and discount details from the End of Day sales report.
Configure Restrict Zero in Pay mode
What to enable?
Restrict Zero in Paymode
What will happen?
The system does not allow selecting a payment method if the amount to be paid is zero. It ensures that payment is allowed only when there is a valid amount due.
Configure Restrict duplicate Pay modes
What to enable?
Restrict Duplicate Paymodes
What will happen?
POS payments do not allow paying more than the bill amount through UPI or other digital methods. Only cash payments are allowed to exceed the bill amount.
Configure Landed Cost & Exceed MRP Validation
What to enable?
Landed Cost & Exceed MRP Validation
What will happen?
The system ensures that the product’s landed cost is correctly added to calculate the true cost. It also prevents selling products at prices higher than the allowed Maximum Retail Price (MRP), helping to avoid mistakes by verifying costs and MRP before completing a sale.
Configure EOD Process Restriction
What to enable?
Landed Cost & Exceed MRP Validation
What will happen?
It allows admins to close sessions if cashiers forget to do so. This ensures that POS sessions are always properly closed for accurate sales records.
Configure Enable POS Default Customer
What to enable?
Enable POS Default Customer
What will happen?
It allows you to set a specific customer as the default for all POS orders. The customer selected in the Default Customer dropdown will be automatically assigned to each sale.
Configure Restrict Zero Quantity
What to enable?
Restrict Zero Quantity
What will happen?
It prevents users from setting a product quantity to zero in the POS. This ensures that only valid quantities (1 or more) are allowed in orders and helps maintain accurate sales records by blocking zero-quantity lines.
Configure Disable Quantity Change in Numpad
What to enable?
Disable Quantity Change in Numpad
What will happen?
The quantity field will no longer be displayed on the POS screen.
Configure Active Excess Qty
What to enable?
Active Excess Qty
What will happen?
It allows selling products in the POS even if the quantity exceeds the available stock.