How to Manage POS Session closure in Head cashier Role in Odoo
Opening the POS Session
To begin operations, the Head Cashier logs into the system and opens the POS session. Access is granted either by scanning the badge or by selecting the appropriate cashier from the list displayed on the screen.
When the option to “Select a Head Cashier” is chosen, the interface shows all available head cashiers and cashiers, allowing the user to pick the correct profile and proceed into the store’s POS environment.
Accessing the Close Session Option
Once logged in, the cashier is taken to the main POS cart screen, where billing activities typically occur. To access session-related controls, the cashier opens the menu bar, which reveals a list of operational options. Selecting the “Close Session” button opens the Close Session popup window, where session-ending tasks and financial reconciliations are performed.
Opening and Closing Notes
The Close Session window presents two important fields: the Opening Note and the Closing Note. The Opening Note shows the opening cash value entered by the cashier at the start of the session, including the detailed breakdown of the money. The Closing Note, however, remains empty initially for the Head Cashier.

If the cashier attempts to close the session without entering denomination details, the system enforces validation by displaying the alert: “Please enter denomination before closing the session,” ensuring that no session is closed without accurate financial entries.
Entering and Saving Denomination
To record the counted cash, the cashier clicks the Rupee icon in the cash field, reviews the denomination details, and confirms the values. When the confirmation is submitted, the system updates the Closing Note with the entered cash information.
By clicking the Save Denomination option, the cashier finalizes the record, after which a confirmation popup appears stating, “Denomination saved successfully.” Once acknowledged, the denomination details are securely stored for the session.
Differences Display
During the reconciliation process, the POS automatically compares the expected amount with the counted amount and displays any differences in the Difference field. Variances are highlighted in red for quick visibility.
The system accurately identifies discrepancies across all payment modes where mismatches occur, giving the cashier complete clarity on which payments need attention before closing the session.

Handling Payment Differences
If differences remain unresolved and the cashier attempts to close the session, the system generates a Payment Difference popup asking, “Do you want to accept payment differences and post a profit/loss journal entry?” This safeguard helps prevent unintended accounting errors. The cashier can cancel the popup to return to the session and correct the discrepancies before proceeding with final closure.
Viewing Bank Details
Within the Close Session popup, the cashier can click the Bank button to view all bank details related to the session’s transactions. This section displays each bank associated with the cashier’s recorded payments along with the respective amounts. The same details are included in the Settlement Print, serving as a verified financial record for reconciliation and audit purposes.

Downloading the Denomination Print
Once denomination details are entered and saved, the cashier can generate the Denomination Print for documentation by clicking the Daily Sale option. This downloadable file contains a complete breakdown of the denominations submitted during the session, ensuring transparency and assisting with financial audits.
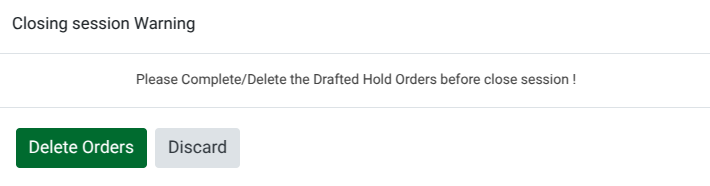
Handling Ongoing Orders
Before a session can be closed, the system checks for any drafted or held orders. If such orders exist, an alert appears stating, “Please complete/delete the drafted hold orders before close session!” This feature prevents incomplete transactions from staying in the system.
The cashier can delete these orders if necessary. Once all drafted orders are cleared, the validation no longer appears, allowing the cashier to continue with the session closure.
Confirming Session Closure
After all entries are verified and discrepancies resolved, the cashier clicks the Close Session button to complete the process. The system returns to the POS terminal screen, where the terminal that has been closed now displays a New Session button. This indicates that the session was successfully closed and the system is ready for the next cashier or the next operational cycle.
