How to View Customer Details in Odoo POS Customer Screen and Bill Receipt
Odoo POS makes it easy for users to find customer details, update their information in customer screen, and display those details on the bill receipt. This helps cashiers work faster and ensures customers get accurate information on every order. The POS system also supports multiple ways to add products and link customers to transactions, making billing smooth and efficient.
Opening and Searching the Customer Screen
Add products to the POS Cart. After adding a product, you can always update the quantity manually if needed. To view customer details, click the Customer icon on the POS screen or press Ctrl + C. This opens the customer list where you can search for a specific customer.
Inside this screen, click the Search icon or press Shift, then type the customer’s name. The system will show matching results as you type. This makes it easy to find the correct customer quickly during billing.
Understanding Customer Information in Search Results
The search results show key details to help identify the right customer. The Name comes from the name entered during customer creation. The Address is automatically generated by combining fields such as street, zip code, city, state, and country.
The Type shows the customer category, and customers created directly in POS are always marked as “Person.” The Contact section displays information from the mobile number, phone, and email fields. You can also see the customer’s loyalty points balance, making it easy to track rewards.
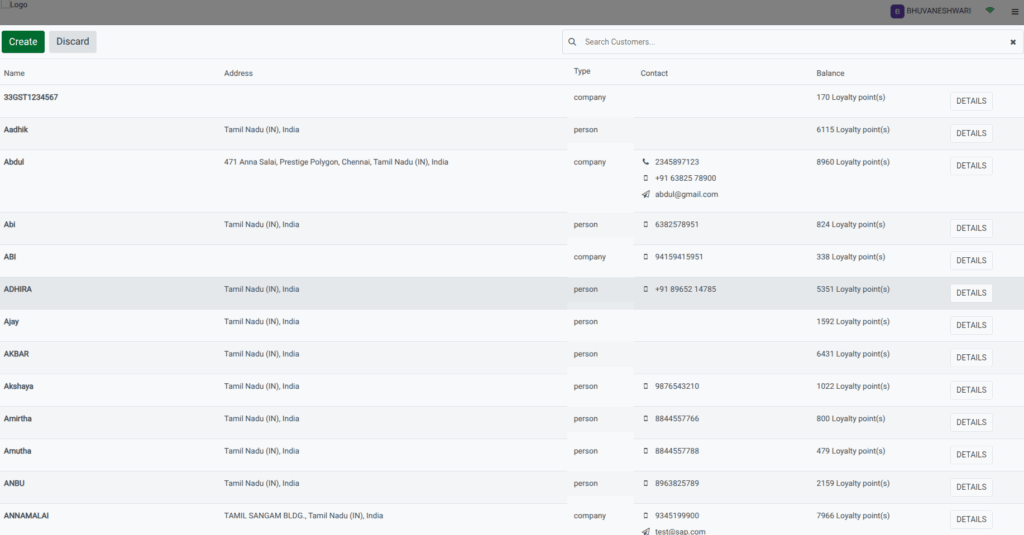
To view or edit a customer, click Details. Most fields can be updated except the mobile number. After making changes, click Save.

Once a customer is selected or updated, their name appears on the Customer icon, confirming they are linked to the ongoing transaction. Loyalty points earned from the current order also appear on the cart screen and will be added to the customer’s account after payment.

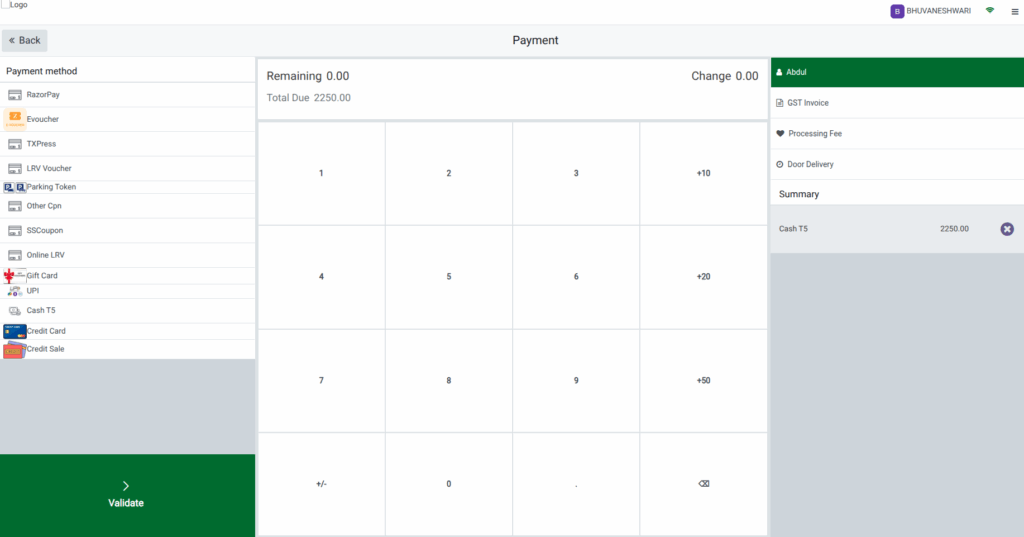
Completing the Order
After verifying the order details, click the Payment Mode button or press F4. Choose the payment method the customer prefers. To complete the transaction, click Validate or press Alt + V. The loyalty points earned for this order will be saved automatically. This makes the checkout process simple and fast for both staff and customers.
Showing Customer Details on the Bill Receipt
To display customer information on the printed bill, open the terminal settings and scroll to the POS Extended Receipt section. Enable the Display Customer Detail option. Once enabled, you can choose which details to print by selecting check boxes such as Customer Name, Customer Address, Customer Mobile, Customer Code, and Customer VAT. After choosing the desired fields, click Save.
When billing, the receipt will show the customer’s name, mobile number, loyalty points earned in the current order, and total accumulated loyalty points.
If Door Delivery is enabled, the receipt will also include the customer’s address and mobile number. For customers registered for GST, their GST Number will also appear on the receipt.

