How to Create a Role in ADempiere Retail
A Role defines what a user can see and do in the system. It controls access to menus, actions, and data based on job responsibility (e.g., cashier, manager, admin).
User Access
Who Can Access
- Admin
- Cashier
- Manager
- Back office
What User Can Do
- Create and assign roles to users
- Define access rights (view, edit, delete, approve)
- Limit access to specific modules
Pre-Requisite Activities
- User master must be created
- Decide responsibilities per department
- Finalize which modules/functions each role should access
- Approve hierarchy (if applicable) must be planned
Business Rules
- A user must be assigned at least one role to access the system
- Roles should follow organizational hierarchy
- Sensitive functions (e.g., price change, cancel invoice) must be restricted
- Roles should be audited regularly to avoid misuse
- Only authorized admins can create or modify roles
User Interface
Step 1 : Select ‘Role’ in Menu -> Administration > General rules > Security > Role or Search Role in Lookup.
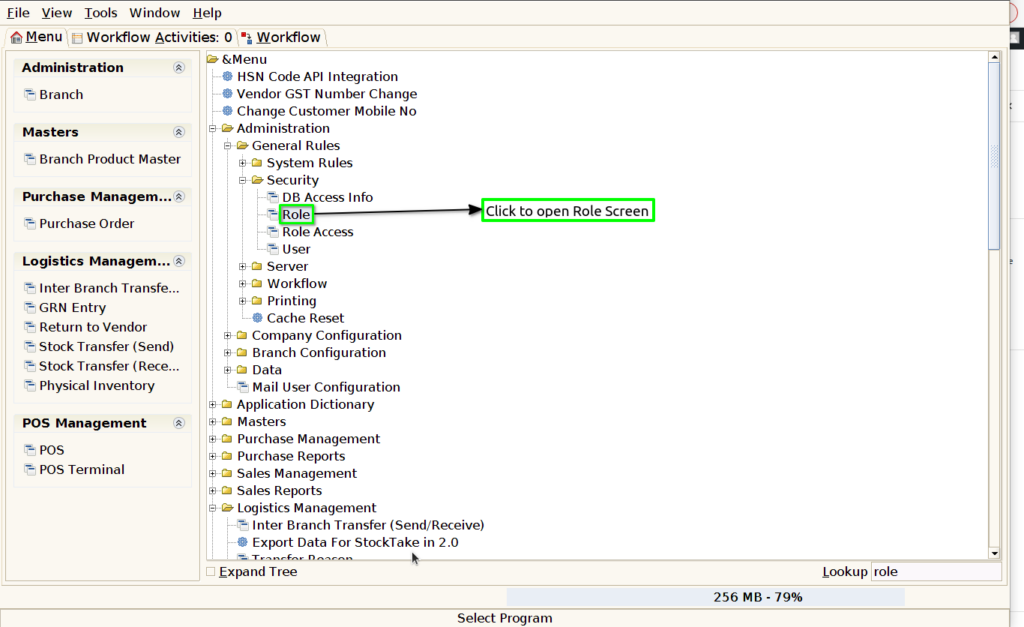
Role
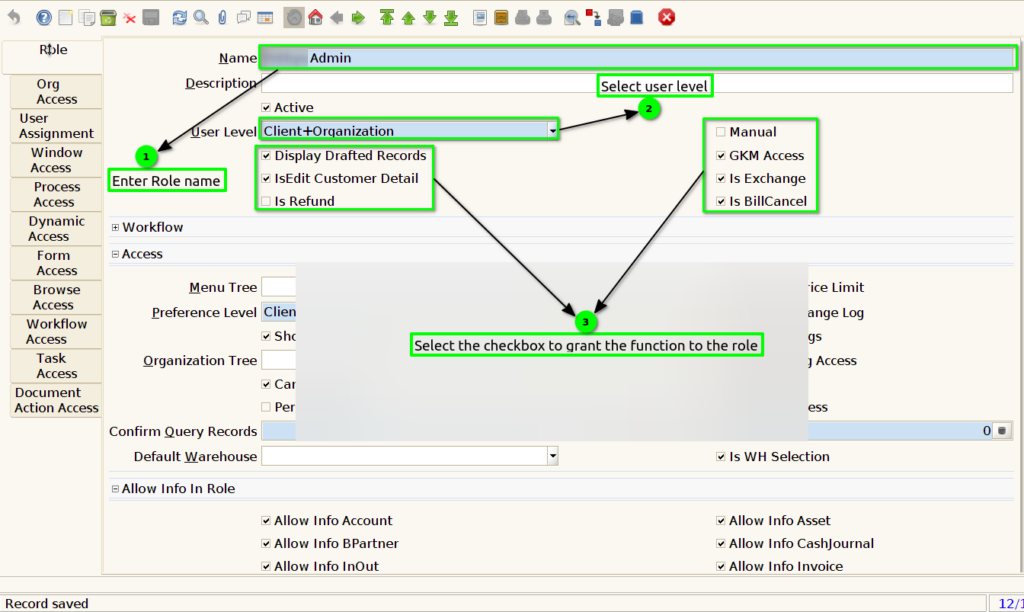
Step 2 : To create a new record and configure roles for it.
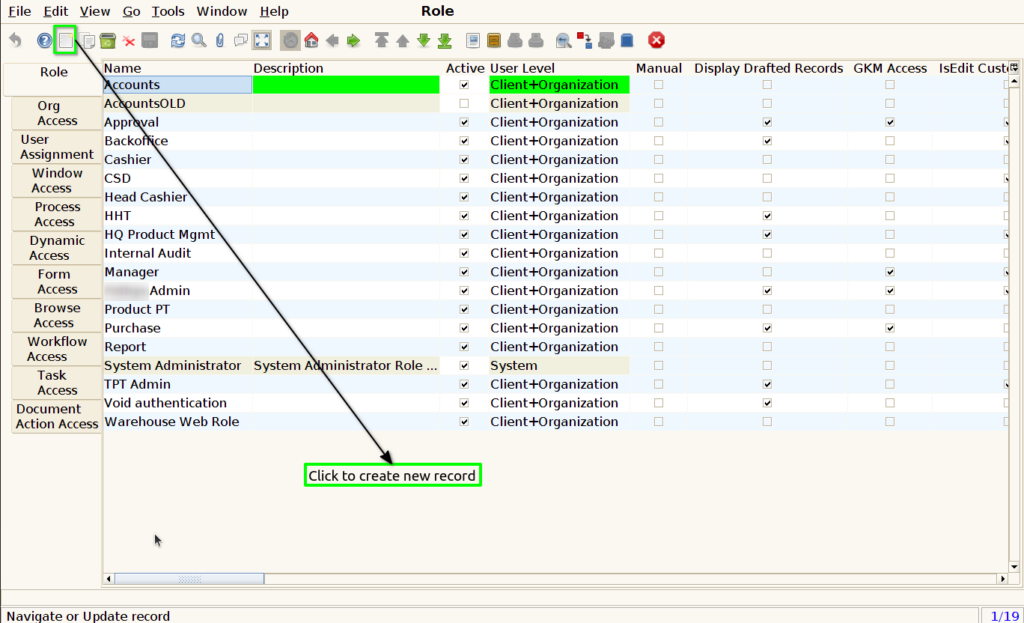
Step 3 : Create a new role to grant function access by using the checkbox
- Display Drafted records : Click this checkbox to display the drafted document (Showing all transactions) allowed for this role, if the checkbox is unchecked, it will cause the function to stop working .
- IsEdit Customer Detail : Click this checkbox to edit the customer details on the customer screen for this role, if the checkbox is unchecked, it will cause the function to stop working.
- Is refund : Click this checkbox to enable the refund function in POS for this role, if the checkbox is unchecked, it will cause the function to stop working.
- GKM Access : Click this checkbox to enable GKM access for this role, if the checkbox is unchecked, it will cause the function to stop working.
- Is Exchange : Click this checkbox to enable the exchange function on the POS screen for this role, If the checkbox is unchecked, it will cause the function to stop working.
- Is Bill cancel : Click this checkbox to enable the Bill Cancel function on the POS screen for this role, If the checkbox is unchecked, it will cause the function to stop working.
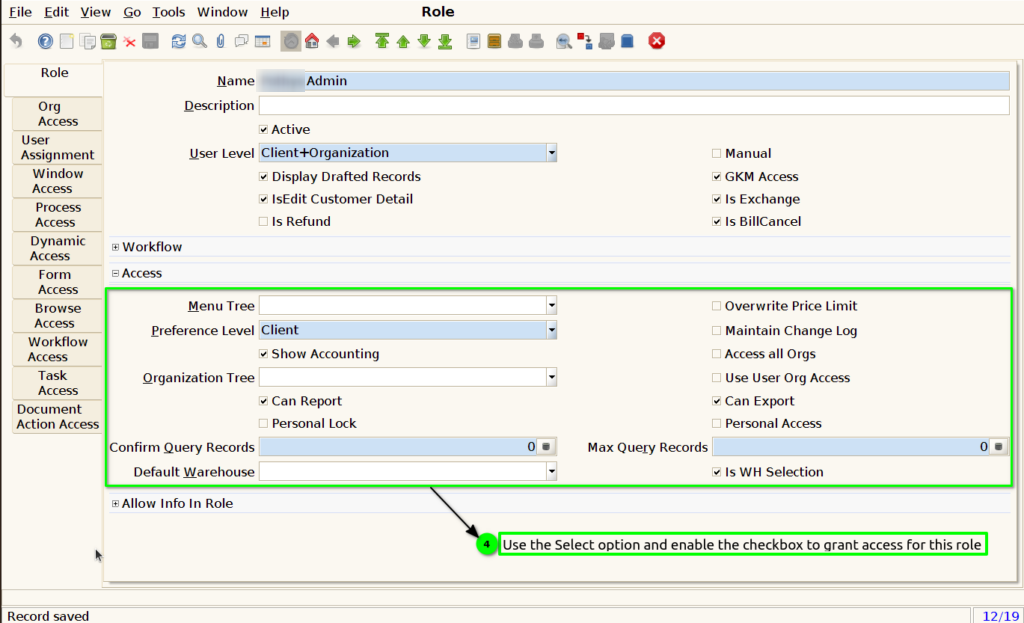
Step 4 : Create a new role to grant access by using the checkbox and selection option,
- Default Warehouse : Select the default warehouse; this role is only for logging in to the default warehouse, Do not select the default warehouse; this role can log in to any warehouse.
- Is WH Selection : Click the checkbox to enable the selected warehouse option, If the checkbox is unchecked, the selection option will not be enabled.
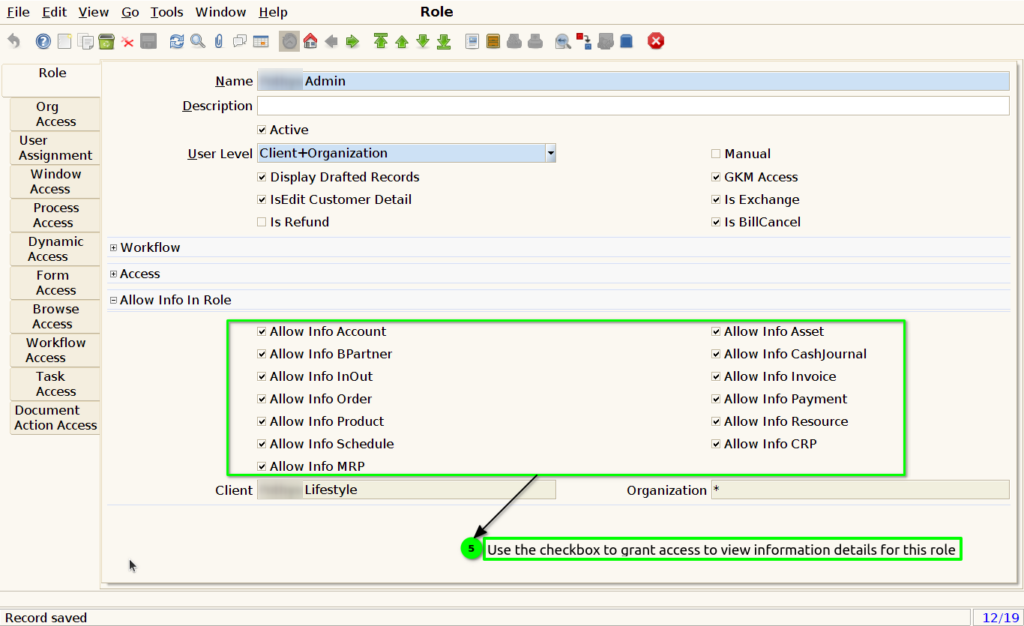
Step 5 : Create a new role to grant INFO access by selecting the checkbox,
- Allow Info Account : Click the checkbox to enable access to the account information View for this role; uncheck the checkbox to disable access to the account information View.
- Allow Info B Partner : Click the checkbox to enable access to the B Partner information View for this role; uncheck the checkbox to disable access to the B Partner information View.
- Allow Info In Out : Click the checkbox to enable access to the In Out information View for this role; uncheck the checkbox to disable access to the In Out information View.
- Allow Info Order : Click the checkbox to enable access to the Order information View for this role; uncheck the checkbox to disable access to the Order information View.
- Allow Info Product : Click the checkbox to enable access to the Product information View for this role; uncheck the checkbox to disable access to the Product information View.
- Allow Info Schedule : Click the checkbox to enable access to the Schedule information View for this role; uncheck the checkbox to disable access to the Schedule information View.
- Allow Info MRP : Click the checkbox to enable access to the MRP information View for this role; uncheck the checkbox to disable access to the MRP information View.
- Allow Info Asset : Click the checkbox to enable access to the Asset information View for this role; uncheck the checkbox to disable access to the Asset information View.
- Allow Info Cash-journal Click the checkbox to enable access to the Cash-journal information View for this role; uncheck the checkbox to disable access to the Cash-journal information View.
- Allow Info Invoice : Click the checkbox to enable access to the Invoice information View for this role; uncheck the checkbox to disable access to the Invoice information View.
- Allow Info Payment : Click the checkbox to enable access to the Payment information View for this role; uncheck the checkbox to disable access to the Payment information View.
- Allow Info Resource : Click the checkbox to enable access to the Resource information View for this role; uncheck the checkbox to disable access to the Resource information View.
- Allow Info CRP : Click the checkbox to enable access to the CRP information View for this role; uncheck the checkbox to disable access to the CRP information View.
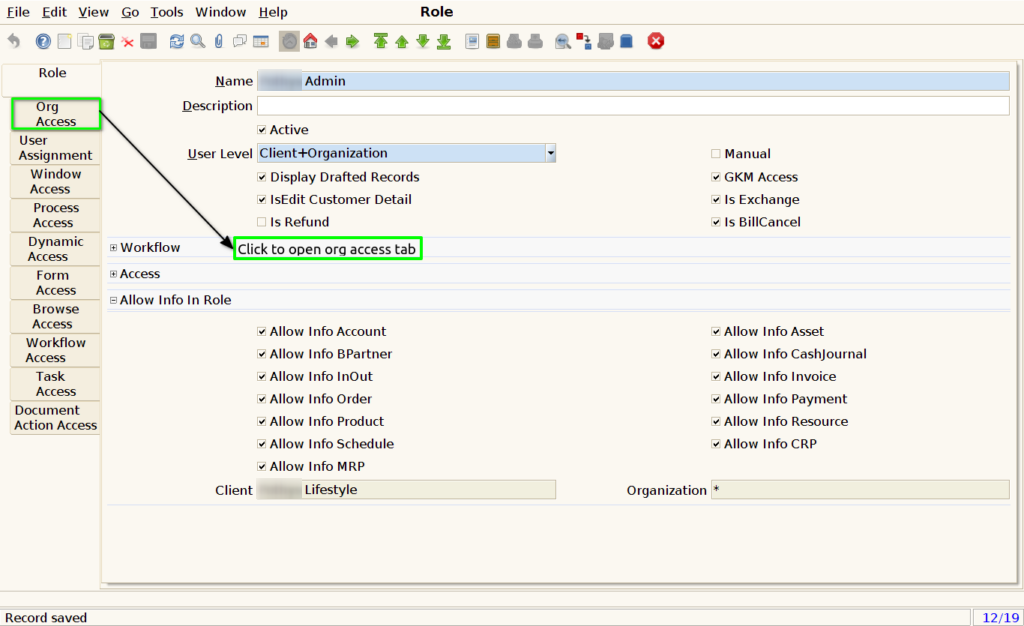
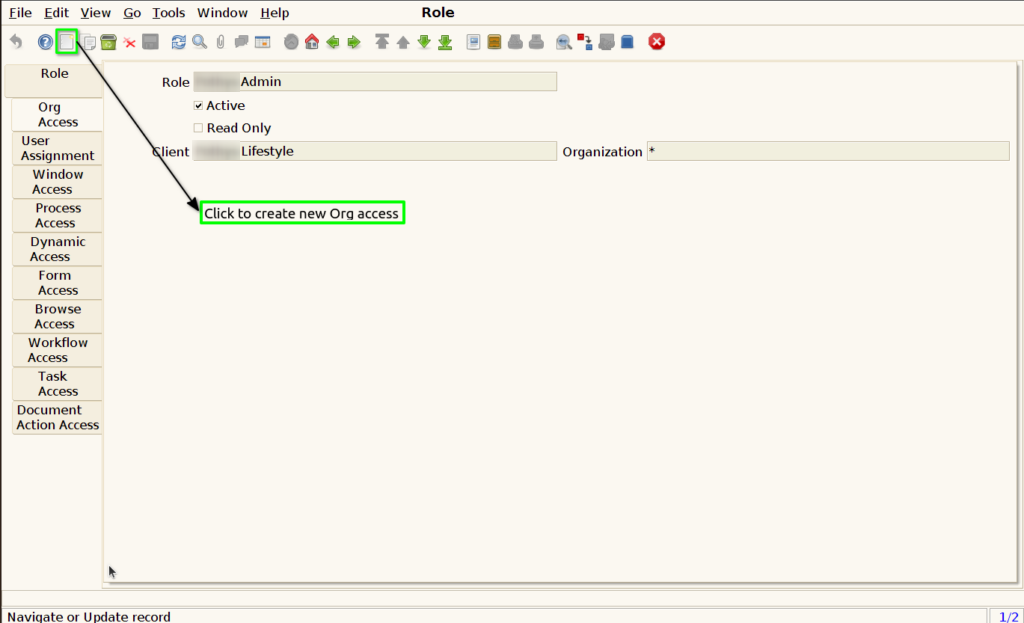
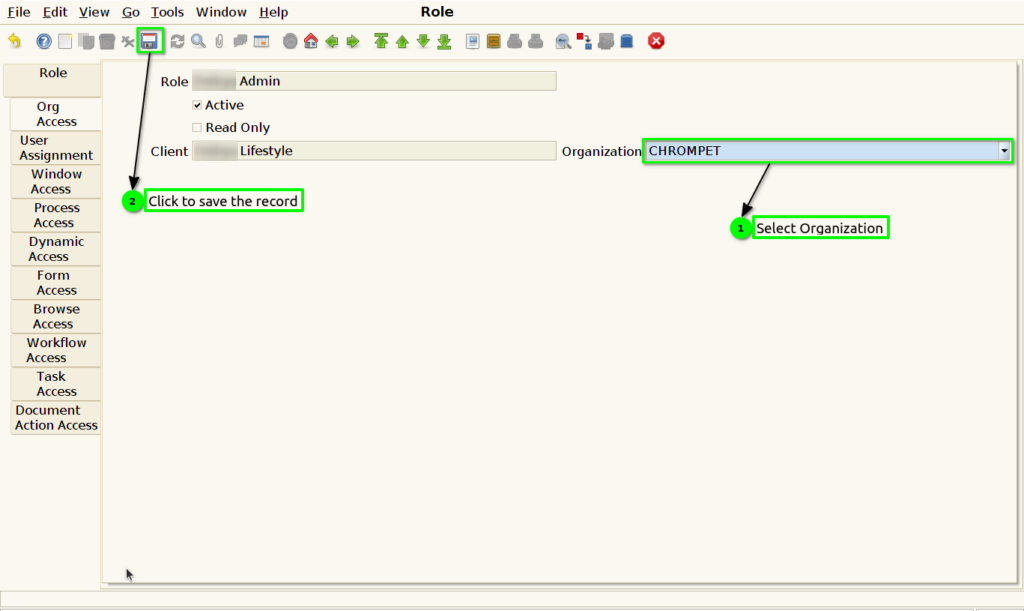
Organization Access
Step 6 : In the role, set the organization access by following these steps:
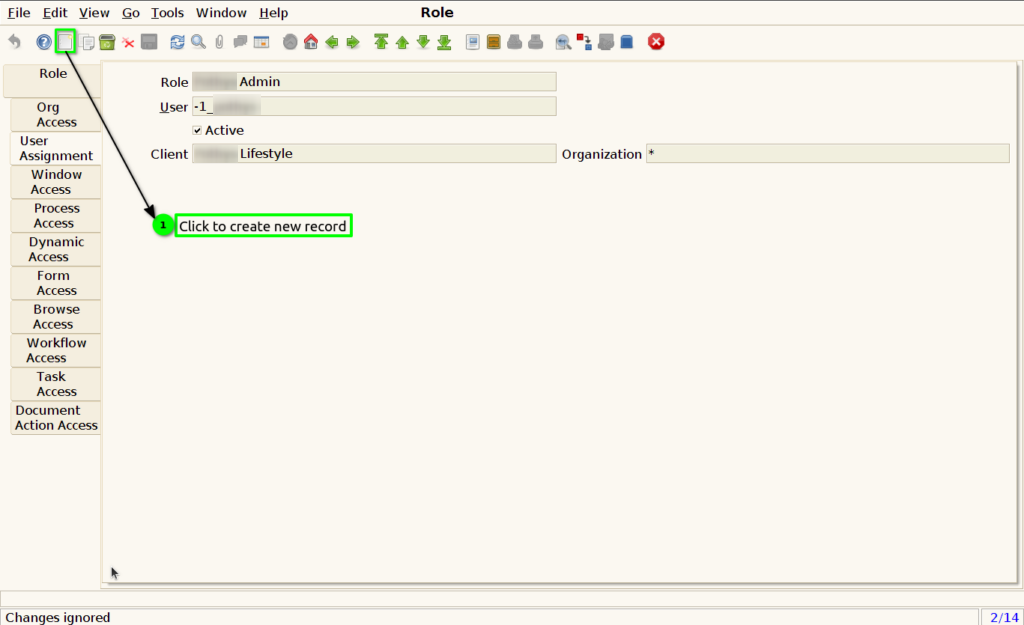
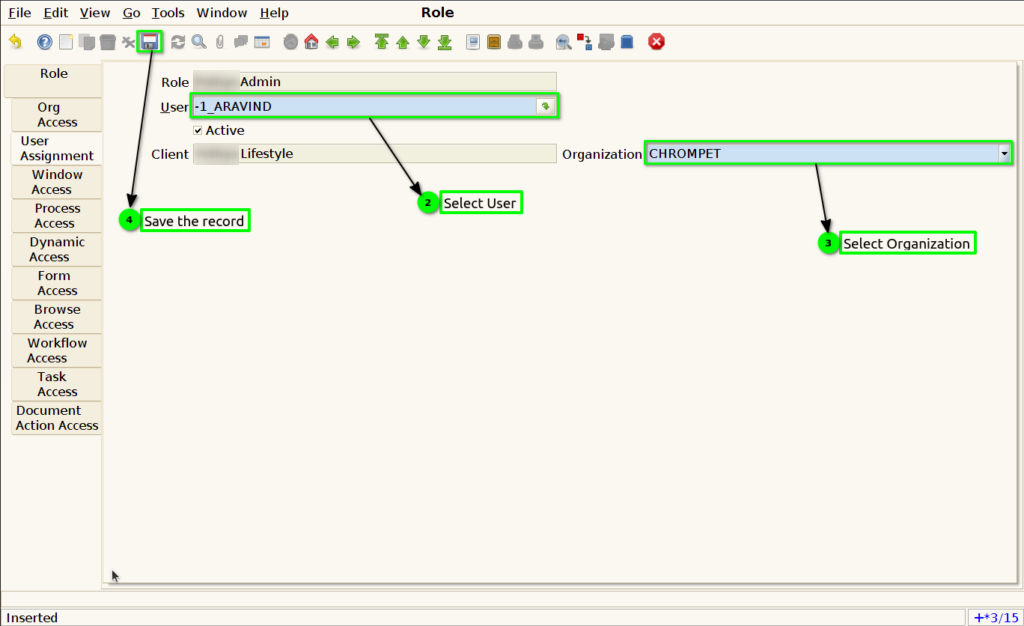
User Assignment
Step 7 : To assign the user to this role, follow these steps:
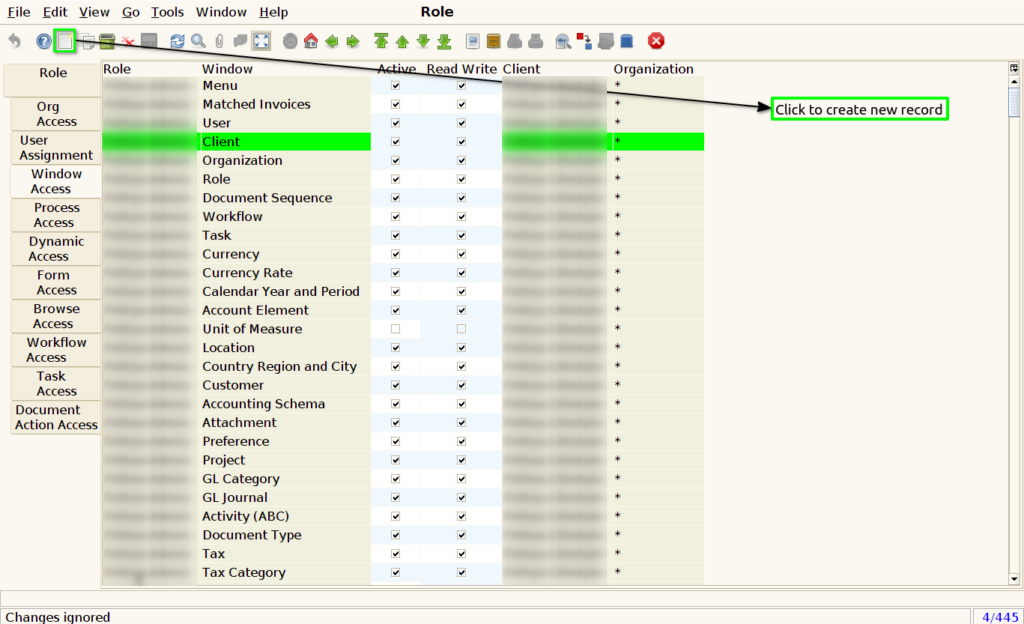
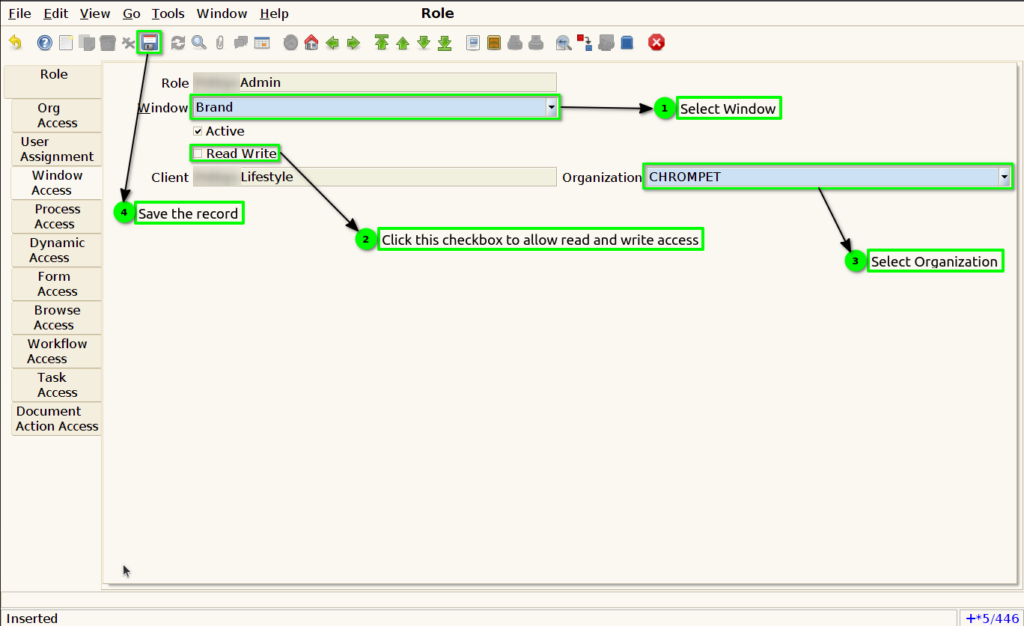
Window Access
Step 7 : In the role, set the Window access by following these steps:
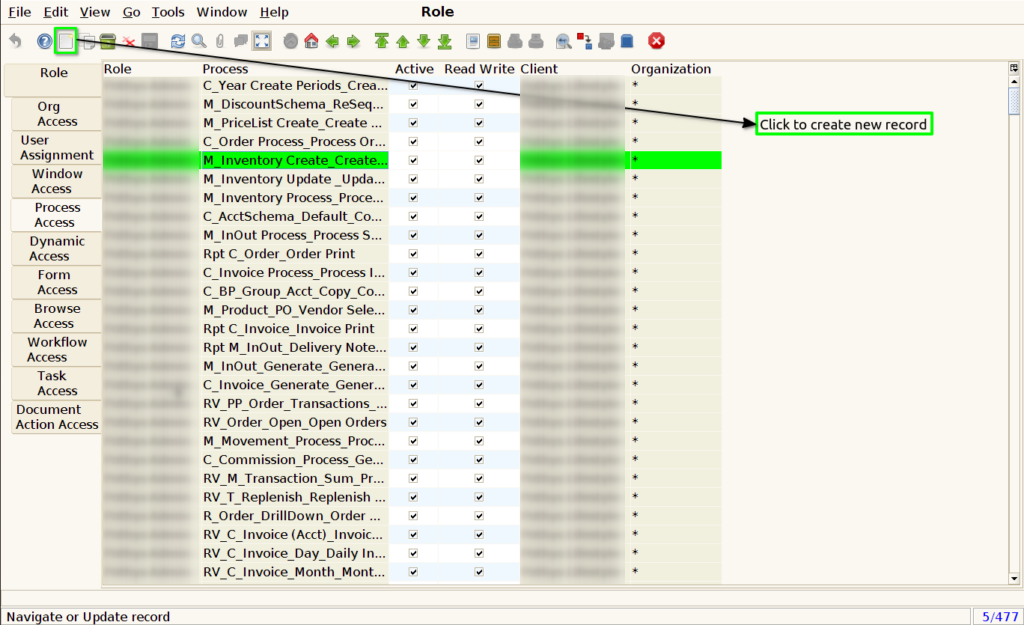
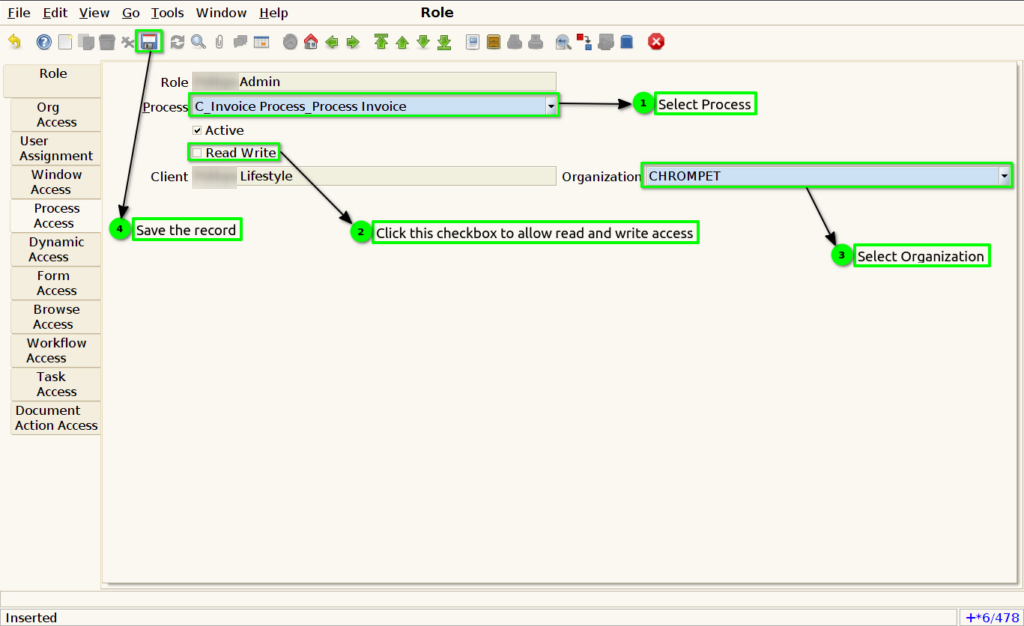
Process Access
Step 8 : In the role, set the Process access by following these steps:
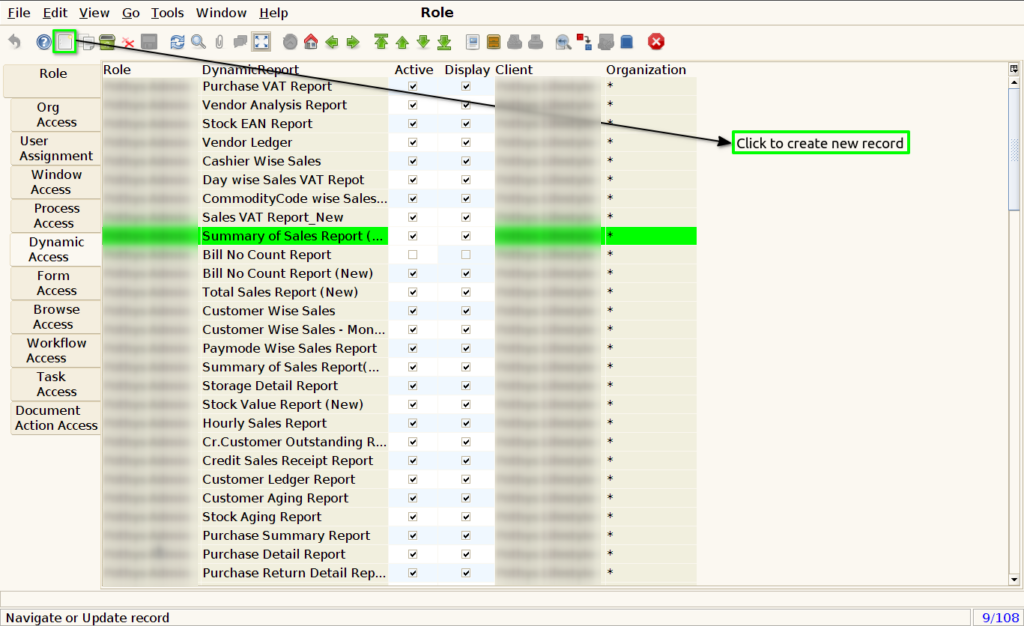
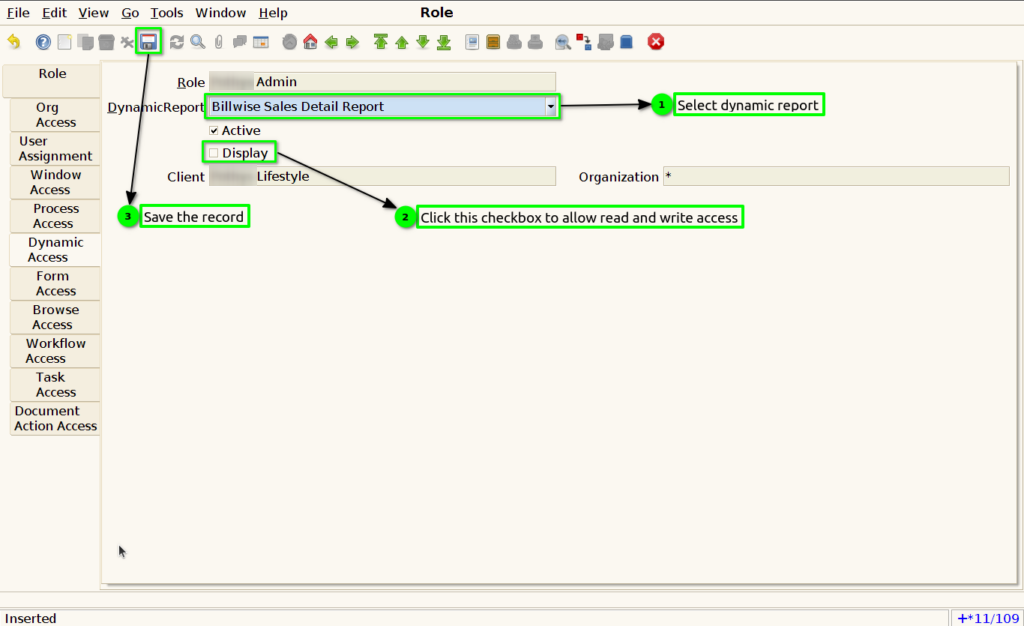
Dynamic Access
Step 9 : In the role, set the Dynamic access by following these steps:
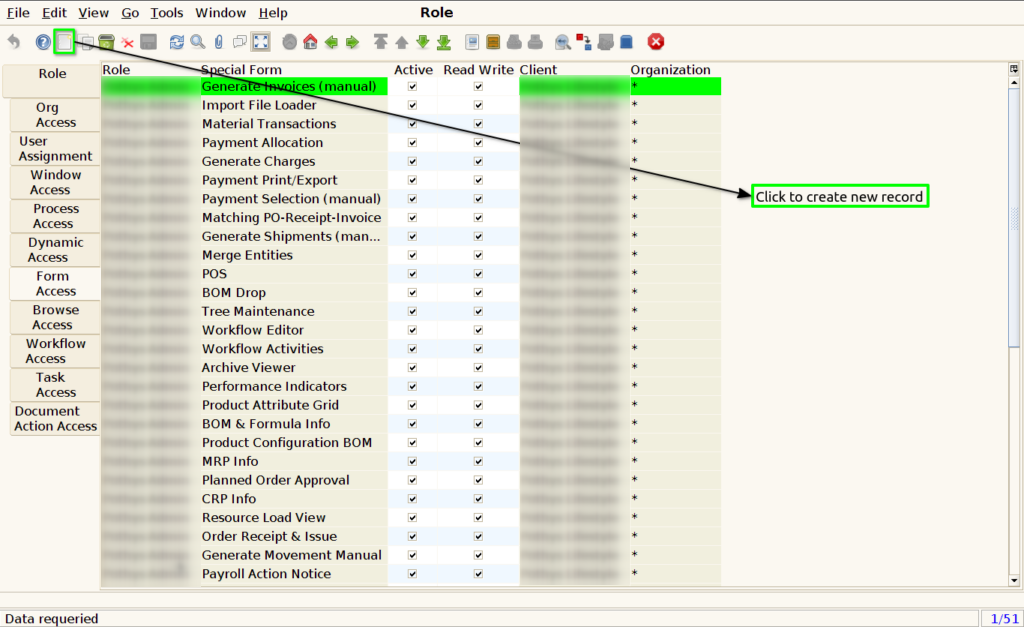
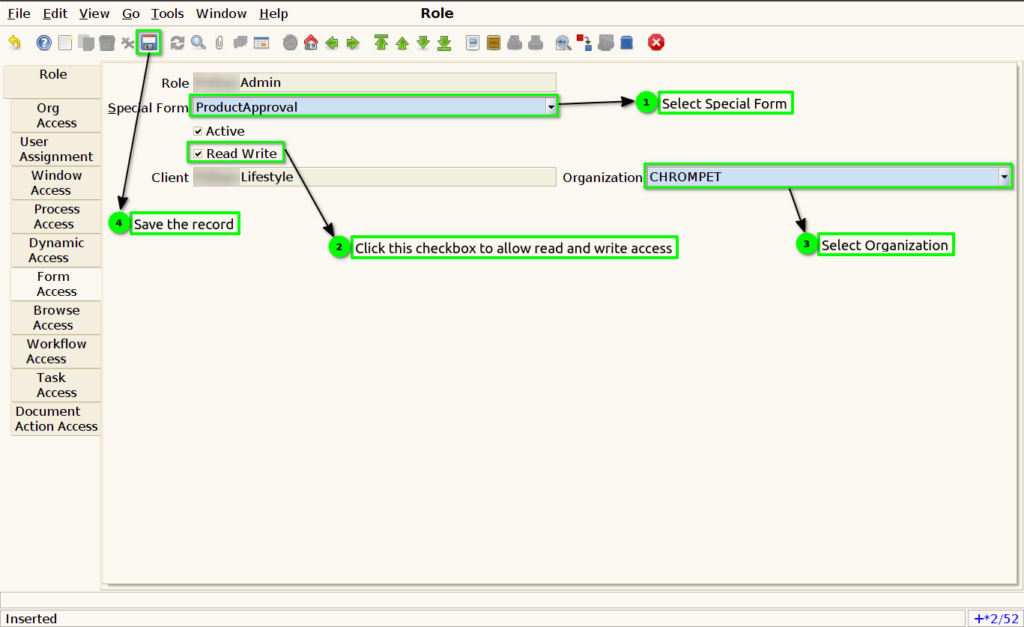
Form Access
Step 10 : In the role, set the Form access by following these steps:
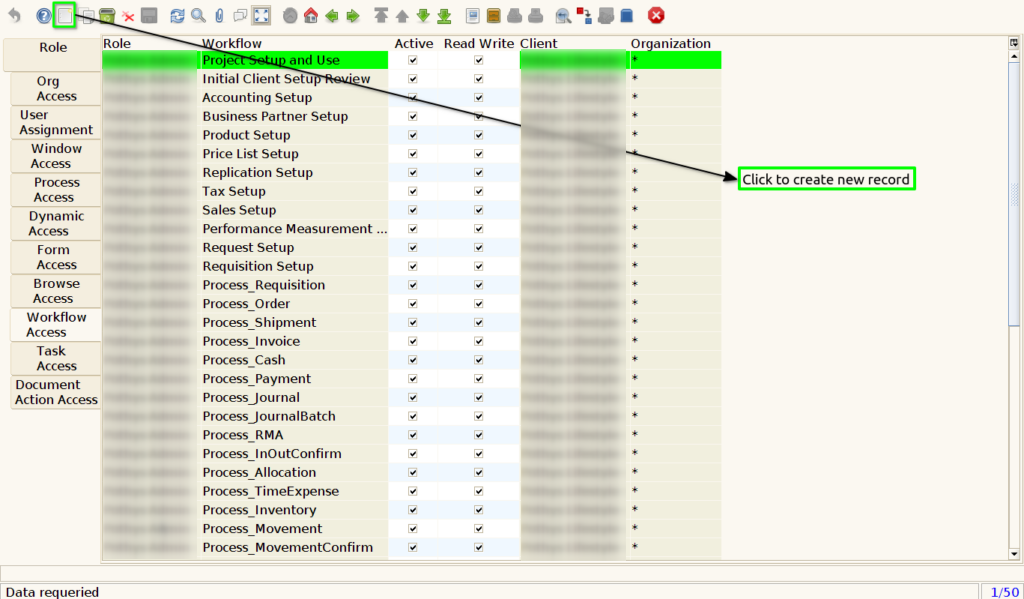
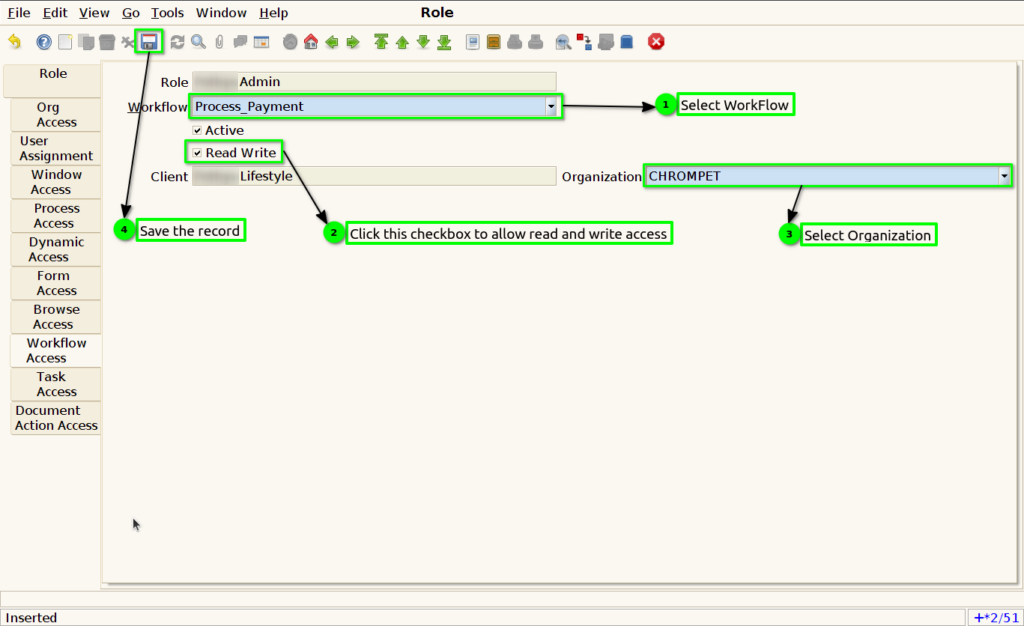
Work Flow Access
Step 11 : In the role, set the Work flow access by following these steps:
Document Action Access
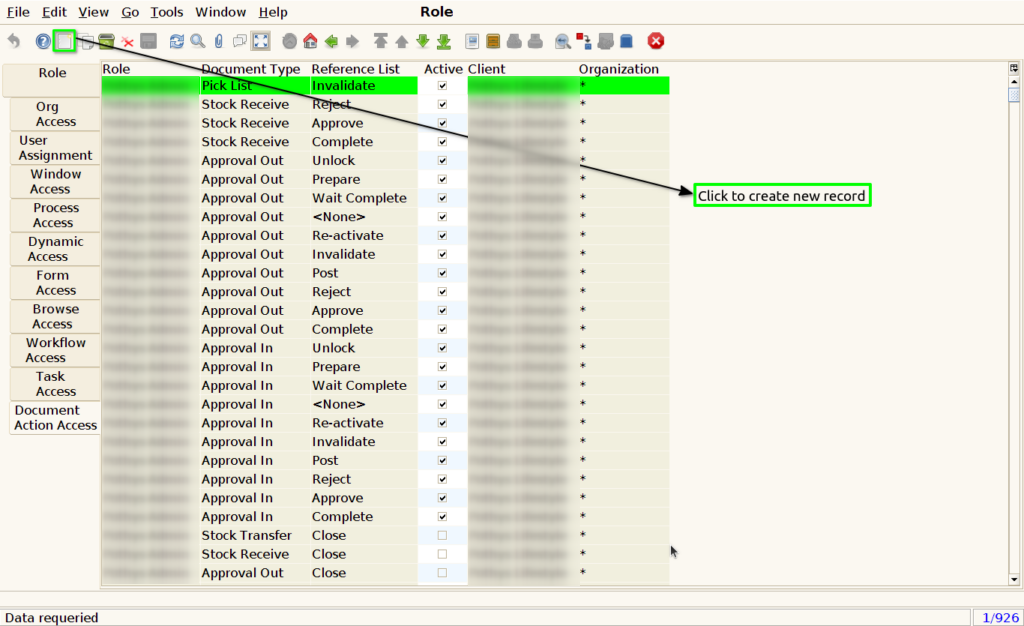
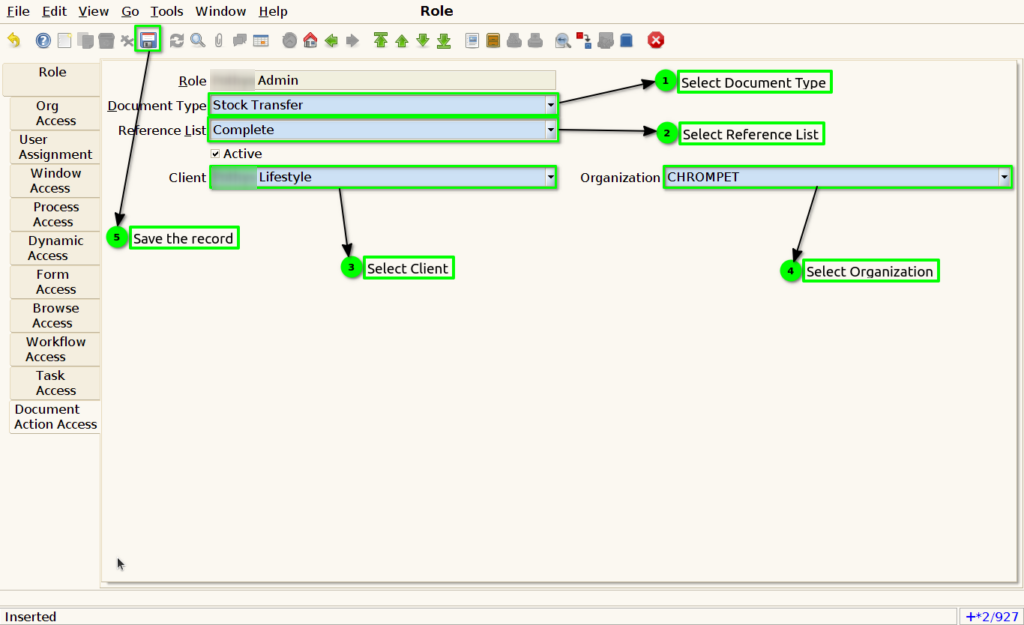
Step 12 : In the role, set the Document Action access by following these steps: