How to View All Users in iDempiere
Introduction
The All Users window in iDempiere shows every user account created across all tenants in a single list, along with the roles assigned to each account.
It is used by the System Administrator role, separate from the tenant-level User window that is used to create and update accounts.
It gives administrators one place to check account status, login activity, and role assignments, supporting security review and access oversight across the installation.
Process Flow

Business Rules
- All Users is a read-only window; accounts cannot be created, edited, or deleted from this screen.
- Only the System Administrator role can open this window, since it lists users across every tenant.
- Each record shows the tenant the account belongs to, helping identify cross-tenant accounts.
- The User Roles tab lists every role assigned to the selected user, including system-level roles.
- The Active field shows whether an account can currently log in; inactive accounts stay visible.
- Locked status and Failed Login Count are shown to support account security review.
- Any change to a user account must be made in the tenant-level User window, not here.
Prerequisites
- System Administrator login credentials.
- User accounts already created for one or more tenants through the User window.
- Roles already assigned to users through the User Roles tab of the User window.
Navigation
Menu → System Admin → General Rules → Security → All Users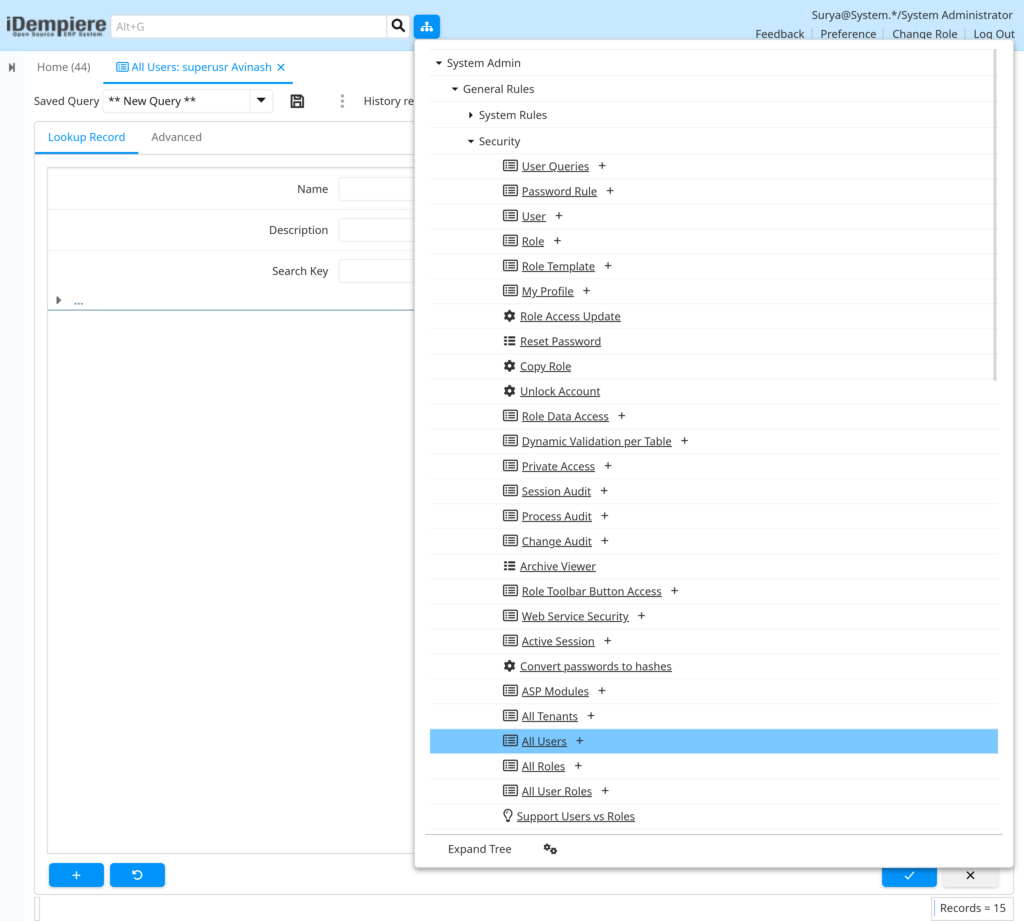
The exact menu grouping can vary slightly by version, but the window is always opened using the System Administrator role.
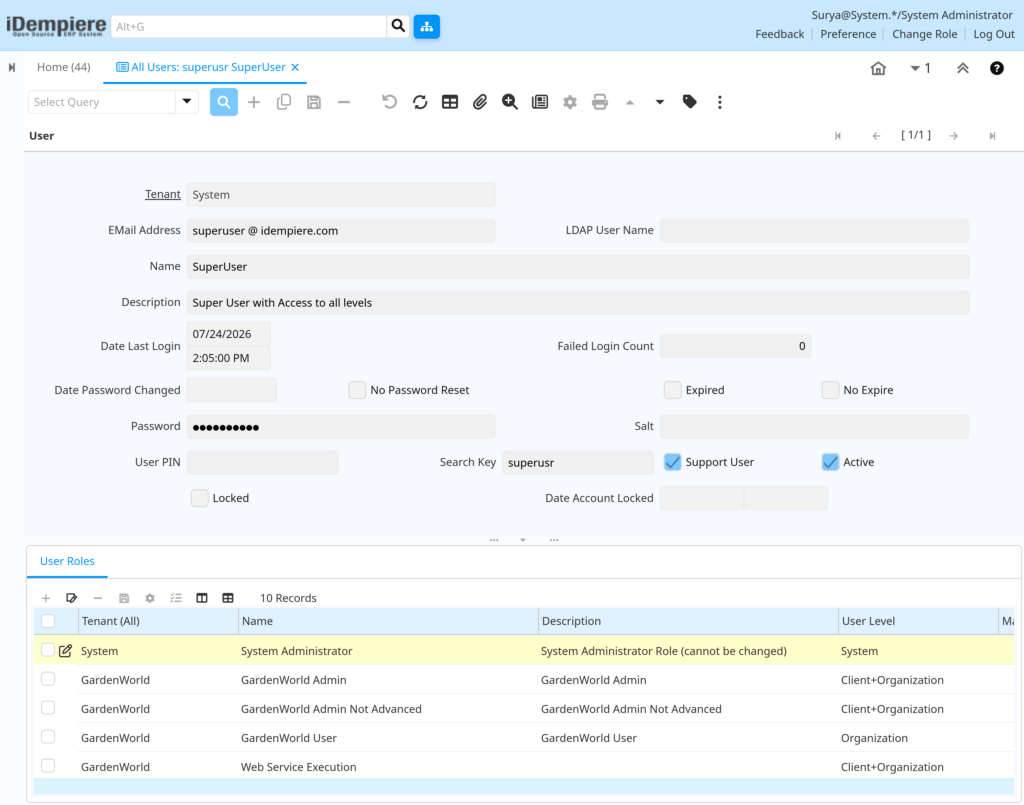
After opening, the User tab lists every account across all tenants. Selecting an account and opening the User Roles tab shows the roles assigned to that account.
Steps to Review User Information
Step 1: Open the All Users Window
This step is required to see user accounts from every tenant in one place, instead of checking each tenant separately.
Instructions
Log in with the System Administrator role and open All Users from the menu. The window opens on the User tab, listing every account across all tenants.
Field Reference Table
| Field | Sample Value | Description |
| Tenant | System | Shows which tenant the account belongs to |
| Name | SuperUser | Display name of the account |
| EMail Address | superuser@idempiere.com | Login email address for the account |
| Search Key | superusr | Short code used to identify the account |
| Active | Checked | Shows whether the account can currently log in |
| Locked | Unchecked | Shows whether the account is locked after failed logins |
| Date Last Login | 07/24/2026 9:27:47 AM | Last recorded login date and time |
| Failed Login Count | 0 | Number of consecutive unsuccessful login attempts |
| Support User | Checked | Marks the account as a support-level user |
| Expired / No Expire | Unchecked | Shows the password expiry status of the account |
Step 2: Review Role Assignments
This step is required to see what access a user has been given, since access is controlled through roles, not the account record itself.
Instructions
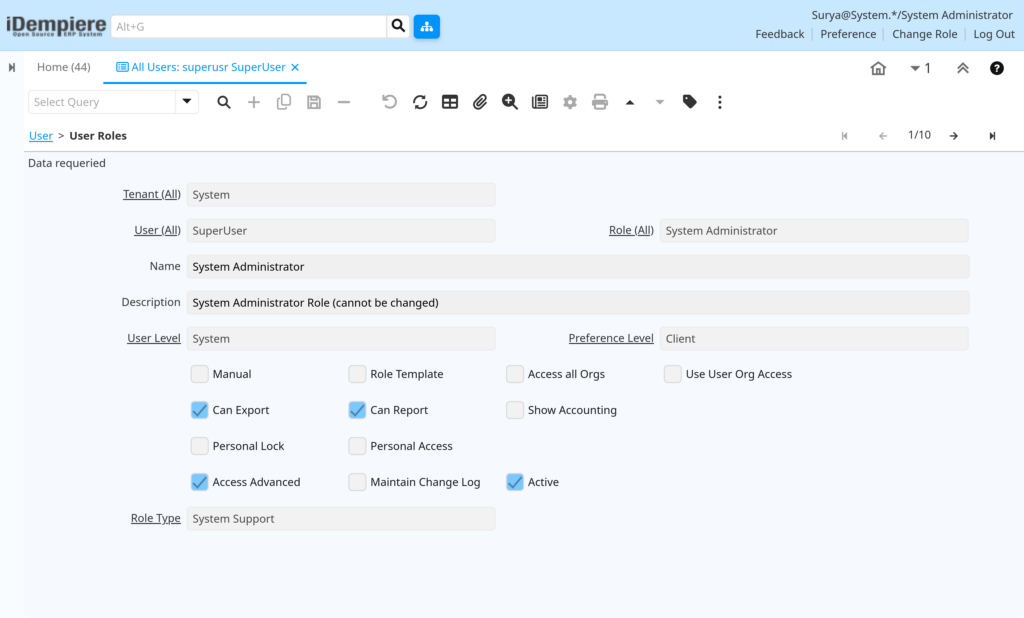
Select a user row in the User tab, then open the User Roles tab. Every role assigned to that account, across tenants, is listed with its access settings.
Field Reference Table
| Field | Sample Value | Description |
| Tenant (All) | System | Tenant to which the role assignment belongs |
| Role (All) | System Administrator | Role assigned to the selected user |
| User Level | System | Level at which the role operates: System, Client, or Client+Organization |
| Preference Level | Client | Default level applied when the user works under that role |
| Access Advanced | Checked | Shows if the role includes advanced access |
| Can Report | Checked | Shows if the role can generate reports |
| Can Export | Checked | Shows if the role can export data |
| Active | Checked | Shows whether the role assignment is currently active |
| Role Type | System Support | Classification of the role, such as Tenant or System Support |
Common Issues and Resolutions
| Issue | Cause | Resolution |
| A newly created account does not appear in the list. | The window was not refreshed after the account was created. | Click refresh or reopen the window to reload the list. |
| Changes typed into a field are not saved. | All Users is a read-only window and does not allow edits. | Open the User window under the relevant tenant to make changes. |
| A user does not show the expected roles. | The role was never assigned in the User window. | Assign the role from the User Roles tab of the User window, then check again here. |
| An account shows a Date Account Locked value. | Failed Login Count reached the limit set by the password rules. | Reset the lock from the User window or review the password rule settings. |
| A user cannot log in even though Active is checked. | The account may be expired, or the assigned role may be inactive. | Check the Expired field and confirm the role status in User Roles. |
| A non-administrator asks why they cannot open All Users. | The window is limited to the System Administrator role by design. | Confirm the request needs system-wide visibility before changing access. |
| The same user name appears more than once. | Separate accounts exist under different tenants with similar names. | Check the Tenant column to confirm which account belongs to which tenant. |
Next Steps
- User window – create or update individual user accounts.
- Role window – define or adjust the roles referenced in User Roles.
- Password Rule window – configure account lockout and expiry behavior.
- Role Data Access window – review the data access granted to a role.