How to create a Prepay Order in iDempiere
Introduction
The Sales Order window in iDempiere manages customer orders from creation through fulfillment. When Target Document Type is set to Prepay Order, the system enforces payment collection before the order proceeds to delivery or final invoicing.
This configuration for store pickup orders, online prepaid purchases, and B2B accounts where advance payment reduces credit risk. It works alongside the Delivery Rule, Payment Rule, and Document Status fields.
Prepay Orders directly affect stock reservation, invoice timing, and revenue recognition, ensuring goods leave the warehouse only after payment is confirmed.
Process Flow Diagram
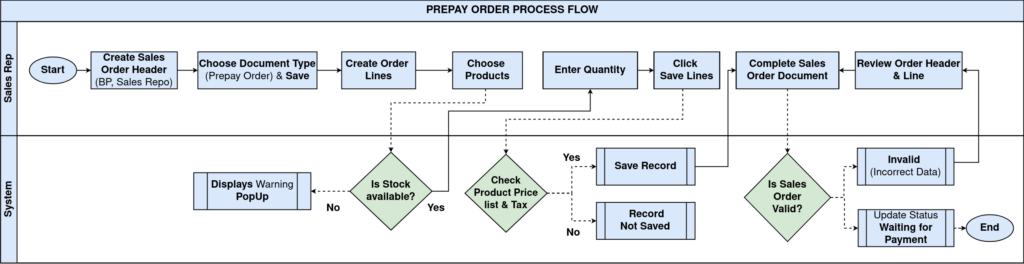
Business Rules
- Prepay Order document type blocks delivery until payment is received.
- Delivery Rule “After Payment” prevents shipment creation before payment is completed.
- Document Status moves from Drafted to Waiting Payment after the Complete action.
- Pay Schedule valid flag confirms a valid payment schedule exists for the order.
- Order Tax lines (CGST/SGST) are calculated automatically from the price list and tax category.
- Payment Rule “Credit Card” requires a valid tender type configured for the organization.
- Invoice Rule “Immediate” generates the invoice as soon as the order is completed.
- Sales Representative and Price List are mandatory for accurate order valuation.
Configuration Steps
Step 1: Enter Order Header and Business Partner Details
Correctly identifying the buyer and locations ensures invoices and shipments route to the right party.
Select Business Partner, Partner Location, and User/Contact. Confirm Invoice Partner, Invoice Location, and Invoice Contact auto-populate correctly before proceeding.
| Field | Sample Value | Description |
| Business Partner | Global Retail Solutions | Customer placing the order |
| Partner Location | Hyderabad | Delivery/service address of the customer |
| User/Contact | Kiran Reddy | Primary contact for the order |
| Invoice Partner | Global Retail Solutions | Entity to be invoiced |
| Invoice Location | Hyderabad | Billing address |
| Invoice Contact | Kiran Reddy | Billing contact |
Step 2: Set Target Document Type to Prepay Order
This determines that the order requires payment before fulfillment can proceed.
In the Target Document Type field, select Prepay Order. This activates the advance-payment workflow rules for delivery and invoicing.
| Field | Sample Value | Description |
| Target Document Type | Prepay Order | Enforces prepayment before order fulfillment |
| Self-Service | Unchecked | Indicates the order was not placed via a self-service channel |
Step 3: Configure Delivery Details
Ensures stock is only released after payment is confirmed for pickup or prepaid orders.
Set Delivery Rule to After Payment, select the Warehouse, set Delivery Via and Priority. Leave Drop Shipment unchecked for direct store pickup orders.
| Field | Sample Value | Description |
| Delivery Rule | After Payment | Restricts shipment until payment is received |
| Warehouse | CDC Godown | Source location for stock |
| Delivery Via | Pickup | Customer collects the order at the store |
| Priority | Medium | Order handling priority |
Step 4: Configure Invoicing Details
Defines pricing, currency, and the payment collection method for the order.
Select Invoice Rule as Immediate, choose the Price List, confirm Currency, assign the Sales Representative, and set Payment Rule to Credit Card.
| Field | Sample Value | Description |
| Invoice Rule | Immediate | Invoice generated immediately on completion |
| Price List | Standard Sales Price List | Defines product pricing |
| Currency | INR | Transaction currency |
| Sales Representative | Aravind Kumar | Salesperson assigned to the order |
| Payment Rule | Credit Card | Method of payment collection |
Step 5: Add Order Lines
Order lines define the products, quantities, and warehouse allocation for fulfillment.
In the Order Line tab, add the Product, Warehouse, and Quantity. Attribute Set Instance and Resource Assignment apply only when the product requires lot or serial tracking.
| Field | Sample Value | Description |
| Product | AASH-ATTA-5KG | Item ordered by the customer |
| Warehouse | CDC Godown | Stock source for the line |
| Line No | 10 | Sequence of the order line |
Step 6: Review Order Tax
Confirms tax calculation is accurate before completing the order.
Open the Order Tax tab and verify the Tax, Tax Amount, and Tax base Amount lines generated automatically based on product tax category and business partner location.
| Field | Sample Value | Description |
| Tax | CGST 9% / SGST 9% | Applicable GST components |
| Tax Amount | 126.00 | Calculated tax value per component |
| Tax base Amount | 1,400.00 | Line total before tax |
Step 7: Complete the Order and Monitor Payment Status
Moves the order into the prepayment cycle and prepares it for downstream processing.
Use Document Action, select Prepare and then Complete. Document Status changes to Waiting Payment until payment is recorded and allocated against the order.
| Field | Sample Value | Description |
| Document Status | Waiting Payment | Order awaiting payment before further processing |
| Document Type | Prepay Order | Confirms document type after completion |
| Pay Schedule valid | Checked after payment | Confirms a valid payment schedule exists |

Common Issues and Resolutions
| Issue | Cause | Resolution |
| Order stuck in Waiting Payment | Payment not yet received or allocated | Record and allocate the payment against the order or invoice |
| Prepay Order not available in Target Document Type | Document Type not configured or inactive | Create and activate Prepay Order in the Document Type window |
| Order Tax not calculated | Tax category missing on product or partner tax exempt | Verify tax category on the product and tax settings on the Business Partner |
| Pay Schedule valid remains unchecked | No valid payment term or schedule generated | Check Payment Term and Invoice Rule configuration |
| Delivery not blocked despite After Payment rule | Delivery Rule overridden or shipment created manually | Confirm the Delivery Rule field and avoid manual shipment generation |
| Credit Card option missing in Payment Rule | Tender type not enabled for the organization | Enable Credit Card tender type in Payment/Tender configuration |
| Document remains Not Posted | Accounting entries not yet generated | Run the posting process or check the accounting schema/GL configuration |
| Cannot Void or reprocess a completed order | Document status restricts available actions | Reverse or close the order per standard workflow before reprocessing |
Next Steps
- Configure payment (Cash/Credit Card Receipt) against the Waiting Payment order.
- Set up invoice generation and review it in the Invoice window.
- Configure Shipment/Delivery confirmation after payment is received.
- Review the accounting schema/GL configuration for posting Prepay Order transactions.
- Configure POS Terminal settings if orders originate from POS.