How to do PO Info Setup in Branch screen of ADempiere Retail
PO Info Setup means configuring the essential details and rules required to create, manage, and process Purchase Orders (PO) in the system.
User Access
Who Can Access
- Admin
- Cashier
- Back office
- Manager
What User Can Do
- Update
- Activate
- De-Activate
Pre-Requisite Activities
- Set up Vendor Master and Product Master
- Define standard PO templates and document formats
- Configure SMTP settings for sending PO mails
- Set default purchase return handling process
- Allocate email roles and recipients for PO communication
Business Rules
- Validation of Negative Stock must be based on POS and Back Office control flags
- Auto PO Import Location must point to a valid and active path/location
- PO Email Message should contain clear and professional communication
- Remarks must reflect return justification when used for vendor returns
- Only authorized roles can modify PO email settings
- CC mail addresses must be valid and periodically reviewed
- Email delivery logs should be auditable
- Any change to PO Info Setup must be logged and restricted
User Interface
Step 1 : Select ‘Branch’ in Menu Branch Configuration -> Branch or Search Branch in Lookup.

Step 2 : Select Organisation Info -> PO Info Sub Tab.
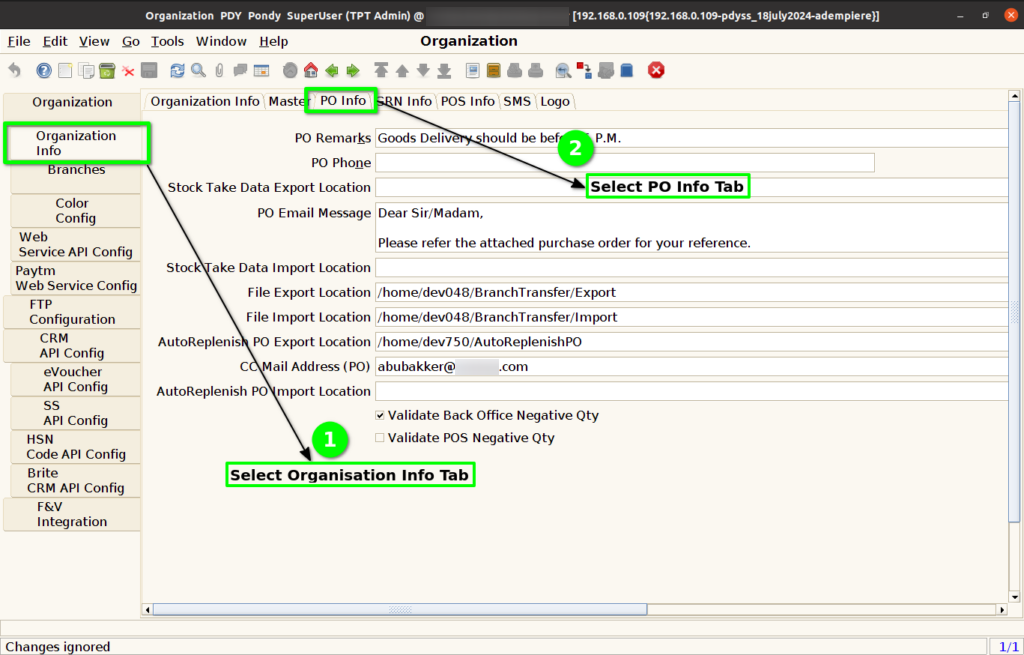
Step 3 : Configure PO Related settings below as per user needs
- PO Remarks – Enter PO Remarks in PO Print
- PO Phone – Enter PO Phone Number, to contact PO related doubts
- PO Email Message – Enter Email Message for PO Email
- Need Alert When PO Expired – If Check Box enable when choose PO in GRN shows PO Expired based on Date Promised in PO
- Stock Take Data Export Location – Enter the File Path of Stock take export location
- Stock Take Data Import Location – Enter the File Path of Stock take import location
- File Export Location – Enter the File Path of IBT export location
- File Import Location – Enter the File Path of IBT import location
- Auto Replenish PO Export Location – Enter the File Path of Auto PO export location
- Auto Replenish PO Import Location – Enter the File Path of Auto PO import location
- CC Mail Address (PO) – Enter CC mail address for PO Mail Sent.

Step 4 : Configure the Negative Qty Validation for Back Office and POS
- Validate Back Office Negative Qty – If Check Box enable negative qty products not allow for all Back office transactions, If Unchecked all products allow to all Back office transactions
- Validate POS Negative Qty – If Check Box enable negative qty products not allow for all POS transactions, If Unchecked all products allow to all POS transactions.
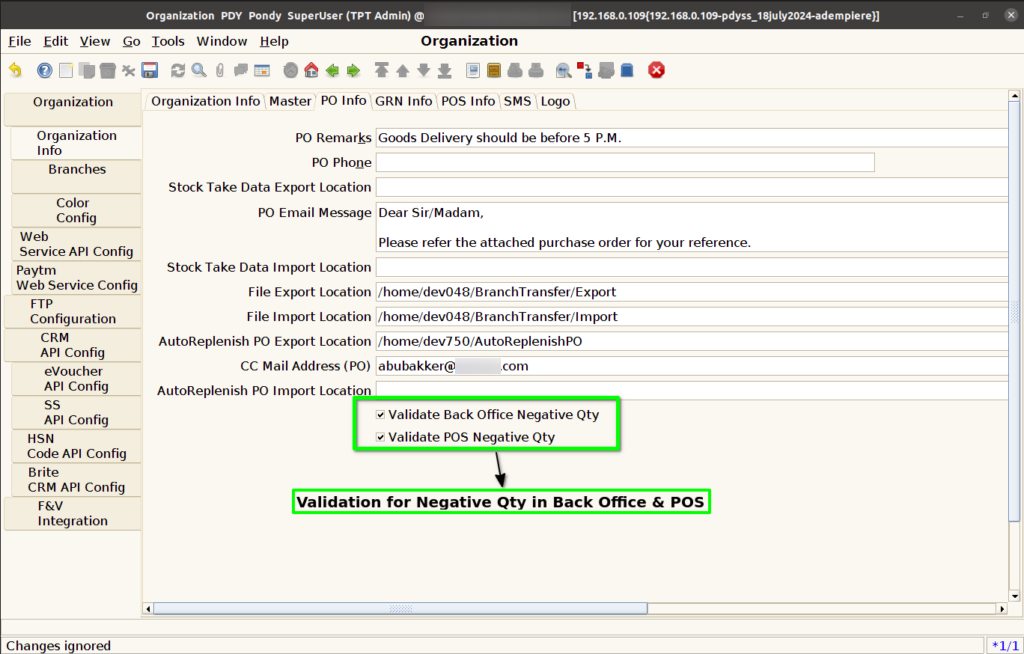
Step 5 : Click to Save the record.
