How to Configure AR Payment and Receipt in iDempiere
The Payment and Receipt window in iDempiere records customer payments against sales invoices and orders, capturing tender type, amount, and bank account for each transaction.
Every payment entered here drives accounts receivable balances, bank reconciliation, and daily sales reporting, making accurate configuration essential.
Process Flow

Business Rules
- Only Completed payments can be allocated to invoices or orders.
- A single payment can be allocated across multiple invoices.
- Receipt checkbox must be checked for incoming customer payments.
- Tender Type determines whether the payment is Cash, Cheque, or Credit Card.
- Bank Account controls the GL account used when the payment is posted.
- Discount and Write-off amounts adjust the invoice balance during allocation.
- Over/Under Payment flags any mismatch between payment and invoice amount.
- Posted payments generate accounting entries and cannot be edited further.
Configuration Steps
Step 1: Create a New Payment or Receipt Document
Click New on the Payment and Receipt window; select Organization and Document Type “AR Receipt”; check Receipt so the record is treated as a customer receipt.
| Field | Sample Value | Description |
| Document Type | AR Receipt | Classifies the transaction as a receipt |
| Receipt | Checked | Marks the record as an incoming payment |


Step 2: Enter Reference Details
Select the Business Partner; choose the Invoice or Order to associate; confirm Transaction Date and Account Date default correctly.
| Field | Sample Value | Description |
| Business Partner | FIVE TECHNOLOGIES PRIVATE LIMITED | Identifies the paying customer |
| Invoice | 100001_07/01/2026_200.0 | Links payment to the outstanding invoice |
| Order | 60001_07/01/2026 | Links payment to the originating order |
| Transaction Date | 07/01/2026 | Date the payment was received |
Step 3: Enter Payment Amounts
Enter the Payment amount; confirm Currency; adjust Discount Amount or Write-off Amount only where applicable.
| Field | Sample Value | Description |
| Payment amount | 200.00 | Amount received from the customer |
| Currency | INR | Currency used for the transaction |
| Discount Amount | 0.00 | Early-payment discount applied |
| Write-off Amount | 0.00 | Uncollectible balance written off |
Step 4: Select Tender Type and Bank Account
Choose Tender type such as Cash; select the Bank Account for the collection point; enable Online Access when processed through a payment gateway.
| Field | Sample Value | Description |
| Tender type | Cash | Payment method used by the customer |
| Bank Account | POS UPI Collection_POS UPI_100002 | GL/bank account receiving the funds |
| Online Access | Unchecked | Enables online gateway processing |
Step 5: Complete and Post the Payment
Click Document Action and choose Complete; verify Document Status shows Completed; click Posted to confirm the accounting entries were generated.
| Field | Sample Value | Description |
| Document Status | Completed | Confirms the document is finalized |
| Posted | Yes | Confirms accounting entries were created |
Step 6: Review or Create the Allocation
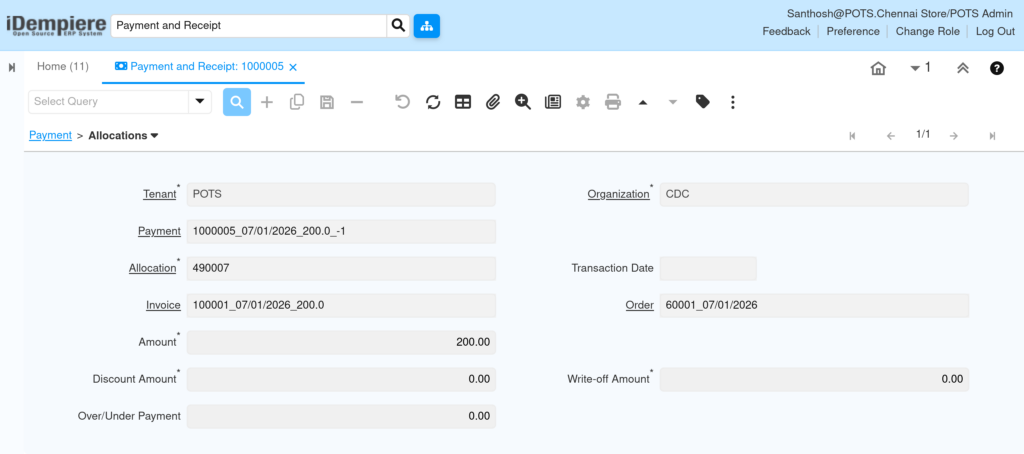
Open the Allocations tab; verify or create an allocation with Invoice, Order, and Amount; confirm the Allocated checkbox is set on the Payment tab.
| Field | Sample Value | Description |
| Allocation | 490007 | Unique allocation record identifier |
| Amount | 200.00 | Amount allocated to the invoice |
| Allocated | Checked | Confirms the payment is matched to an invoice |
Common Issues and Resolutions
| Issue | Cause | Resolution |
| Payment shows Allocated unchecked | No allocation created against the invoice | Open the Allocations tab and match the payment to the invoice |
| Over/Under Payment amount is not zero | Payment amount differs from invoice amount | Adjust the allocation amount or apply Discount/Write-off |
| Posting fails with an accounting error | GL accounts not configured for the Bank Account | Configure account mapping in the Bank Account window |
| Invoice not visible in the Invoice field | Invoice not completed or belongs to a different Business Partner | Complete the invoice and confirm the matching Business Partner |
| Wrong Bank Account selected for a store | Multiple bank accounts not clearly labeled | Rename Bank Accounts to identify the store or collection point |
Next Steps
- Configure the Invoice (Customer) window for AR invoices.
- Set up the Allocation window for multi-invoice matching.
- Configure Bank Statement and Reconciliation.
- Review the Cash Journal for POS cash drawer management.