How to Configure User Preference in iDempiere
The User Preference window in iDempiere lets each user configure personal navigation, entry and display settings.
Introduction
The User Preference window in iDempiere lets a logged-in user personalize how the application behaves for their own session, without affecting other users. It controls navigation, save, zoom and search behaviour at the individual user level.
It is accessed from the Preference link available on every standard iDempiere screen, and applies across all windows the user opens during data entry, review and reporting.
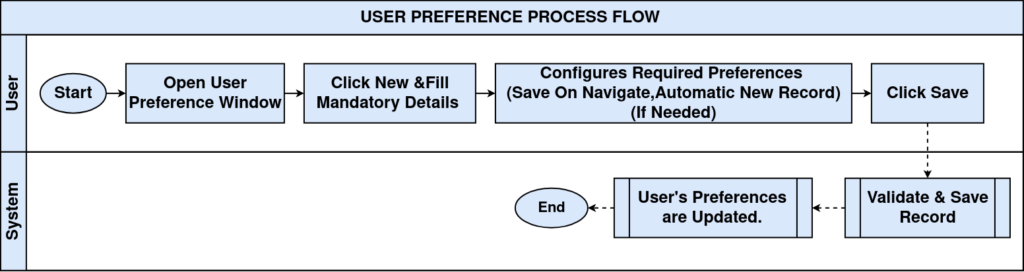
Process Flow
Business Rules
- Preferences are stored per Tenant, Organization and User/Contact combination.
- An Organization value of * applies the preference across all organisations for that user.
- Save on Navigate automatically saves an edited record when the user moves to another record.
- Toggle on Double Click lets a checkbox field be switched by double-clicking the row.
- Automatic Decimal Places For Amounts sets the default decimal precision shown on amount fields.
- Automatic New Record opens a blank new record automatically after a save completes.
- Detailed Zoom Across expands the list of related windows offered when zooming from a record.
- Use Similar To changes default text search to a similar-to (fuzzy) match instead of exact match.
- Read Only Session, when enabled, prevents the user from saving any changes during that session.
- View find result determines whether the Find window opens in Default or Grid layout by default.
Prerequisites
- User must be logged in with a valid iDempiere User/Contact account.
- User must have access to the Tenant and Organization the preference applies to.
- Role must permit access to the User Preference window if opened from the menu tree.
Configuration Steps
Step 1: Open User Preference
This step is required to reach the personal settings screen for the logged-in user. Click the Preference link at the top-right of any iDempiere window.
| Field | Sample Value | Description |
| Tenant | POTS | Client organisation the preference belongs to. |
| Organization | * | Scope of the preference; * applies to all organisations. |
| User/Contact | SuperUser | The user this preference record applies to. |
The window always opens scoped to the currently logged-in user and cannot be used to edit another user’s preferences.
Step 2: Set Navigation and Save Behaviour
This step is required to control how the session responds while moving between records. Enable or disable the relevant checkboxes based on the user’s preferred data-entry style.
| Field | Sample Value | Description |
| Save on Navigate | Checked | Automatically saves changes when leaving the current record. |
| Toggle on Double Click | Unchecked | Allows checkbox fields to be toggled with a double-click. |
| Automatic New Record | Checked | Opens a new blank record automatically after saving. |
These flags apply immediately to the user’s session once the record is saved.
Step 3: Set Display and Search Behaviour
This step is required to define how amounts, zoom targets and searches appear for the user. Configure the decimal, zoom and search-related fields.
| Field | Sample Value | Description |
| Automatic Decimal Places For Amounts | 0 | Default number of decimal places shown on amount fields. |
| Detailed Zoom Across | Unchecked | Shows an expanded list of related zoom target windows. |
| Use Similar To | Unchecked | Uses similar-to matching instead of exact match in searches. |
| View find result | Default | Default layout used when opening the Find window. |
Changes to search and zoom behaviour take effect the next time the user opens Find or Zoom.
Step 4: Set Session and Help Options
This step is required to control session write access and the level of help detail shown. Review the Read Only Session, Show Technical Information on Help and Active fields.
| Field | Sample Value | Description |
| Read Only Session | Unchecked | When checked, prevents saving changes during the session. |
| Show Technical Information on Help | Unchecked | Displays technical field details in the Help popup. |
| Active | Checked | Indicates the preference record is active and in use. |
A user with Read Only Session enabled can navigate and view data but cannot save any record.
Step 5: Save the Preference Record
This step is required to apply the selected personalization to the user’s future sessions. Save the record using the standard toolbar Save action.

After completing the configuration, the window is ready for use in standard iDempiere transactions.
Common Issues and Resolutions
| Issue | Cause | Resolution |
| Preference changes not applied | Session was not restarted after saving | Log out and log back in, or reopen the window. |
| Cannot save any record | Read Only Session is enabled | Uncheck Read Only Session in User Preference. |
| Amount fields show wrong decimals | Automatic Decimal Places For Amounts set incorrectly | Update the field to the required decimal precision. |
| Unwanted auto-save on navigation | Save on Navigate is enabled | Disable Save on Navigate if manual save is preferred. |
| Too many zoom targets listed | Detailed Zoom Across is enabled | Disable Detailed Zoom Across to show only direct targets. |
| Search returns too many results | Use Similar To is enabled | Disable Use Similar To for exact-match searching. |
| Preference applies to wrong organization | Organization field set to a specific org instead of * | Set Organization to * for a tenant-wide preference. |
| Help popup lacks technical detail | Show Technical Information on Help is unchecked | Enable the option to view technical field information. |
Next Steps
- Role window – review window and menu access tied to the current role.
- User/Contact window – manage the user’s login and contact details.
- Preference window (system-level) – configure organization-wide default preferences.
- Change Role – switch tenant, organization or role context for the session.