How to Configure Dunning in iDempiere
The Dunning window defines an organization’s customer payment reminder policy for overdue receivables, made up of one or more escalating Dunning Levels.
In retail, it is used to automate reminder letters for unpaid invoices, from a friendly first notice through fees, credit stop, and legal collection status.
The Dunning definition itself does not send reminders; it is the policy the Dunning Run process applies when evaluating overdue invoices.
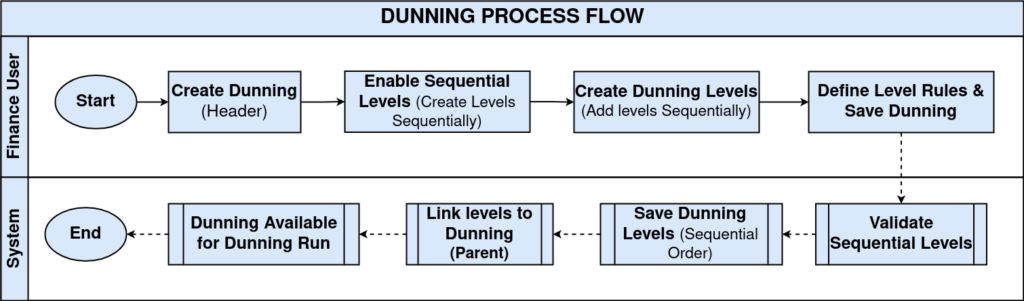
Process Flow Diagram
Business Rules
- A Dunning Name is mandatory on the header.
- A Dunning can contain multiple Dunning Levels.
- Each Dunning Level has its own overdue period, fee, and collection behavior.
- Print Text is mandatory on every Dunning Level.
- When Create Levels Sequentially is enabled, earlier levels must be reached before a higher level applies.
- Collection fees, Credit Stop, Payment Term changes, and Collection Status are all optional per level.
- Collection Status offers four options: Collection Agency, Dunning, Legal Procedure, and Uncollectable.
- The Dunning configuration itself does not generate reminders; it is the policy used by the Dunning Run.
Prerequisites
- Organization configured.
- Payment Term configured, if a level will use Set Payment Term.
- Dunning Print Format configured, if a custom print layout is required.
Configuration Steps
Step 1: Create the Dunning Header
The header names the policy and decides whether levels must be reached in order, before any individual reminder stage is defined.
Create a new Dunning record, enter the Name and Description, then set Active, Default, and Create Levels Sequentially as needed.
| Field | Sample Value | Description |
| Organization | CDC | Organization this dunning policy applies to |
| Name | Standard Customer Dunning | Mandatory name identifying the policy |
| Description | Customer payment reminder with three escalation levels | Optional description of the policy |
| Active | Checked | Enables the policy for use |
| Default | Checked | Uses this policy automatically when no other is specified |
| Create levels sequentially | Checked | Requires earlier levels to be reached before a higher level applies |
| Note: Name and, on each level, Print Text are mandatory; saving with either blank leaves the field outlined in red. | ||

Step 2: Create the First Dunning Level
The first level is usually a low-pressure reminder, sent soon after the due date without any fee or credit restriction.
Add a new Level, enter the Name, Days after due date, Days between dunning, and Print Text, then leave Charge fee and Credit Stop unchecked.
| Field | Sample Value | Description |
| Name | Friendly Reminder | Label for this escalation stage |
| Description | First payment reminder for overdue invoices | Purpose of this level |
| Days after due date | 5.0 | How many days overdue before this level applies |
| Days between dunning | 5 | Minimum days before the next reminder can be sent |
| Show Not Due | Unchecked | Whether invoices not yet due are listed on the notice |
| Show All Due | Checked | Lists all due invoices, not just the overdue one |
| Charge fee | Unchecked | No collection fee applied at this level |
| Print Text | Your payment is overdue. Kindly arrange payment. | Message printed on the reminder |
| Note | First reminder sent to the customer. | Internal note about this level |

Step 3: Create the Second Dunning Level
The second level escalates the reminder by adding a fee, signalling to the customer that the account is now further overdue.
Add a new Level, enter the timing and Print Text as before, then check Charge fee and enter a Fee Amount, and set a Collection Status.
| Field | Sample Value | Description |
| Name | Second Reminder | Label for this escalation stage |
| Description | Second notice for unpaid customer invoices | Purpose of this level |
| Days after due date | 15.0 | How many days overdue before this level applies |
| Days between dunning | 10 | Minimum days before the next reminder can be sent |
| Charge fee | Checked | Applies a collection fee at this level |
| Fee Amount | 250.00 | Fee charged when this level is reached |
| Collection Status | Dunning | Collection status applied to the business partner at this level |
| Print Text | Second payment reminder. Settle all outstanding invoices. | Message printed on the reminder |
| Note | Second reminder with administrative fee | Internal note about this level |

Step 4: Create the Final Dunning Level
The final level is the last step before legal collection, so it typically applies a higher fee, stops further credit, and can force immediate payment terms.
Add a new Level, enter the timing and Print Text, check Charge fee with a higher Fee Amount, then check Credit Stop and Set Payment Term with the required Payment Term and Collection Status.
| Field | Sample Value | Description |
| Name | Final Notice | Label for this escalation stage |
| Description | Final Demand before legal collection | Purpose of this level |
| Days after due date | 30.0 | How many days overdue before this level applies |
| Days between dunning | 15 | Minimum days before the next reminder can be sent |
| Charge fee | Checked | Applies a collection fee at this level |
| Fee Amount | 500.00 | Fee charged when this level is reached |
| Credit Stop | Checked | Blocks further credit to the business partner |
| Set Payment Term | Checked | Overrides the business partner’s payment term |
| Payment Term | Immediate | Payment term applied once this level is reached |
| Collection Status | Legal Procedure | Collection status applied to the business partner at this level |
| Print Text | Final payment notice, make immediate payment | Message printed on the reminder |
| Note | Final collection notice before legal escalation. | Internal note about this level |
| Note: Collection Status offers four values: Collection Agency, Dunning, Legal Procedure, and Uncollectable. | ||

Step 5: Review All Dunning Levels
Reviewing all levels together confirms the escalation makes sense from first reminder through to final notice before the policy is used.
Open the Level tab on the Dunning header and confirm each level’s Days after due date, Fee Amount, and Print Text increase in severity in order.
| Level | Days after Due Date | Fee Amount |
| Friendly Reminder | 5.0 | 0.00 |
| Second Reminder | 15.0 | 250.00 |
| Final Notice | 30.0 | 500.00 |

Step 6: Use the Dunning Configuration
The configured policy only takes effect once it is applied during an actual Dunning Run against overdue invoices.
Assign the Dunning policy to a Business Partner if required, then execute the Dunning Run process; the system evaluates overdue invoices against the configured levels and applies the matching rules.
Common Issues and Resolutions
| Issue | Cause | Resolution |
| Cannot save Dunning | Name not entered | Enter a unique Dunning Name |
| Cannot save Dunning Level | Name or Print Text not entered | Enter both the mandatory Name and Print Text before saving |
| Reminder level not applied | Overdue days do not satisfy the configured Days after due date | Verify the invoice’s overdue days against the level’s threshold |
| Higher level not reached | Create Levels Sequentially is enabled but earlier levels were skipped | Ensure previous levels have already been generated before the next applies |
| Credit Stop not enforced | Credit Stop not enabled on the applicable level | Enable Credit Stop on the Dunning Level |
| Fee not applied | Charge fee unchecked or Fee Amount left blank | Enable Charge fee and enter a Fee Amount for the level |
Next Steps
- Assign the Dunning policy to applicable Business Partners.
- Create and complete Sales Orders and AR Invoices.
- Allow invoices to become overdue based on their payment terms.
- Execute the Create Dunning Run process.
- Review generated Dunning Notices and send reminders to customers.
- Continue through higher Dunning Levels until payment is received or the final stage is reached.