How Does Work Print Font in iDempiere
The Print Font window in iDempiere is a standard Application Dictionary setup screen used to define reusable fonts that Print Formats apply when generating printed documents and reports.
It supports the document printing process across all standard iDempiere modules and is typically maintained by system administrators or report designers rather than end users during daily transactions.
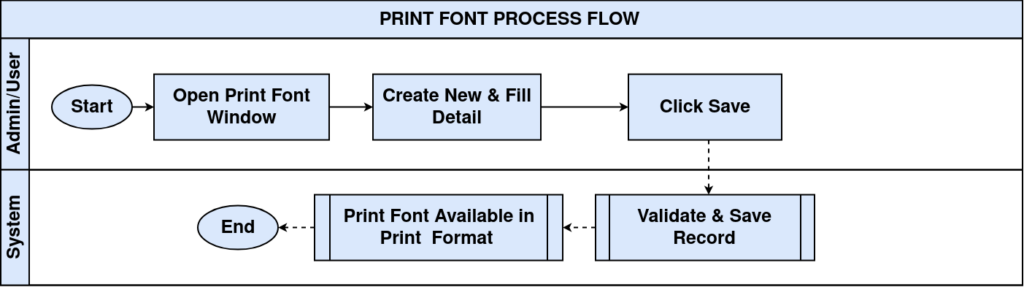
Process Flow
Business Rules
- Only Active Print Fonts are available for selection in Print Format configuration.
- A Print Font marked as Default is automatically used when a new Print Format needs a font.
- Print Font records are Tenant-level and can be scoped to a specific Organization or to all (*).
- The Validation Code stores the actual font definition used by the reporting engine.
- Print Fonts control report text appearance only; they do not affect transaction data or postings.
Prerequisites
- User role with access to the Application Dictionary menu (System Administrator or Report Designer).
- Tenant and Organization already configured in standard iDempiere.
- Basic familiarity with standard iDempiere Print Format setup.
Navigation
Menu → Application Dictionary → Print → Print Font
Users see a list of existing Print Font records; selecting or creating one opens a detail form with the font header fields.
Configuration Steps
Step 1: Open the Print Font Window
This step is required to access existing Print Font records or start a new one before it can be linked to a Print Format.
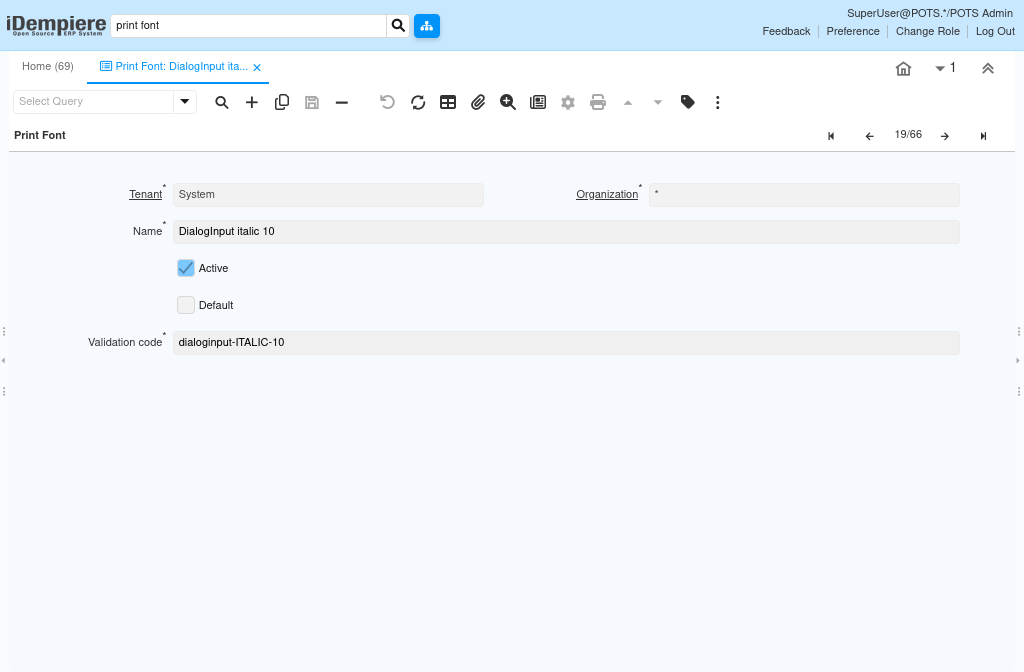
Navigate to Application Dictionary → Print → Print Font. The window opens showing the first record, with navigation controls to browse all records.
Step 2: Define Print Font Header Details
Setting the Tenant, Organization and Name identifies the font and determines its visibility scope across the system.
Enter a unique, descriptive Name. Confirm the Tenant and Organization values, using “*” for Organization when the font should be available to all organizations.
Step 3: Set Active and Default Flags
The Active and Default check boxes control whether the font is usable and whether it is applied automatically.
Check Active to make the font available for selection. Check Default only for the font that should be pre selected on new Print Formats.
Step 4: Define the Validation Code (Font Definition)
The Validation Code stores the actual font family, style and size that the reporting engine applies when printing.
Enter the font definition in the format FontFamily-Style-Size, for example dialog-PLAIN-10, meaning Font Family Dialog, Style Plain, Size 10 pt.
After completing the configuration, the window is ready for use in standard iDempiere transactions.

Field Reference
| Field | Sample Value | Description |
| Tenant | System | Owning tenant of the Print Font record. |
| Organization | * | Scope of the record; * means available to all organizations. |
| Name | Dialog 10 | Descriptive name identifying the print font. |
| Active | Yes | Determines if the Print Font can be selected and used. |
| Default | No | Marks this font as the default choice for new selections. |
| Validation Code | dialog-PLAIN-10 | Actual font definition: Font Family=Dialog, Style=Plain, Size=10 pt. |
Common Issues and Resolutions
| Issue | Cause | Resolution |
| Print Font not appearing in Print Format | Active checkbox is unchecked | Enable the Active checkbox on the Print Font record and save. |
| Default font not applied automatically | Default flag not set on any record | Check the Default checkbox on the intended Print Font record. |
| Font not selectable in a specific Organization | Organization scope mismatch | Set Organization to “*” or to the matching organization. |
| Report text prints in the wrong font or size | Incorrect Validation Code syntax | Review and correct the FontFamily-Style-Size value in Validation Code. |
| Duplicate or unclear font names | No naming convention followed | Apply a consistent naming standard when creating new fonts. |
| Changes not reflected in a printed report | Report was generated before the change was saved | Save the Print Font record, then regenerate or reprint the report. |
| Font renders differently across environments | Font family not installed on the print server | Confirm the specified font family is available on the server. |
Next Steps
- Print Format – assign the configured Print Font to report elements.
- Print Color – define colors used alongside Print Fonts on reports.
- Print Paper – configure paper size and layout used with Print Fonts.
- Report and Process – review how Print Formats are applied when running reports.