How to Create Asset from Project in iDempiere
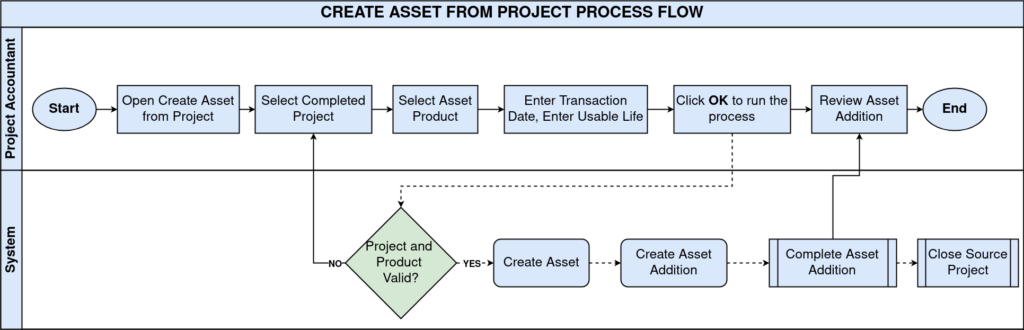
The Create Asset from Project process converts a completed project into a Fixed Asset by generating and completing an Asset Addition document. It is used once construction, fit-out, or equipment installation work is finished and ready for capitalization.
It directly impacts fixed asset accounting, depreciation schedules, and project closure, ensuring capital costs move from the Project ledger into the Asset register for reporting.
Process Flow
Business Rules
- Project field is mandatory before the process can run.
- Product field is mandatory and must represent the asset being created.
- Product must belong to a Product Category linked to an Asset Group.
- Transaction Date is used as both Document Date and Accounting Date.
- Asset Addition is created and completed automatically in one run.
- The source Project is closed automatically once the asset is created.
- Usable Life Years is optional and overrides the Asset Group default.
- The selected Project must have its Project Balance fully posted, as the system uses this balance to determine the created asset’s value.
Prerequisites
- Project window configured with actual project costs recorded.
- Asset Product created and linked to a Product Category.
- Product Category linked to a valid Asset Group.
- Asset Group configured with depreciation type and useful life.
- Fixed Asset accounting (Asset Accounting) configured for the Organization.
- Transaction Date period open in the Calendar/Period Control.
Configuration Steps
Step 1: Select the Completed Project
Click the Project field, search for the closed project (for example, a store renovation), and select it. Confirm all project costs are posted before proceeding.
Important: The system uses the balance amount to determine the value of the asset that gets created.

Step 2: Select the Asset Product
Select the asset product, such as Store Fixtures or Refrigeration Unit. Verify the product’s category has an Asset Group before running the process.
| Field | Sample Value | Description |
| Project | Store 12 Renovation | Source project whose cost is capitalized |
| Product | Store Fixtures – Asset | Defines the Fixed Asset type created |
Step 3: Set the Transaction Date
Enter the date the asset goes into service, typically the project completion date. This date affects when depreciation begins.
Step 4: Enter Usable Life Years (Optional)
Only populate this if the asset’s actual useful life differs from the Asset Group default, such as leasehold improvements with a shorter lease term.
| Field | Sample Value | Purpose |
| Transaction Date | 07/15/2026 | Sets Document Date, Accounting Date, and in-service date |
| Usable Life – Years | 5 | Overrides Asset Group default depreciation years |
| Run as Job | Unchecked | Runs the process immediately in the foreground |
Step 5: Run the Process
Click OK. The system validates the Project and Product, verifies the Asset Group, then creates and completes the Asset Addition automatically.
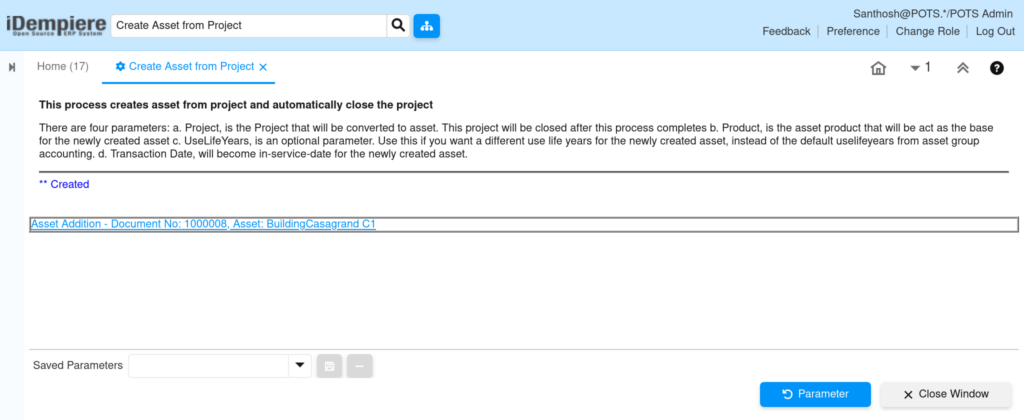
Step 6: Review the Created Asset Addition
After successful completion, the process log links directly to the new Asset Addition for review.
Common Issues and Resolutions
| Issue | Cause | Resolution |
| Missing Mandatory Field Value error | Project or Product left blank | Select both Project and Product before clicking OK |
| “Product is not asset type” error | Product’s category has no Asset Group | Link the Product Category to a valid Asset Group |
| Wrong depreciation years applied | Usable Life Years left blank unintentionally | Enter the correct override value if it differs from Asset Group default |
Next Steps
- Configure Asset Group and depreciation settings in Asset Setup.
- Review the Asset Addition window for accounting entries.
- Set up the Depreciation Workfile for the new Fixed Asset.
- Verify Fixed Asset appears correctly in Asset reporting.