How to Configure Request Type Window in iDempiere
The Request Type window in iDempiere defines categories of service requests, such as customer complaints, warranty claims, or delivery issues, used within Request Management.
Each request type controls due dates, escalation emails, and confidentiality, driving faster resolution and more accurate service reporting.
Process Flow

Business Rules
- Active request types are available for creating new requests.
- Default request type is automatically pre-selected when a new request is created.
- Due Date Tolerance sets the grace days allowed before a request is overdue.
- Auto Due Date Days defines the default due date offset for new requests.
- Email notifications are sent automatically when a request is due or overdue.
- Confidentiality level restricts who can view sensitive request details.
- Status Category determines the workflow stage a request type follows.
Prerequisites
- Organization configured.
- Request Group configured (for further categorization, if used).
- User/Contact records configured for assignment and notifications.
- Confidentiality values available (system-defined in iDempiere).
- Mail/SMTP server configured for email notification delivery.
Navigation
Menu → Partner Relations → Requests → Request Type
Configuration Steps
Step 1: Define Basic Request Type Information
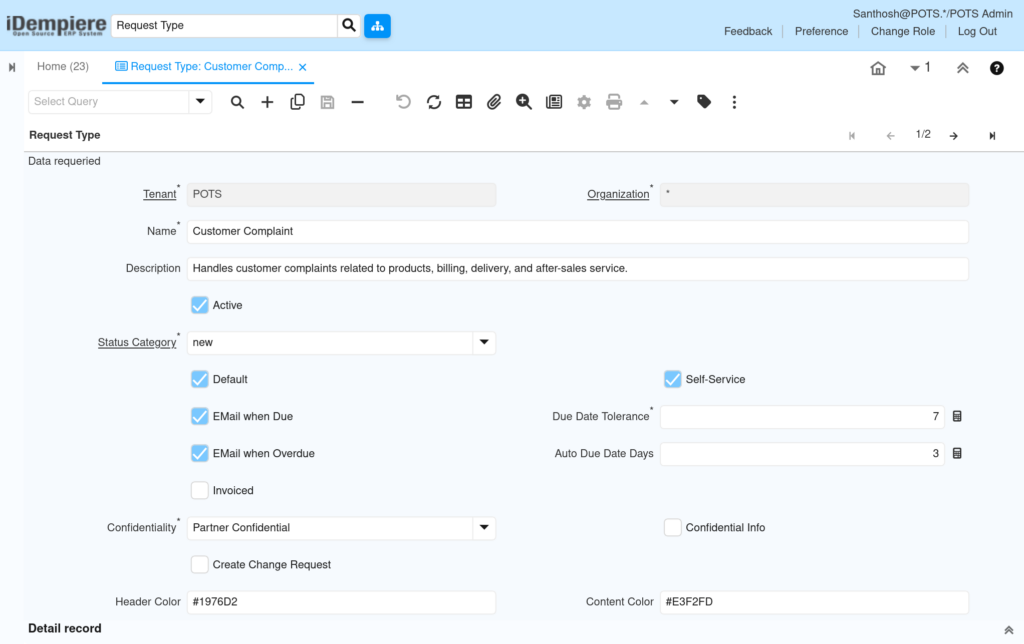
Enter a Name such as “Customer Complaint” and a Description explaining its purpose. Check Active to enable the record for use.
| Field | Sample Value | Description |
| Name | Customer Complaint | Identifies the request type in lists and dropdowns |
| Description | Handles customer complaints related to products, billing, delivery, and after-sales service. | Explains the scope of the request type |
| Active | Checked | Enables the request type for use in transactions |
Step 2: Set Default and Self-Service Options
Check Default to make this the pre-selected type for new requests. Check Self-Service to allow customers to submit requests through a portal.
| Field | Sample Value | Description |
| Default | Checked | Auto-selects this type when a new request is created |
| Self-Service | Checked | Allows customers to submit requests directly |
Step 3: Configure Status Category and Confidentiality
Select a Status Category such as “new”. Set Confidentiality to “Partner Confidential” to restrict visibility to authorized internal users.
| Field | Sample Value | Description |
| Status Category | new | Sets the initial workflow stage for requests |
| Confidentiality | Partner Confidential | Restricts visibility to authorized partner-level users |
| Confidential Info | Unchecked | Flags individual requests as confidential when checked |
Step 4: Configure Due Date and Escalation Settings
Enter Due Date Tolerance and Auto Due Date Days in days. Check EMail when Due and EMail when Overdue to trigger notification emails.
| Field | Sample Value | Description |
| Due Date Tolerance | 7 | Grace days allowed before a request is marked overdue |
| Auto Due Date Days | 3 | Default number of days added to set the due date |
| EMail when Due | Checked | Sends a reminder email as the due date approaches |
| EMail when Overdue | Checked | Sends an alert email once the request is overdue |
Step 5: Set Visual Identifiers
Enter a hex value for Header Color and Content Color to visually distinguish this request type from others.
| Field | Sample Value | Description |
| Header Color | #1976D2 | Background color used for the request type header |
| Content Color | #E3F2FD | Background color used for the request content area |
Step 6: Configure Update Notification
In the Update Notification detail tab, add a row, select the User/Contact to notify, and check Active to enable the rule.
| Field | Sample Value | Description |
| User/Contact | Santhosh | Staff member who receives update notifications |
| Active | Checked | Enables this notification rule |

Common Issues and Resolutions
| Issue | Cause | Resolution |
| Request Type not appearing in dropdown | Active checkbox is unchecked | Enable Active and save the record |
| Multiple request types set as Default | Default is checked on more than one record | Uncheck Default on all but the intended type |
| Overdue emails not sent | EMail when Overdue unchecked or SMTP not configured | Enable the checkbox and verify mail server setup |
| Staff not receiving notifications | User/Contact missing or inactive in Update Notification tab | Add the correct user and mark the row Active |
| Confidential complaints visible to wrong roles | Confidentiality set too low | Set Confidentiality to Partner Confidential or higher |
Next Steps
- Configure Request Group for further categorization of request types.
- Use the Request window to log actual customer complaints and requests.
- Review Request Type based workflow if custom approval steps are needed.
- Check Request reports or dashboards to monitor SLA compliance.