How to Import Account Window in iDempiere
The Import Account window lets iDempiere users bulk load Chart of Accounts values from a staging table into live account records, instead of creating each account manually.
A correctly run import directly affects GL posting accuracy, default account mapping, and the reliability of financial and store-level reporting.
Process Flow
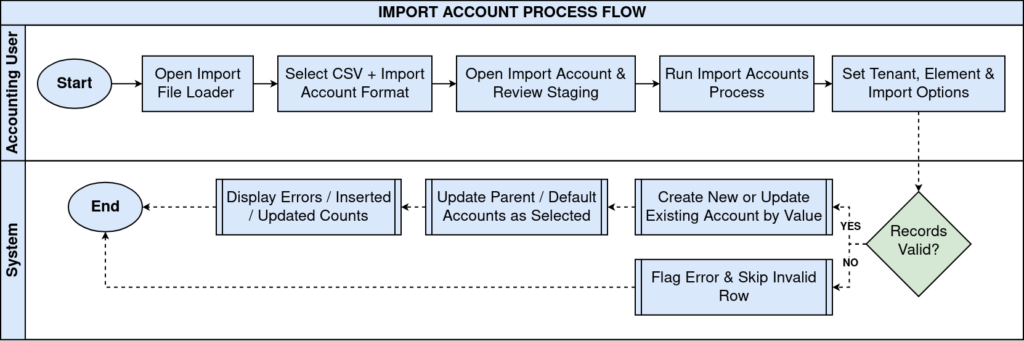
Business Rules
- Only active accounts are available for GL posting and transaction entry.
- Existing accounts with a matching Value are updated, not duplicated on re-import.
- Missing Account Type defaults to Expense during import processing.
- Missing Account Sign defaults to Natural during import processing.
- A child account requires its parent Value to already exist in the Chart of Accounts.
- Enabling Update Default Accounts changes accounts used across future postings.
- Records that fail validation are flagged with an error message and are skipped.
- Previously imported staging rows can be auto-deleted before a new import run.
Prerequisites
- Accounting Element (C_Element) configured, for example “POTS Account”.
- Accounting Schema configured for the retail organization.
- Import file prepared in the Import Account CSV format.
- Tenant and Organization already configured in iDempiere.
- Parent account Values imported first when loading child-level accounts.
Navigation
Menu → Data → Data Import → Import File Loader / Import Account
Configuration Steps
Step 1: Prepare the Import File
Create a CSV with Organization, Value, Search Key, Name, Description, Account Type, Account Sign, and Is Summary columns, one row per account.
| Field | Sample Value | Description |
| Organization | 0 | Organization the account belongs to. |
| Element ID / Value | 1000000 | Account key/code used to match or create records. |
| Search Key | AP | Short code identifying the account. |
| Name | Accounts Payable | Display name of the account. |
| Description | Account for Account Payables | Descriptive text for the account. |
| Account Type | R | Asset, Expense, Liability, Memo, Owner Equity, or Revenue. |
| AccountSign | N | Natural, Credit, or Debit balance sign. |
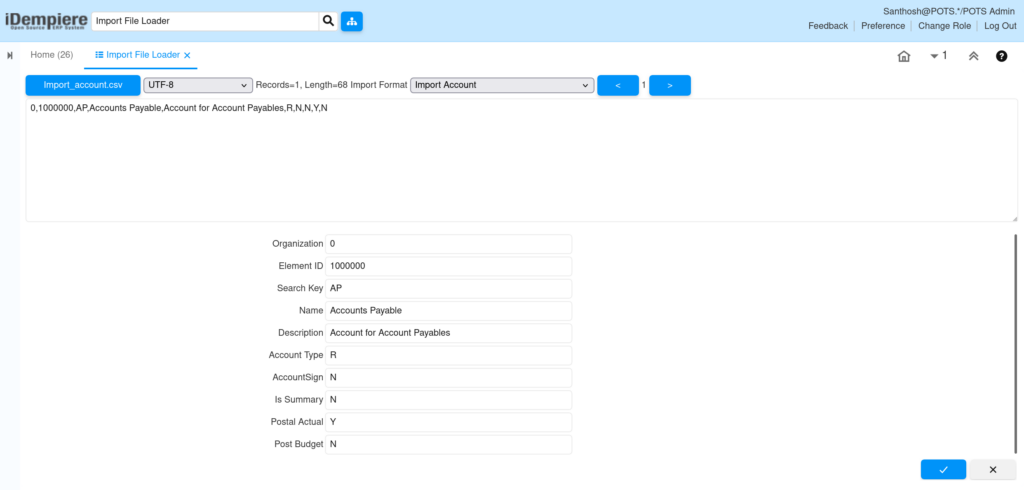
Step 2: Load the File Using Import File Loader
Open Import File Loader, select the CSV file, choose UTF-8 encoding, set Import Format to Import Account, then click the file name button to load.
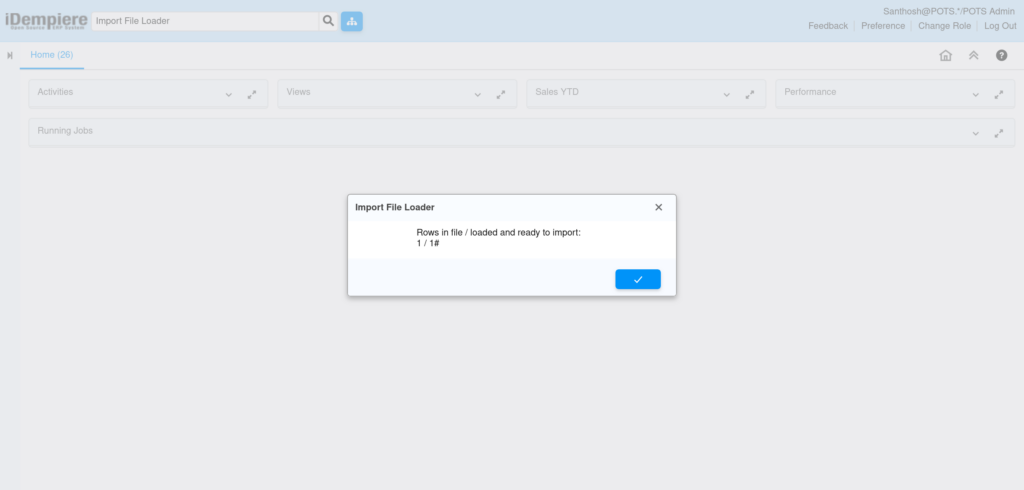
Step 3: Review the Import Account Staging Record
Open the Import Account window, check Element, Name, Account Type, Account Sign, Parent Key, and posting flags for each staged row.
| Field | Sample | Purpose |
| Element | POTS Account | Accounting element the row belongs to. |
| Account Type | Revenue | Classifies the account for financial statements. |
| Account Sign | Natural | Defines the normal balance behavior. |
| Parent Key | (blank) | Links this account under a summary parent account. |
| Post Actual | Checked | Allows actual transactions to post to this account. |
| Post Statistical | Checked | Allows statistical postings to this account. |
| Document Controlled | Unchecked | Marks whether the account is tied to a default-account column. |

Step 4: Run the Import Accounts Process
Click the process button, set Tenant and Element, then choose Update Default Accounts, Create New Combination, and Delete Old Imported Records as needed.

Step 5: Review Import Results
After the process completes, review the Errors, Inserted, and Updated counts shown in the confirmation dialog.
| Field | Sample | Description |
| Errors | 0 | Count of rows that failed validation. |
| Account Element: Inserted | 1 | Count of new accounts created. |
| Account Element: Updated | 0 | Count of existing accounts updated. |
| Parent Account: Updated | 1 | Count of accounts linked to a parent. |

Step 6: Verify the Account in the Chart of Accounts
Open Account Element (Chart of Accounts), locate the new account in the tree, and confirm its type, sign, and posting flags.

Common Issues and Resolutions
| Issue | Cause | Resolution |
| Row shows “ERR=No Name” | Value or Name column is empty in the CSV. | Fill in Value and Name for every row before re-loading the file. |
| Row shows “ERR=Invalid Element” | Element Name in the file does not match any C_Element. | Set the Element parameter or correct the ElementName column. |
| Default accounts did not change | Update Default Accounts checkbox left unchecked. | Enable Update Default Accounts when running the Import Accounts process. |
| Import shows 0 Inserted and 0 Updated | Rows already marked Processed=Y from an earlier run. | Reload the CSV file so new unprocessed rows are created before running the process. |
| Existing account combinations affected unexpectedly | Create New Combination disabled while changing a default account. | Enable Create New Combination, or confirm the replace behavior first and keep a backup. |
Next Steps
- Configure the Accounting Schema and confirm its default accounts.
- Review Element Value Security if certain organizations should not see all accounts.
- Set up Bank Account and GL Category records linked to the new accounts.
- Continue with Business Partner and Product setup to begin posting retail transactions.