How to Use All Tenants in iDempiere
All Tenants is the iDempiere window that gives System Administrators a centralized, read-only view of every tenant configured in the system.
IT teams use it to confirm which tenants exist and to review the users belonging to each one, including login history and password status.
The window is built on the AD_AllClients_V system view and is intended for administrative monitoring rather than day-to-day transaction processing.
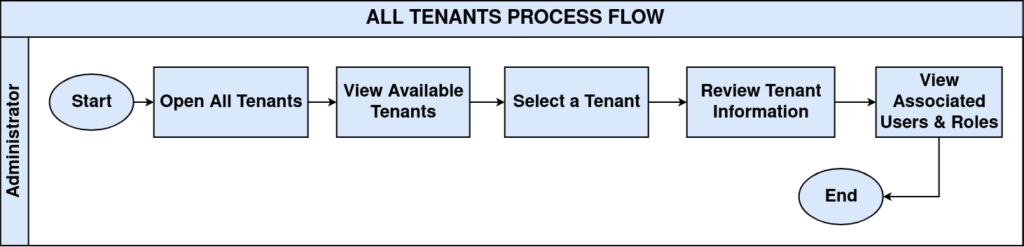
Process Flow
Business Rules
- The window displays all tenants configured in the iDempiere system.
- Each tenant displays its basic identification information.
- Selecting a tenant displays the users associated with that tenant.
- User information includes login-related and password-related details.
- The window supports administrative review, not transaction processing.
- The window is based on the AD_AllClients_V system view.
Prerequisites
- System Administrator role and access to the System Tenant.
- Tenants and users already configured in the system.
Configuration Steps
Step 1: Open the All Tenants Window
This provides the entry point to review every configured tenant in one place.
Navigate to System Administrator → All Tenants to view the list of available tenants.
Step 2: Select a Tenant to Review
Selecting a tenant loads its details and its associated user list.
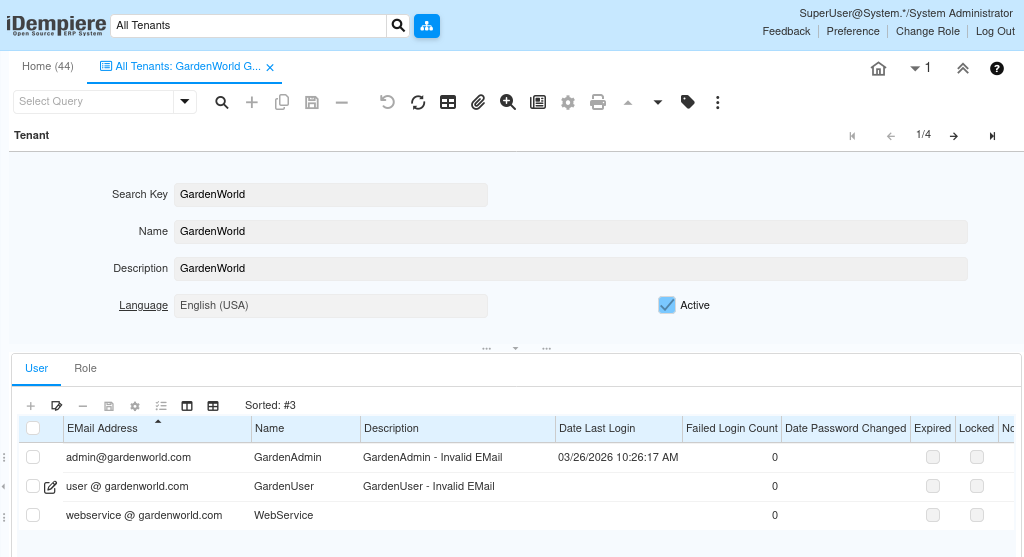
Select a row in the tenant grid and review the Search Key, Name, Description, and Language.
| Field | Sample Value | Purpose |
| Search Key | POTS | Unique identifier of the tenant |
| Name | POTS | Tenant name |
| Language | English (USA) | Default language configured for the tenant |
Step 3: Review the Associated Users
The User tab lists everyone belonging to the selected tenant, along with their login and password status.
Open the User tab below the tenant grid and review each user’s Email Address, Name, and Description.
| Name | Description |
| PotsAdmin | PotsAdmin |
| StoreManager | StoreManager |
| Ravi Kumar | Store Cashier |
| Santhosh |
Step 4: Monitor Login and Password Status
These fields help administrators spot stale passwords, locked accounts, or repeated failed logins.
Review Date Last Login, Failed Login Count, Date Password Changed, Expired, and Locked for each user in the User tab.
| Field | Description |
| Date Last Login | Most recent successful login date and time |
| Failed Login Count | Number of unsuccessful login attempts |
| Date Password Changed | Date when the password was last changed |
| Expired | Indicates whether the password has expired |
| Locked | Indicates whether the user account is locked |
Common Issues and Resolutions
| Issue | Cause | Resolution |
| Tenant not visible | Tenant doesn’t exist, or the logged-in user lacks System Administrator access | Verify the tenant exists and the logged-in user has System Administrator access |
| User not displayed | User doesn’t belong to the selected tenant | Confirm the user’s Tenant assignment |
| Login information not updated | User hasn’t logged in since the relevant activity | Verify the user has logged into the system after the activity in question |
| Password fields appear unexpected | Password display depends on system-level configuration | Review Tenant or system security settings controlling password visibility |
| Locked or expired status unclear | Grid data not refreshed | Refresh the window or re-query to see the current status |
Next Steps
- Manage tenant configuration in the Tenant window.
- Maintain users in the User window.
- Manage roles and access permissions as needed.
- Review password policies and security settings.