How to Use All User Roles in iDempiere
The User Roles window defines the security and access level for every iDempiere user in a retail deployment. It controls what stores, functions, and financial data staff such as cashiers, store admins, and regional managers can access.
Process Flow
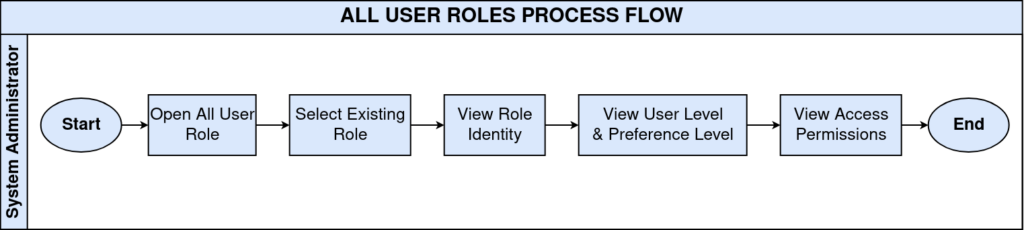
Business Rules
- Only Active roles can be assigned to users for system login.
- User Level determines access scope: Client, Organization, or Client+Organization.
- Can Export and Can Report control data extraction and report visibility per role.
- Show Accounting restricts financial ledger data to authorized roles only.
- Access Advanced exposes advanced configuration windows to selected roles.
- Personal Lock and Personal Access restrict records to the creating user.
- Preference Level controls whether user preferences apply at Client, Org, or User scope.
- Access all Orgs grants a role visibility across every store organization.
Prerequisites
- Tenant (Client) configured, e.g. POTS.
- Organization(s) representing stores or regions configured.
- System Users created and available for role assignment.
- Org structure and Business Partner setup completed for scoping access.
Navigation
Menu → General Rules → Security → All User Role
Configuration Steps
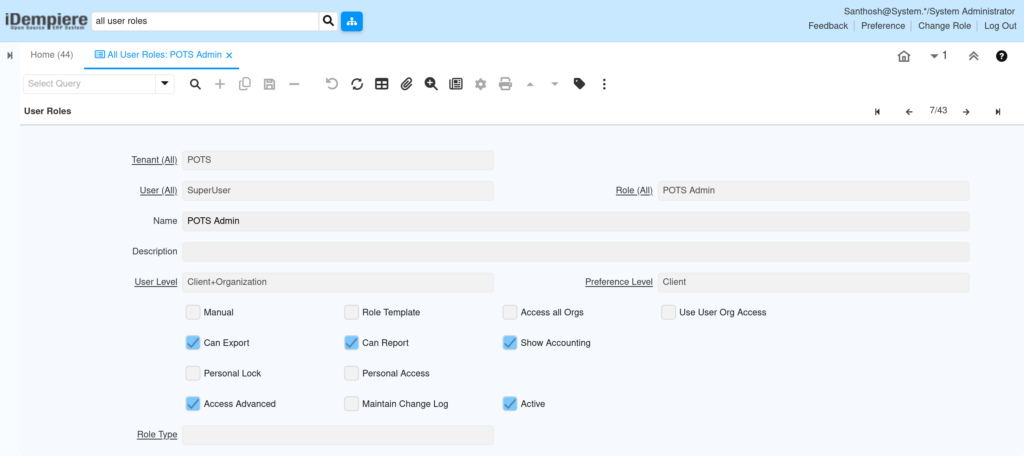
Step 1: Define Role Identity
Enter a descriptive Name (e.g. Store Cashier) and an optional Description explaining the role’s intended use.
| Field | Sample Value | Description |
| Name | POTS Admin | Identifies the role for assignment to users |
| Description | (optional) | Explains the intended purpose of the role |
Step 2: Set User Level and Scope
Select the appropriate User Level for the role and set the Preference Level to control where saved preferences apply.
| Field | Sample Value | Description |
| User Level | Client+Organization | Role can operate at both chain and store level |
| Preference Level | Client | User preferences saved apply chain-wide |
Step 3: Configure Access Permissions
Enable only the checkboxes required for the role’s function. Leave sensitive options like Show Accounting unchecked for store-floor staff.
| Field | Sample Value | Description |
| Manual | Unchecked | Role is not manually maintained outside templates |
| Role Template | Unchecked | Role is not used as a template for other roles |
| Access all Orgs | Unchecked | Restricts visibility to assigned organizations only |
| Use User Org Access | Unchecked | Org access follows role, not individual user |
| Can Export | Checked | Allows the role to export data |
| Can Report | Checked | Allows the role to run and view reports |
| Show Accounting | Checked | Allows the role to view accounting/financial data |
| Personal Lock | Unchecked | Records are not locked to the creating user |
| Personal Access | Unchecked | Records are not restricted to the creating user |
| Access Advanced | Checked | Grants access to advanced configuration windows |
| Maintain Change Log | Unchecked | Change log tracking is not enforced for this role |
Step 4: Set Role Type
Leave Role Type blank unless the organization uses role classification for reporting.
Step 5: Activate the Role
Check the Active box, then save the record to make the role available for user assignment.
| Field | Sample Value | Description |
| Active | Checked | Enables the role for assignment and login |
Common Issues and Resolutions
| Issue | Cause | Resolution |
| User cannot log in with assigned role | Role marked inactive | Activate the role record and save |
| Staff can view other stores’ data | Access all Orgs enabled incorrectly | Disable Access all Orgs; restrict via Org Access tab |
| Cashier can view accounting reports | Show Accounting checked for cashier role | Uncheck Show Accounting for non-finance roles |
| Export button missing for manager | Can Export not enabled | Enable the Can Export checkbox and save |
| User preferences not saved per store | Preference Level set to Client | Change Preference Level to Organization |
| Role changes not reflected for user | Cached role session in browser | Ask the user to log out and log back in |
| New windows not visible after update | Menu or window access not granted | Grant window access via the role’s Window Access tab |
Next Steps
- Configure Org Access, Window Access, and Process Access tabs for the role.
- Assign the completed role to Users via the User window.
- Set up Document Type access per role for POS transactions.