How to Use the Allocation Report in iDempiere
The Allocation report window in iDempiere lets retail finance teams match customer payments and cash receipts against open invoices. It is used in accounts receivable during payment reconciliation and month-end closing. By linking Business Partner, Invoice, and Payment records, the report confirms which invoices are settled, shows over or under payments, and drives accurate customer balances and audit trails across retail stores.
Business Rules
- Allocation records link one or more payments to one or more invoices for the same Business Partner.
- Only finalized entries display when Document Status is set to Completed.
- Previously reversed allocations appear in the report as reversed entries.
- Over/Under Payment reflects any unallocated invoice or payment balance.
- Write-off amounts must be approved before the allocation document posts.
- Summary mode consolidates multiple allocation lines into totals per Business Partner.
- Saved Parameters let users reuse frequent filter combinations for daily reconciliation.
Prerequisites
- Business Partner configured with active status.
- Invoice generated and completed for the customer or vendor.
- Payment or Cash Journal entry received and processed.
- Currency and Payment Term configured on the Business Partner.
- Payment Allocation document created for the transactions being reviewed.
Navigation
Open Items (Financial Movements and Aging) → Allocation Report
Configuration Steps
Step 1: Open the Allocation Report
Type “Allocation” in the top search bar and select Payment – Invoice – Allocation. The parameter screen opens for filter entry.
| Field | Sample Value | Description |
| Business Partner | FIVE TECHNOLOGIES PRIVATE LIMITED | Customer or vendor whose allocations are reported |
| Invoice | 100001_07/01/2026_200.0 | Invoice document filtered for allocation lookup |
| Payment | (blank) | Payment record filtered for allocation lookup |
| Document Status | Completed | Restricts results to finalized allocation documents |
| Run as Job | Unchecked | Runs the report as a background scheduled process |
Step 2: Set Filter Parameters
Select the Business Partner, then choose Invoice or Payment when checking one document. Set Document Status to Completed for finalized entries; leave fields blank for a broader account review.

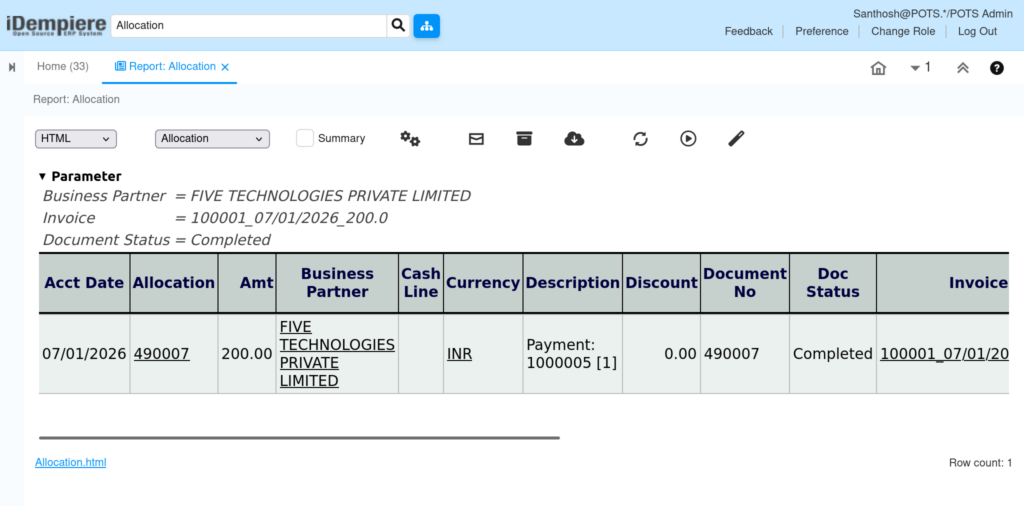
Step 3: Generate the Report Output
Pick a View Report format such as HTML, and a Print Format if a custom layout is required. Click OK to run. Enable Summary to see consolidated totals instead of line-level detail.
| Field | Sample | Purpose |
| Acct Date | 07/01/2026 | Accounting date of the allocation transaction |
| Allocation | 490007 | Allocation document number generated by the system |
| Amt | 200.00 | Amount allocated between invoice and payment |
| Currency | INR | Transaction currency of the allocation |
| Document No | 490007 | Allocation document reference number |
| Doc Status | Completed | Current status of the allocation document |
| Invoice | 100001_07/01/2026_200.0 | Invoice matched to the payment |
| Order | 60001_07/01/2026 | Sales or purchase order linked to the invoice |
| Over/Under Payment | 0.00 | Difference between invoice and payment amount |
| Payment | 1000005_07/01/2026_200.0_-1 | Payment record matched to the invoice |
| Write-off | 0.00 | Amount written off during allocation |
| Approved | Yes | Indicates whether the allocation was approved |
Step 4: Save Frequent Filters
After setting parameters, click the save icon next to Saved Parameters and name the filter set. Reload it from the dropdown on future report runs.

Common Issues and Resolutions
| Issue | Cause | Resolution |
| No rows returned | Filter combination does not match any completed allocation | Clear Invoice or Payment filter and rerun with Business Partner only |
| Invoice shows no allocation | Payment has not yet been allocated to the invoice | Complete the allocation in the Payment Allocation window first |
| Over/Under Payment not zero | Partial payment or discount not fully accounted for | Review the payment amount and apply the balance or a write-off |
| Report shows reversed lines | A prior allocation was reversed and reallocated | Confirm the latest allocation document number and date before reconciling |
| Write-off column not editable | Write-off is entered during allocation, not in the report | Return to Payment Allocation to record the write-off amount |
| Saved Parameters missing | Filter was not saved before navigating away | Recreate the filters and click the save icon before running the report |
| Summary totals differ from detail | Summary checkbox aggregates multiple allocation lines | Uncheck Summary to review individual allocation entries |
| Run as Job shows no output | Report is queued as a background process | Check the Process Monitor or notifications for the completed job |
Next Steps
- Configure the Payment Allocation window to create new allocations.
- Review the Business Partner statement for outstanding balances.
- Set up a Print Format for a customized allocation report layout.
- Configure Cash Journal settings for cash-based allocations.