How to Configure Request Email Processor in iDempiere
Introduction
The Request Email Processor is a window in iDempiere that reads incoming emails from a mailbox and turns them into service requests, so support emails do not need to be entered by hand.
It is used in Service Request handling, typically for a shared support mailbox that customers or contacts email directly with questions or issues.
Each processed email becomes a request record linked to the sending customer where possible, keeping communication history, attachments, and follow-up in one place for reporting and tracking.
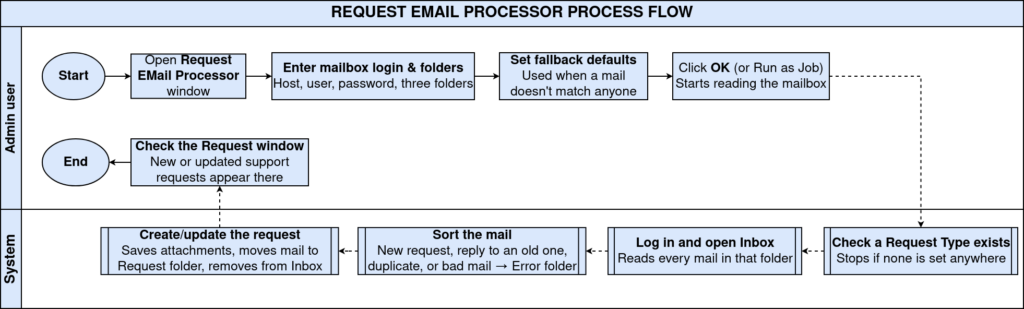
Note: This is a background process. It must be run manually or scheduled; it does not check the mailbox continuously on its own.Process Flow
Business Rules
- A request is created only once per email; the same email is never processed twice.
- A reply to an existing request updates that request instead of creating a new one.
- Emails with no sender address are moved to the Error Folder and are not processed.
- Successfully processed emails are moved to the Request Folder and removed from the Inbox.
- The sender’s email address is matched against existing users to identify the requestor.
- When the sender matches a user, that user’s linked Business Partner is applied automatically.
- When no user match is found, the default Business Partner, User, and Role are applied.
- The request Start Date is set to the date and time the email was originally sent.
- Request Type defaults to the value entered, or the system default Request Type if left blank.
- Files attached to the email are automatically added as attachments on the request.
- The email itself can be saved as an HTML attachment or as its embedded images.
- Priority and Confidentiality are applied from the defaults entered when the process is run.
Prerequisites
- Mailbox created with an Inbox, a Request folder, and an Error folder.
- Request Type configured, or a default Request Type set in Service Request setup.
- Business Partner configured, for use as the default requestor.
- User/Contact configured with a matching email address, for automatic sender matching.
- Role configured, for use as the default role on created requests.
- Sales Representative configured, for use as the default owner of created requests.
Navigation
Menu → System Admin → General Rules → Server → Request Email Processor
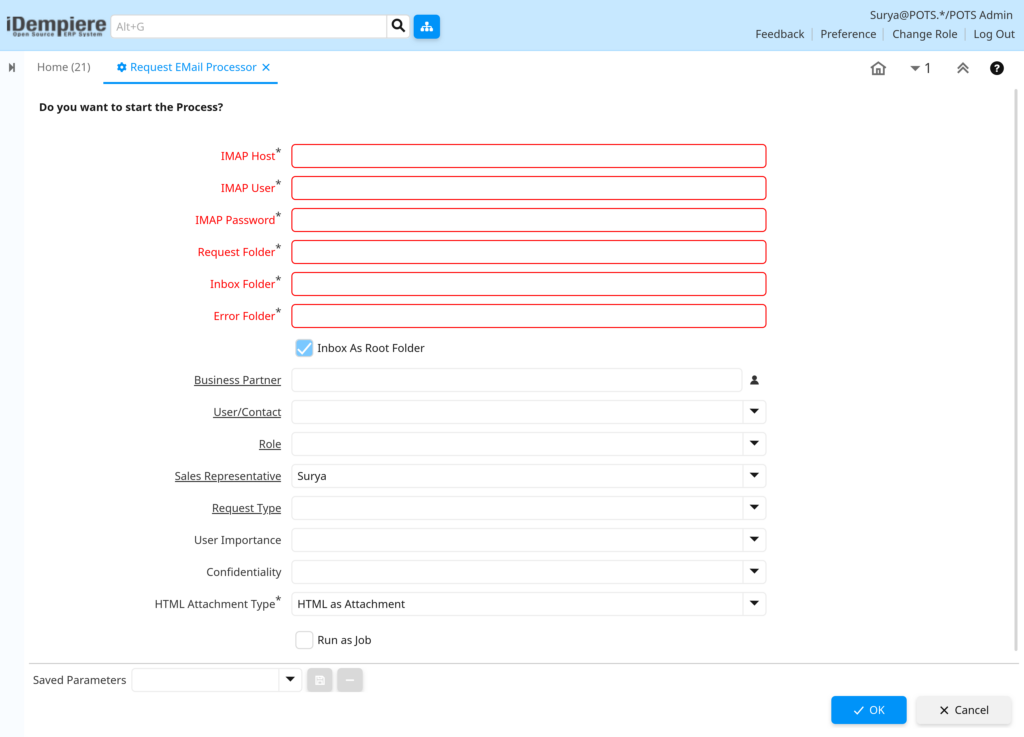
Opening the window displays a parameter entry screen. Here mailbox connection details, folder names, and default request values are entered before the process is run.
Configuration Steps
Step 1: Enter Mailbox Connection Details
The process needs to connect to the support mailbox before it can read any email.
Instructions
Enter the mail server address with its connection type, the mailbox user name, and the mailbox password. These match the login details used to access the mailbox directly.
Field Reference Table
| Field | Sample Value | Description |
| IMAP Host | imaps://imap.gmail.com:993 | Address and connection type of the mail server hosting the mailbox. |
| IMAP User | support@company.com | Mailbox user name used to log in to the email account. |
| IMAP Password | •••••••• | Password for the mailbox user account. |
Step 2: Define Mail Folders
The process needs to know which folder to read new email from, and where to move emails once they are processed or rejected.
Instructions
Enter the folder that holds new email, the folder for successfully processed email, and the folder for email that could not be processed. Indicate whether the Inbox is the top-level folder.
Field Reference Table
| Field | Sample Value | Description |
| Inbox Folder | INBOX | Folder checked for new, unread email. |
| Request Folder | Processed Requests | Folder where successfully processed email is moved. |
| Error Folder | Processing Errors | Folder where email that cannot be processed is moved. |
| Inbox As Root Folder | Checked | Indicates the Inbox is the top-level folder rather than nested under another folder. |
Step 3: Set Default Requestor Details
These values are used whenever a sender’s email address cannot be matched to an existing user, so every request still has an owner and a linked customer.
Instructions
Select the default Business Partner, User/Contact, Role, and Sales Representative to apply to requests created from unrecognized senders.
Field Reference Table
| Field | Sample Value | Description |
| Business Partner | (optional) | Default customer applied when the sender is not linked to a user. |
| User/Contact | (optional) | Default contact applied when the sender is not recognized. |
| Role | (optional) | Default role applied to requests from unrecognized senders. |
| Sales Representative | Surya | Default owner assigned to every request created by this run. |
Step 4: Set Request Classification Defaults
These values classify how the resulting requests appear in reporting and in the request queue.
Instructions
Select a Request Type, and optionally a default User Importance and Confidentiality level, to apply to every request created during this run.
Field Reference Table
| Field | Sample Value | Description |
| Request Type | (optional) | Category applied to created requests; uses the system default if left blank. |
| User Importance | (optional) | Default priority level applied to created requests. |
| Confidentiality | (optional) | Default confidentiality level applied to created requests. |
Step 5: Configure Email Attachment Handling
This determines how the original email content is kept on the request record.
Instructions
Choose whether the full email is saved as an HTML attachment, or whether only the images embedded in the email are saved as separate attachments.
Field Reference Table
| Field | Sample Value | Description |
| HTML Attachment Type | HTML as Attachment | Determines whether the email is saved as an HTML file or as embedded images. |
Step 6: Run the Process
Once the connection, folders, and defaults are set, the process can be run immediately or scheduled to run in the background.
Instructions
Select Run as Job to process the mailbox in the background, or leave it unchecked to run immediately. Select OK to start.
Field Reference Table
| Field | Sample Value | Description |
| Run as Job | Unchecked | Runs the process in the background instead of immediately. |
Common Issues and Resolutions
| Issue | Cause | Resolution |
| Process fails immediately with a connection error. | Mail server address, connection type, or login details are incorrect. | Confirm the address, connection type, and password with the mailbox provider and re-enter them. |
| No new requests are created, though new email exists. | The email has no recognizable sender address. | Check the Error Folder; such email is moved there without creating a request. |
| Process stops with a request type error. | No Request Type was entered and no default Request Type exists. | Set a default Request Type in Service Request setup, or select one in the process. |
| A reply creates a new request instead of updating the original. | The subject line or reply reference no longer matches the original email. | Ask users to keep the original subject line when replying to a request email. |
| The same email is processed more than once. | Folder names entered do not match the actual mailbox structure, so processed email is not moved out of the Inbox. | Verify the Inbox, Request, and Error folder names and the Inbox As Root Folder setting. |
| Requests are not linked to the correct customer. | The sender’s email address is not saved on any User/Contact record. | Add the sender’s email address to the relevant User/Contact record. |
| Attachments from the email are missing on the request. | The email had no attachments, or the HTML Attachment Type setting excluded them. | Confirm the email included attachments and review the HTML Attachment Type selection. |
| The process takes a long time to complete. | A large number of unread email is waiting in the Inbox Folder. | Run the process during off-peak hours, or select Run as Job to process it in the background. |
Next Steps
- Configure Request Type to classify incoming requests consistently.
- Review created requests in the Request window to confirm details and follow up.
- Set up a scheduler to run Request Email Processor automatically at regular intervals.
- Configure a Mail Template for automatic acknowledgement of received requests, if required.