How the Request Window works in iDempiere
Introduction
The Request window in iDempiere is where staff record and manage service requests, customer complaints, and internal follow-up tasks. Every request captures who raised it, what it concerns, and who is responsible for resolving it.
This window is used daily by support teams, sales representatives, and customer service staff to log issues and track them until closure. It is commonly linked to a Business Partner, Order, Invoice, or Product when a request relates to a specific transaction.
Because each request carries a status, priority, and due date, it directly affects service reporting, workload tracking, and escalation. Unresolved or overdue requests are easy to identify, helping teams respond to customers on time.
Process Flow Diagram
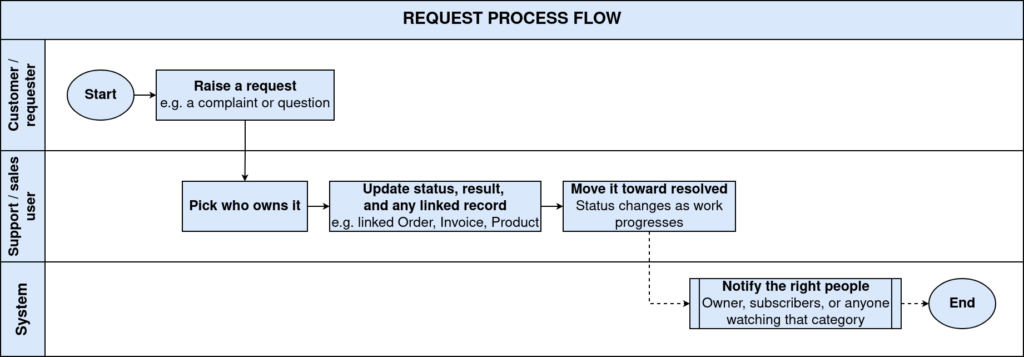
Business Rules
- A request must have a Request Type, Priority, and Summary before it can be saved.
- A new request is set to Due type automatically until a next action date is entered.
- Confidentiality is inherited from the selected Request Type when one is available.
- If no confidentiality is set, the request defaults to Public Information.
- User Importance defaults to Medium and can be raised manually at any time.
- System Priority can shift automatically based on the linked Business Partner’s group.
- Moving a request to an open status automatically records the Start Date.
- Moving a request to a closed status automatically records the Close Date.
- A Final Close status marks the request as fully processed and prevents further edits.
- Every entry typed in the Result field is saved as a new update in the request history.
- A request can be linked to a related request to connect duplicate or similar issues.
- Self-service requests follow the same status and confidentiality rules as internal requests.
Prerequisites
- Business Partner configured, if the request relates to a customer or vendor.
- Request Type configured with a linked status category.
- Status and Resolution values configured for that status category.
- Sales Representative (user) available for assignment.
- Organization configured for where the request is being raised.
Navigation
Menu → Partner Relation → Request → Request
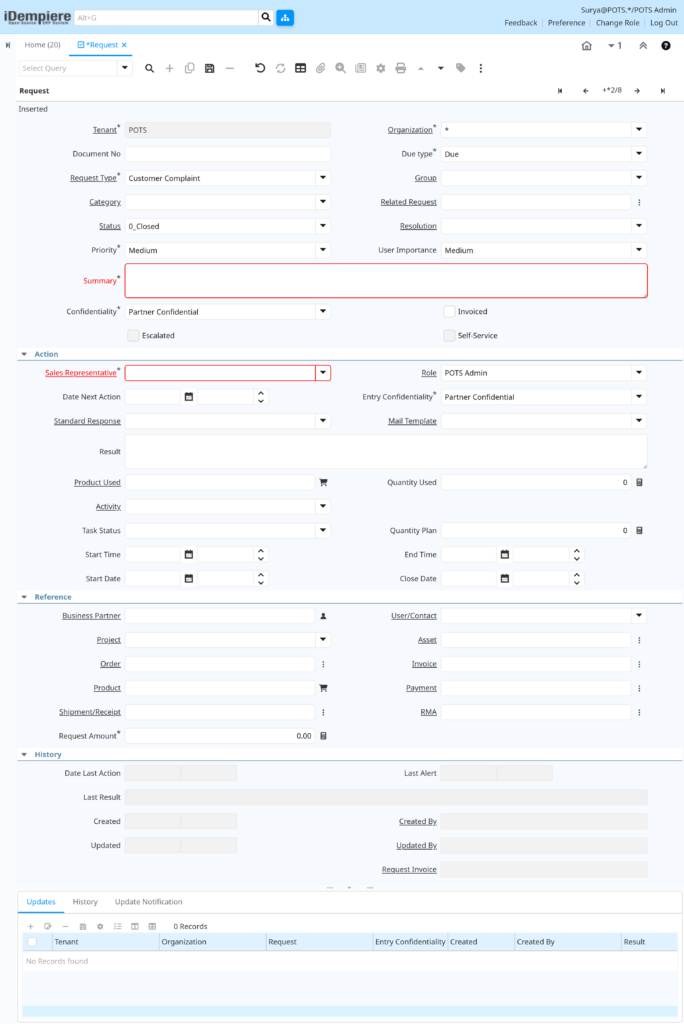
Opening the window shows a blank Request form with four sections: the request header, an Action section for follow-up work, a Reference section for linking related documents, and a History section showing past activity. An Updates tab below the form lists every remark added to the request.
Configuration Steps
Step 1: Enter the Core Request Details
Every request needs a clear type, priority, and summary so staff can identify and route it correctly.
Instructions
Select a Request Type, set the Priority and User Importance, then type a short Summary describing the issue. Choose a Category and Group if the request needs further classification.
| Field | Sample Value | Description |
| Request Type | Customer Complaint | Classifies the nature of the request. |
| Priority | Medium | System-driven urgency level. |
| User Importance | Medium | Urgency level set by the requester. |
| Summary | Delayed delivery for order #1045 | Short description of the issue. |
| Category | Delivery Issue | Optional finer classification of the request. |
Step 2: Set Confidentiality and Status
Confidentiality controls who can view the request, while Status tracks where it stands in its lifecycle.
Instructions
Choose the Confidentiality level for the request and the Entry Confidentiality for individual updates. Select a Status once one has been configured for the request type.
| Field | Sample Value | Description |
| Confidentiality | Partner Confidential | Overall visibility level of the request. |
| Entry Confidentiality | Partner Confidential | Visibility level applied to new updates. |
| Status | Open | Current stage of the request. |
| Resolution | Replacement Sent | Outcome recorded once the request is resolved. |
Step 3: Record Action and Follow-Up Information
This section tracks who is handling the request and what needs to happen next.
Instructions
Assign a Sales Representative, set the Date Next Action if follow-up is required, and type progress notes in the Result field. Record Product Used and Quantity Used if a product was involved.
| Field | Sample Value | Description |
| Sales Representative | John Mathew | User responsible for handling the request. |
| Date Next Action | 25-07-2026 | Date the next follow-up is due. |
| Result | Called customer, replacement scheduled | Notes added while working the request. |
| Standard Response | Delivery Delay Apology | Predefined reply text for common issues. |
| Activity | Follow-up Call | Type of action performed on the request. |
Step 4: Link Related Business Documents
Linking a request to the transaction it concerns gives staff full context without searching separately.
Instructions
Use the Reference section to attach the relevant Business Partner, Order, Invoice, Payment, Product, Shipment/Receipt, Asset, Project, or RMA. Only add references that apply to the request.
| Field | Sample Value | Description |
| Business Partner | Vision Retail Ltd. | Customer or vendor the request relates to. |
| Order | SO-1045 | Sales or purchase order linked to the request. |
| Invoice | INV-2201 | Invoice linked to the request, if applicable. |
| Product | Wireless Mouse M100 | Product involved in the request. |
| Request Amount | 0.00 | Monetary value associated with the request. |
Step 5: Review History and Updates
The History section and Updates tab give a complete timeline of everything recorded against the request.
Instructions
Check the Updates tab after saving to confirm the latest note was recorded. Use the History tab to review prior status changes and the Update Notification tab to see who was notified.
| Field | Sample Value | Description |
| Date Last Action | 20-07-2026 | Date of the most recent update. |
| Last Result | Replacement dispatched | Most recent note recorded on the request. |
| Last Alert | 20-07-2026 | Date the last reminder was triggered. |

Common Issues and Resolutions
| Issue | Cause | Resolution |
| Request will not save | Summary field left blank | Enter a short description in Summary before saving. |
| Sales Representative not filled automatically | No default representative configured for the role | Select the Sales Representative manually. |
| Status list appears empty | Request Type has no status category configured | Configure Status values for that request type’s category. |
| Confidentiality does not match expectation | Value is inherited from the selected Request Type | Override the Entry Confidentiality manually if permitted. |
| Escalating priority has no effect | Priority is already at the highest level | No action needed; the request is already at maximum urgency. |
| Close Date not recorded | Status selected is not part of the closed category | Choose a status that is configured as closed or final close. |
| Duplicate requests logged for the same issue | Related Request field left blank | Use the Related Request field to link duplicate issues together. |
| Updates tab shows no entries | Result field left blank when the request was created or updated | Add remarks in the Result field so an update record is generated. |
Next Steps
- Configure Request Types to define categories and default confidentiality.
- Set up Status and Resolution values for each request category.
- Configure Standard Responses for frequently used replies.
- Review the Request Processor for automatic reminders and escalation.