How to Configure Request Category in iDempiere
Request Category is a setup window in iDempiere used to group related customer service requests under a common classification, such as Customer Support.
Proper categorization improves request routing, reporting accuracy, and helps store teams track resolution across support types.
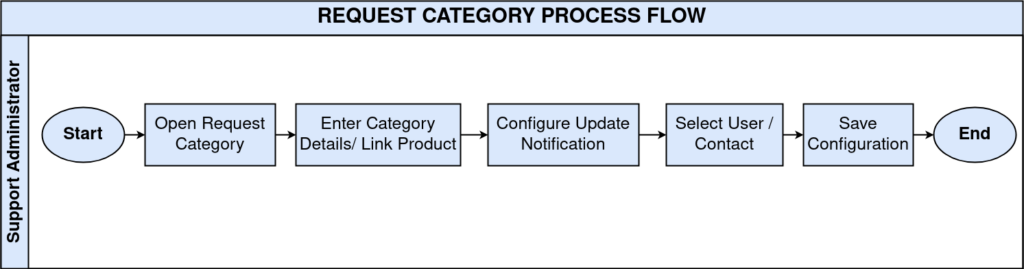
Process Flow
Business Rules
- Only active Request Categories are available for selection in the Request window.
- Each category should use a unique, descriptive Name within the Organization.
- Description and Comment/Help text guide staff on correct request classification.
- Update Notification records determine which users are alerted for a category.
- A category can optionally link to a Product for product-specific issue tracking.
Prerequisites
- Organization configured for the retail store or business unit.
- User/Contact records created for staff who will receive notifications.
- Product records set up if categories will link to specific products.
- Role and Client-level access configured for request management users.
Navigation
Menu → Partner Relation → Request → Request Category
Configuration Steps
Step 1: Define the Request Category
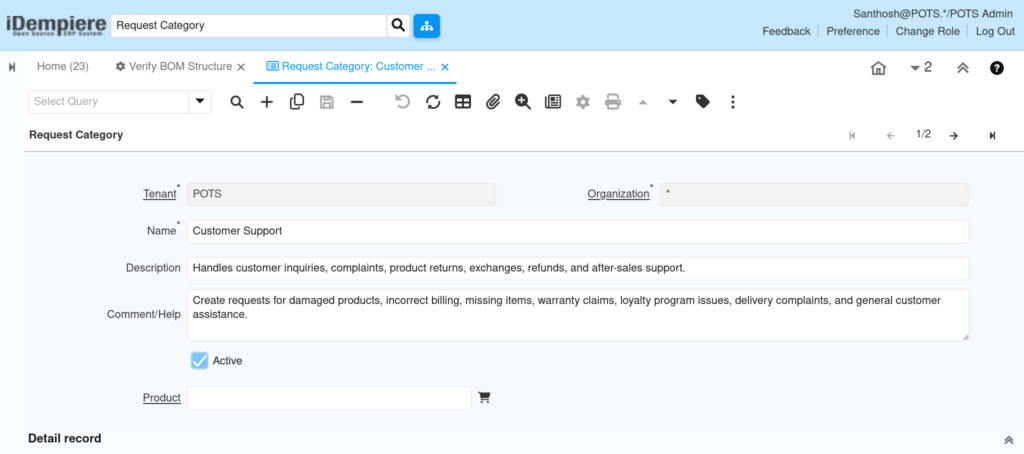
Open Request Category and click New. Enter a descriptive Name such as Customer Support, add a Description and Comment/Help text explaining what belongs in this category, then check Active to make it available.
| Field | Sample Value | Description |
| Name | Customer Support | Identifies the category shown during request entry |
| Description | Handles customer inquiries, complaints, product returns, exchanges, refunds, and after-sales support. | Summarizes the category’s purpose for staff reference |
| Comment/Help | Create requests for damaged products, billing errors, missing items, warranty claims, loyalty issues, and delivery complaints. | Guides staff on which issues to log under this category |
| Active | Checked | Controls whether the category is available for use |
| Product | (blank) | Optional link to a specific product for product-related requests |
Step 2: Configure Update Notification
In the Update Notification tab, click New. Select the Category and the User/Contact to notify. Check Active to enable the rule, and check Self-Service if customers should see this category in the self-service portal.
| Field | Sample Value | Purpose |
| Category | Customer Support | Links the notification rule to the request category |
| User/Contact | Santhosh | Staff member notified when a request is created or updated |
| Active | Checked | Enables or disables the notification rule |
| Self-Service | Unchecked | Allows customers to select this category in self-service |

Common Issues and Resolutions
| Issue | Cause | Resolution |
| Category not visible in Request window | Active checkbox unchecked | Enable Active and save the record |
| Staff not receiving alerts for new requests | No Update Notification record created for the user | Add a notification row with the correct User/Contact |
| Customers cannot see category in self-service portal | Self-Service checkbox not enabled | Enable Self-Service on the notification record |
| Category linked to wrong Product | Incorrect Product selected in header | Update or clear the Product field |
Next Steps
- Configure the Request Type window to define request behaviors.
- Set up the Request window for logging actual customer tickets.
- Review Request Group for grouping related categories.
- Assign Roles with access to Request Category maintenance.