How to Configure Test Export Model in iDempiere
Introduction
The Test Export Model window lets business users export a selected business record from iDempiere into a structured XML file, using export rules already configured in the system.
It is commonly used during data replication, system integration, or when sharing business information, such as Business Partner, Product, or Order details, with external systems or trading partners.
The exported file follows the exact field structure defined in the export setup, helping keep reporting, integration, and downstream business systems consistent and accurate.
Process Flow

Business Rules
- An Export Format must be selected before an export can be completed.
- Only active Export Formats are available for selection in this window.
- The exported file follows the field structure defined in the selected Export Format.
- The File Name field determines where the exported file is saved.
- If no file name is entered, the system saves the file to a default export location.
- Selecting Run as Job processes the export in the background instead of immediately.
- The export always reflects the current saved data of the selected business record.
- Users must have access rights to the record before it can be exported.
Prerequisites
- Export Format configured and marked as Active.
- Business record available for export, such as a Business Partner, Product, or Order.
- User access rights confirmed for the relevant record and window.
- Replication Strategy configured, if the export supports a data replication setup.
- Accessible file storage location for saving the exported file.
Navigation
Menu → System Admin → Data → Replication Data → Test Export Model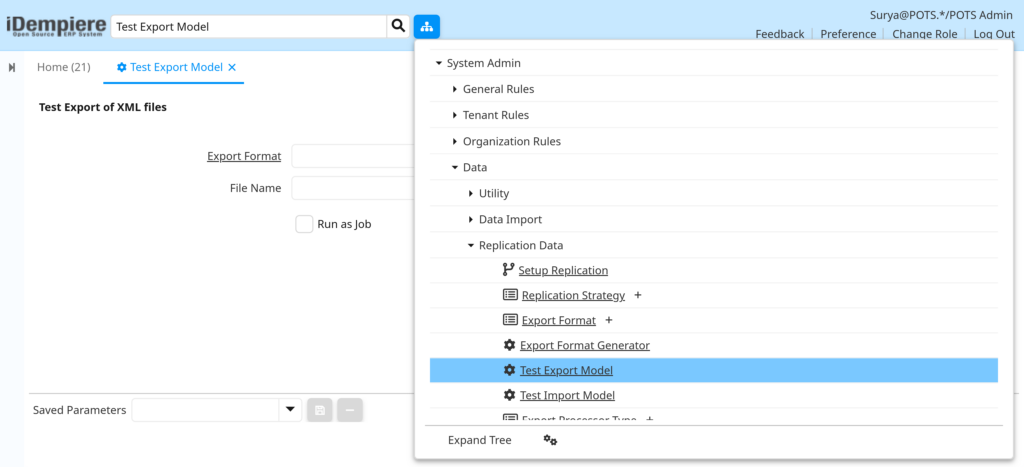
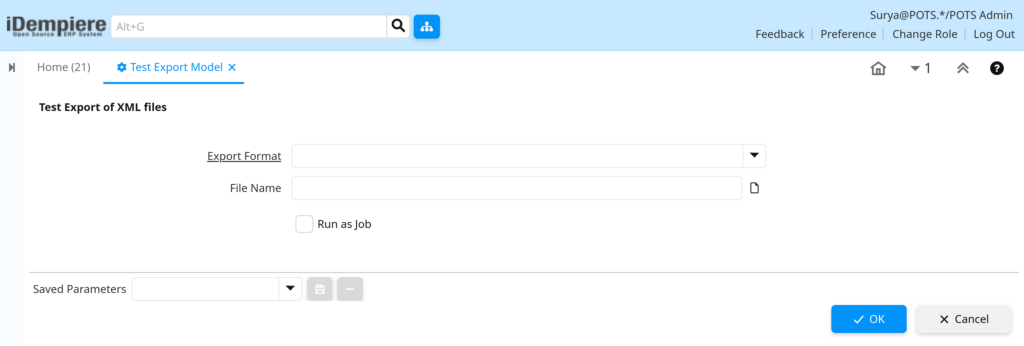
Opening this window displays the Export Format field, the File Name field with a file selection option, a Run as Job checkbox, and OK and Cancel buttons to complete or exit the export.
Configuration Steps
Step 1: Select the Export Format
The Export Format decides which fields and structure appear in the exported file, so the correct format must be chosen before exporting.
Instructions
Click the Export Format field, search for a format that matches the type of record being exported, select it from the list, then confirm the selection.
Field Reference Table
| Field | Sample Value | Description |
| Export Format | BP Export XML | Defines the fields and structure included in the exported file |
Step 2: Specify the File Name
The File Name field sets where the exported file will be created, so users can find and share it after the export runs.
Instructions
Enter a file name and save location, or click the file icon to browse the system and choose where the exported file should be saved.
Field Reference Table
| Field | Sample Value | Description |
| File Name | C:\Export\BPartner_Export.xml | Location and name of the file that will be generated |
Step 3: Choose the Run Mode
This step decides whether the export runs right away or in the background, which is helpful for larger exports.
Instructions
Check Run as Job to process the export in the background, or leave it unchecked to run the export immediately and view the result directly.
Field Reference Table
| Field | Sample Value | Description |
| Run as Job | Unchecked | Unchecked runs the export immediately; checked runs it in the background |
Step 4: Run the Export
This final step generates the export file using the format and file location chosen in the earlier steps.
Instructions
Click OK to generate the exported file using the selected Export Format and File Name. Click Cancel to close the window without exporting.
Common Issues and Resolutions
| Issue | Cause | Resolution |
| Export does not generate a file | No Export Format was selected | Select a valid, active Export Format before running the export |
| Exported file cannot be found | Incorrect or inaccessible file path entered | Confirm the file path exists and the user has permission to save there |
| Exported file is missing information | Selected Export Format does not include all needed fields | Review and update the Export Format field setup |
| No confirmation appears after running | Run as Job option was selected | Check the background job status to confirm the export completed |
| Export Format not listed in the field | Export Format is inactive or not linked to the record type | Activate the Export Format and confirm it applies to this record |
| Exported file shows outdated information | Record was exported before recent changes were saved | Save or complete the record, then run the export again |
| Export takes a long time or appears stuck | Large record volume or a complex Export Format | Use Run as Job for larger exports to avoid delays |
Next Steps
- Review or configure the Export Format used for this record type.
- Set up a Replication Strategy if this export supports ongoing data sharing.
- Confirm the receiving system can read the exported file correctly.
- Repeat the export whenever the source record is updated and needs resharing.