How to Process Customer Shipments in iDempiere
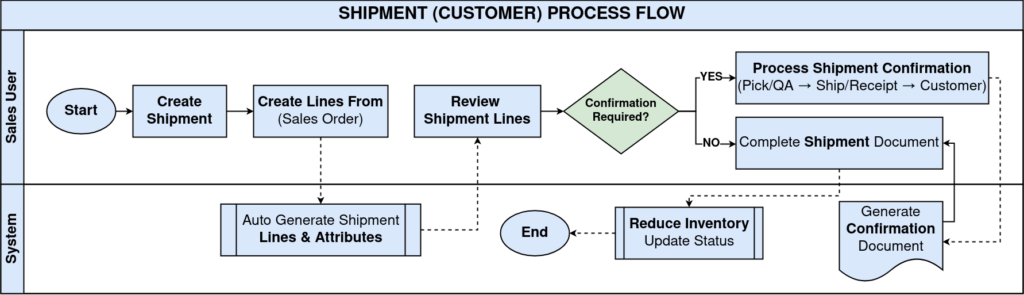
The Shipment (Customer) window in iDempiere records the physical delivery of products to a customer. It is used in retail once a Sales Order is ready for fulfillment, such as a store pickup or warehouse dispatch.
Completing a Customer Shipment reduces inventory, records the product movement, and keeps traceability to the originating Sales Order for invoicing and delivery tracking.
Process Flow
Business Rules
- Shipment can be created only for Sales Orders with shippable quantities.
- At least one shipment line is required before the document can be completed.
- Shipment quantity cannot exceed the ordered quantity.
- Organization, Document Type, Business Partner, and Warehouse are mandatory fields.
- Inventory on hand reduces only after the Customer Shipment is completed.
- Completed shipments are read-only and retain traceability to the Sales Order.
- Attribute Set Instance records are auto-generated for shipment lines when no manual attributes are entered.
- Selecting a Confirmation Type automatically creates a linked confirmation document.
- Confirmation types follow a hierarchical fulfillment order depending on how the order is sourced.
Configuration Steps
Step 1: Create the Customer Shipment Header
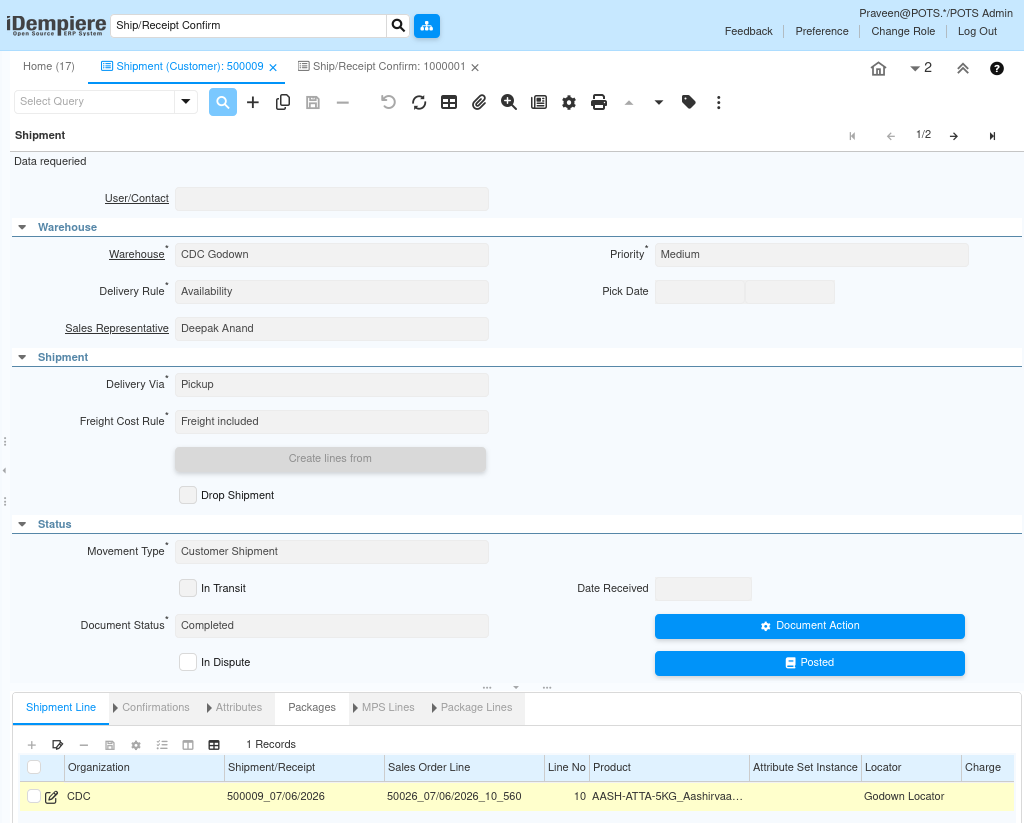
A new Shipment record must capture the customer, warehouse, and delivery details before any products can be added, since these mandatory fields drive the rest of the document.
- Create a new Shipment, then set Organization, Document Type, Business Partner, Partner Location, and Warehouse.
- All five are mandatory and are flagged red until completed.
| Field | Sample Value | Description |
| Organization | CDC | Organization the shipment is issued from |
| Document Type | MM Shipment | Identifies the transaction as a customer shipment |
| Business Partner | GLOBAL RETAIL SOLUTIONS | Customer receiving the delivery |
| Partner Location | Hyderabad | Delivery location of the Business Partner |
| Warehouse | CDC Godown | Warehouse the stock is issued from |
| Delivery Rule | Availability | When the shipment is triggered relative to stock availability |
| Sales Representative | Deepak Anand | Sales rep responsible for the order |
| Delivery Via | Pickup | How the customer receives the goods |
| Freight Cost Rule | Freight Included | How freight cost is handled on the shipment |
| Priority | Medium | Processing priority of the shipment |

Step 2: Generate Shipment Lines from the Sales Order
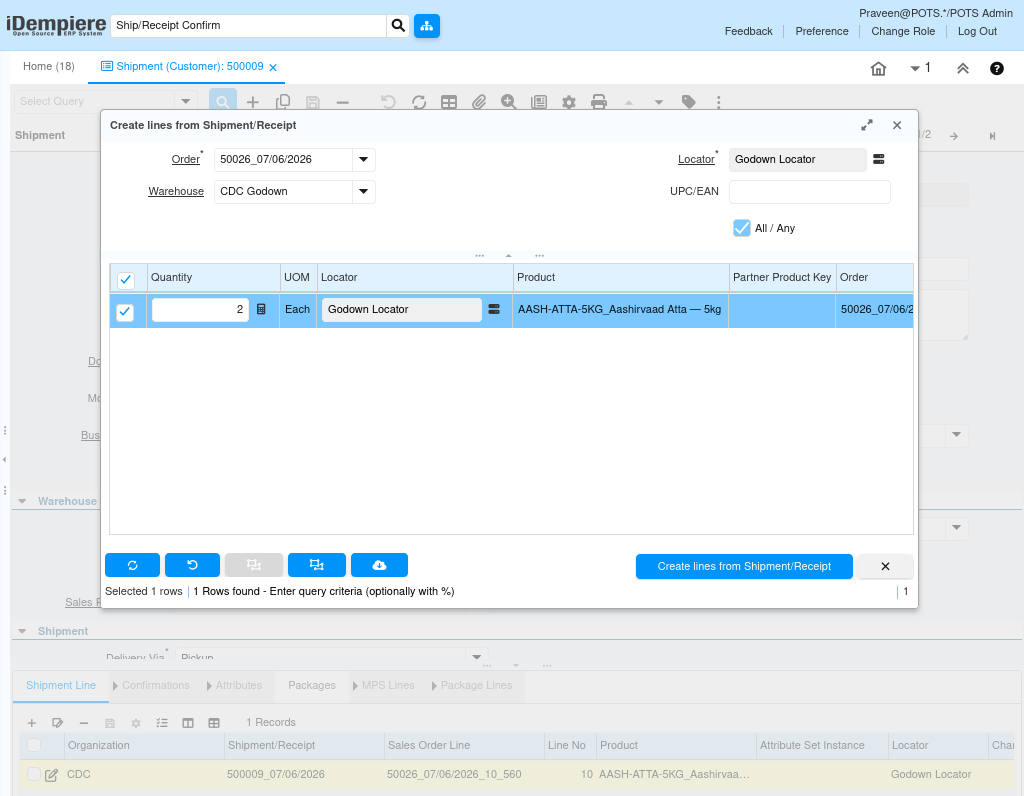
Shipment lines are pulled from the Sales Order so quantities and products match what the customer ordered, avoiding manual entry errors.
Click Create Lines From on the Shipment header, select the Sales Order and product line, then click Create Lines from Shipment/Receipt.
| Field | Sample Value | Description |
| Order | 50026_07/06/2026 | Sales Order the shipment is fulfilling |
| Warehouse | CDC Godown | Warehouse the stock is issued from |
| Locator | Godown Locator | Storage location the stock is picked from |
| Quantity | 2.00 | Ordered quantity available to ship |
| Product | AASH-ATTA-5KG_Aashirvaad Atta – 5kg | Product being shipped to the customer |
Step 3: Review the Shipment Line
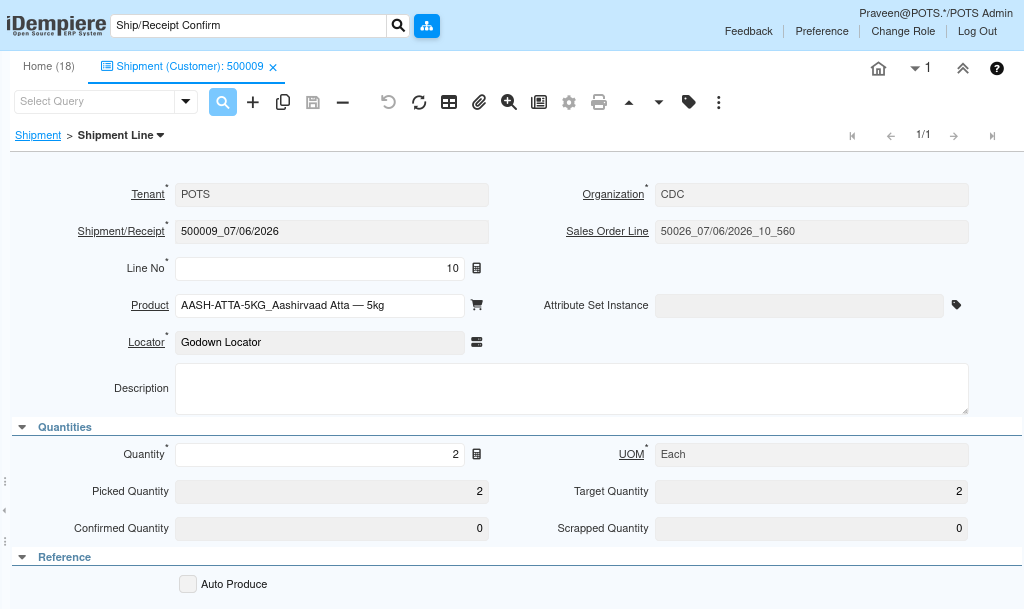
Open the Shipment Line tab and verify the Product, Locator, Quantity, and Sales Order Line reference before proceeding.
Step 4: Review the Auto-Generated Line Attributes
When a shipment line is created from a Sales Order, iDempiere automatically creates an Attribute Set Instance record for that line so the movement stays traceable, even when no batch or serial data is entered manually.
Open Shipment Line → Attributes and confirm the Auto Generated checkbox is ticked, and that Shipment/Receipt Line and Movement Quantity match the line.
| Field | Sample Value | Description |
| Shipment/Receipt Line | 10_2_AASH-ATTA-5KG_Aashirvaad Atta – 5kg_500008_07/06/2026 | Shipment line this attribute record belongs to |
| Movement Quantity | 2 | Quantity carried on the attribute record |
| Date Material Policy | 06/15/2026 | Date used to apply FIFO/FEFO stock policy |
| Auto Generated | Checked | Confirms the record was created automatically by the system, not entered manually |

Step 5: Create a Shipment Confirmation (Optional)
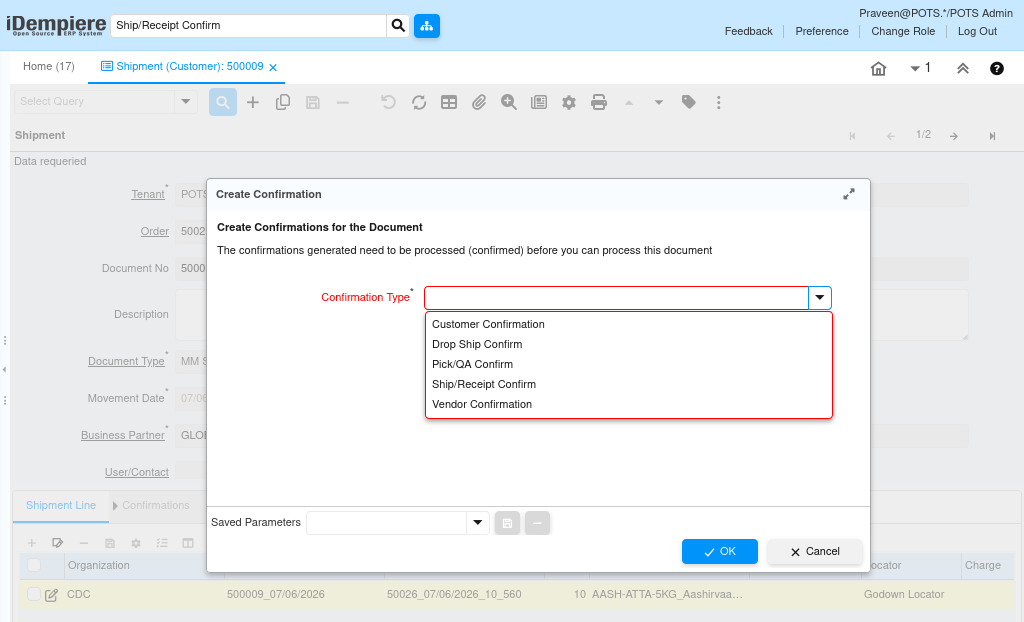
Click the actions (gear) icon next to Document Action, select Create Confirmation, choose the required Confirmation Type, then click OK. iDempiere generates a new confirmation document.
Confirmation Types
| Order | Confirmation Type | Description |
| 1 | Pick/QA Confirm | Confirms goods were picked from the locator and passed quality check before packing |
| 2 | Ship/Receipt Confirm | Confirms the quantity actually shipped matches the picked quantity; runs after picking is confirmed |
| 3 | Customer Confirmation | Confirms the customer has received the delivered goods; final step in the standard sequence |
Two additional types apply only to drop-ship fulfillment, where the vendor ships directly to the customer instead of the retail warehouse:
| Confirmation Type | Description |
| Vendor Confirmation | Confirms the vendor has dispatched the goods on the retailer’s behalf |
| Drop Ship Confirm | Confirms delivery of a drop-shipped order once the vendor has shipped it |
Note: Drop Ship Confirm and Vendor Confirmation run outside the Pick/QA → Ship/Receipt → Customer sequence and apply only when the order is fulfilled by drop shipment.
Step 6: Review the Generated Confirmation Record
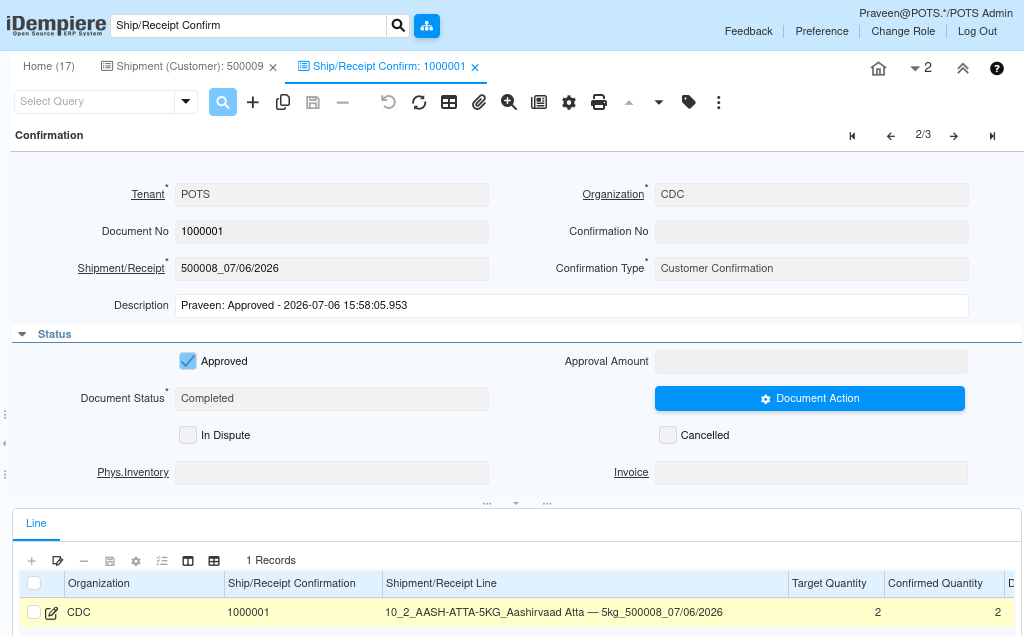
Open the generated confirmation (opens in the Ship/Receipt Confirm window regardless of type selected), verify the header and Line tab quantities, then confirm or approve the document.
| Field | Sample Value | Description |
| Document No | 1000001 | Number assigned to the generated confirmation document |
| Shipment/Receipt | 500008_07/06/2026 | Shipment this confirmation was created from |
| Confirmation Type | Customer Confirmation | Type selected when the confirmation was created |
| Document Status | Drafted | Confirmation must be processed before it counts toward completion |
Confirmation Line
| Field | Sample Value | Description |
| Target Quantity | 2 | Quantity expected to be confirmed |
| Confirmed Quantity | 2 | Quantity actually confirmed |
| Difference | 0 | Variance between target and confirmed quantity |
| Scrapped Quantity | 0 | Quantity scrapped during picking or shipping |
Note: The same confirmation record also appears under Shipment → Shipment Line → Confirmations, keeping the shipment line and the confirmation document linked both ways.
Step 7: Complete the Customer Shipment
Completing the document is what actually reduces inventory; until this step, the shipment has no stock impact.
Select Document Action → Complete. The Document Status changes to Completed and the document becomes read-only.
Common Issues and Resolutions
| Issue | Cause | Resolution |
| Mandatory fields in red | Organization, Document Type, Business Partner, Partner Location, or Warehouse left blank | Complete all mandatory header fields before saving |
| No Sales Order available | Order has no pending shippable quantity | Ensure the Sales Order exists and contains pending shipment quantities |
| No shipment lines generated | Stock unavailable or wrong Sales Order selected | Verify stock availability and the correct Sales Order |
| Unable to complete shipment | No shipment line exists on the document | Add at least one shipment line before completing |
| Insufficient inventory | Stock on hand is less than the shipment quantity | Replenish inventory before processing the shipment |
| Invalid locator | Warehouse locator not configured | Verify warehouse locator configuration before generating lines |
| Shipment quantity exceeds order | Quantity manually overridden above the ordered amount | Match the shipment quantity to the ordered quantity |
| Confirmation stuck in Drafted | Generated confirmation not processed or approved | Open the confirmation record and complete/approve it |
| Wrong confirmation type selected | Confirmation type chosen does not match the fulfillment path (warehouse vs. drop-ship) | Follow the hierarchical order: Pick/QA Confirm → Ship/Receipt Confirm → Customer Confirmation for warehouse shipments, or Vendor Confirmation → Drop Ship Confirm for drop-ship orders |
Next Steps
- Customer Invoice generation and posting.
- Customer Payment processing.
- Inventory posting verification.
- Sales analysis and reporting.