How to Configure Schedule in iDempiere
Learn how the Schedule window in iDempiere lets you configure Frequency or Cron based timing to automate execution of background processes.
Introduction
The Schedule window in iDempiere defines reusable scheduling configurations that determine when a background process should run. Each Schedule specifies either a Frequency-based interval or a Cron Scheduling Pattern.
A Schedule does not run a process by itself. It is assigned to a Schedule Process, which uses the configuration to control execution timing for reports, maintenance jobs, and synchronization tasks.
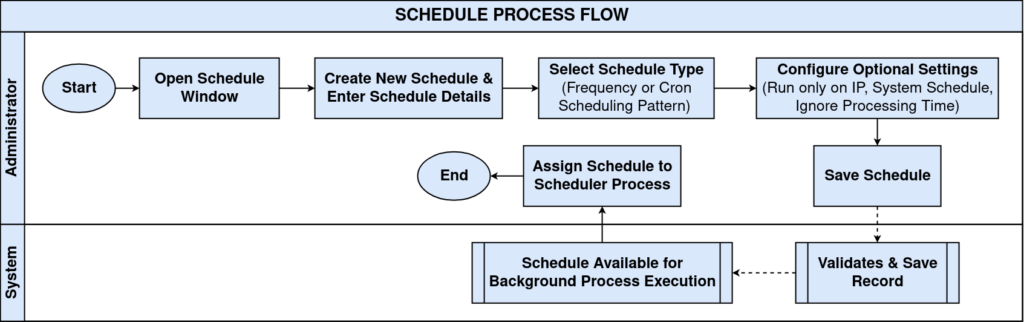
Process Flow
Business Rules
- Tenant is mandatory; every Schedule belongs to a Tenant.
- Organization is mandatory and must be specified for each Schedule.
- A descriptive Name is required to identify the Schedule.
- Schedule Type determines whether Frequency or Cron Scheduling Pattern is used.
- Frequency Type and Frequency are both required for frequency-based scheduling.
- Cron Scheduling Pattern is validated on save; invalid patterns are rejected.
- An invalid Cron expression displays the error InvalidCronPattern.
- Only Active schedules are intended for use in scheduling processes.
- A single Schedule can be reused across multiple Schedule Process records.
- The Schedule itself does not execute a process; Schedule Process performs execution.
- Run only on IP accepts an IP address or hostname for scheduler evaluation.
- Ignore Processing Time is inherited by the associated Schedule Process.
- System Schedule is an optional configuration field on the Schedule record.
Prerequisites
- User must have System Administrator access or a role with rights to General Rules.
- A valid Tenant and Organization must already exist in the system.
- The Process intended for scheduling should be available for later assignment in Schedule Process.
- Basic familiarity with Cron expression syntax if Cron Scheduling Pattern will be used.
Configuration Steps
Step 1: Create a Schedule
This step is required to establish a new, reusable scheduling definition before it can be linked to any background process.
Open the Schedule window and create a new record. Enter the Tenant, Organization, and a descriptive Name, then select a Schedule Type of Frequency or Cron Scheduling Pattern.
| Field | Sample Value | Description |
| Tenant | System | Identifies the tenant that owns the Schedule record |
| Organization | * | Organization associated with the Schedule |
| Name | 30 Minute | Descriptive name identifying the Schedule |
| Schedule Type | Frequency | Determines whether Frequency or Cron Scheduling Pattern is used |
| Active | Checked | Controls whether the Schedule is available for use |
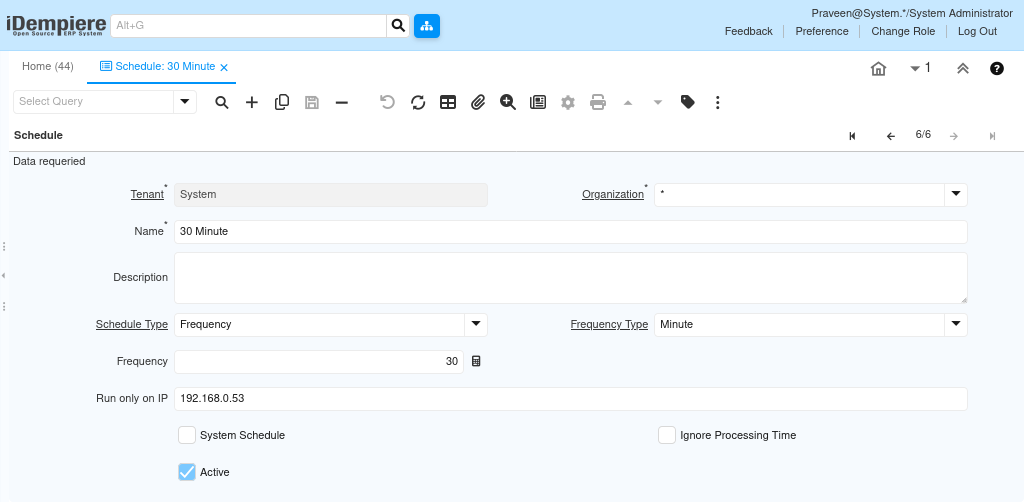
Saving the record creates a new Schedule that can later be assigned to a Schedule Process.
Step 2: Configure a Frequency Schedule
This step is required when recurring execution should occur at a fixed, repeating interval such as every few minutes or hours.
Set Schedule Type to Frequency, then select a Frequency Type and enter a Frequency value representing the repeat interval.
| Field | Sample Value | Description |
| Schedule Type | Frequency | Enables interval-based scheduling fields |
| Frequency Type | Minute | Unit of time used for the repeat interval |
| Frequency | 30 | Number of Frequency Type units between executions |
With these values, the Schedule represents an execution interval of every two hours once assigned to a Schedule Process.
Step 3: Configure a Cron Schedule
This step is required for more complex or precise timing needs that a simple interval cannot express, such as running only on specific days or times.
Set Schedule Type to Cron Scheduling Pattern and enter a valid Cron expression. The pattern is validated when the record is saved.
| Field | Sample Value | Description |
| Schedule Type | Cron Scheduling Pattern | Enables Cron-based scheduling |
| Cron Scheduling Pattern | Valid Cron expression | Defines the exact execution timing pattern |
If an invalid value such as “abc” is entered, iDempiere displays the error InvalidCronPattern and prevents saving until a valid expression is provided. A valid pattern is saved and made available for assignment to a Schedule Process.
Step 4: Configure Optional Settings
These optional fields refine how and where the Schedule is applied once assigned to a Schedule Process.
Enter an IP address or hostname in Run only on IP if execution should be restricted to a specific scheduler node. Enable System Schedule or Ignore Processing Time as needed, and confirm the Active flag.
| Field | Sample Value | Description |
| Run only on IP | 192.168.0.53 | IP address or hostname evaluated during scheduler registration |
| System Schedule | Unchecked | Optional flag identifying the record as a System Schedule |
| Ignore Processing Time | Unchecked | Optional setting inherited by the associated Schedule Process |
| Active | Checked | Determines whether the Schedule is available for use |
Once saved, the Schedule is ready for selection in the Schedule Process window, where it controls the execution timing of the assigned process.
Common Issues and Resolutions
| Issue | Cause | Resolution |
| InvalidCronPattern error | Invalid Cron Scheduling Pattern entered | Enter a valid Cron Scheduling Pattern before saving |
| Frequency fields unavailable | Schedule Type is set to Cron Scheduling Pattern | Change Schedule Type to Frequency |
| Cron Scheduling Pattern field unavailable | Schedule Type is set to Frequency | Change Schedule Type to Cron Scheduling Pattern |
| Schedule unavailable for selection | Schedule record is inactive | Activate the Schedule record |
| Run only on IP behavior differs from expectations | Runtime behavior depends on scheduler registration and environment | Verify scheduler configuration and environment settings |
| Schedule Process not executing as expected | Schedule not yet assigned to a Scheduler Process | Assign the Schedule within the Scheduler Process window |
Next Steps
- Open the Schedule Process window.
- Create a new Schedule Process record.
- Select the required Process to be automated.
- Assign the previously created Schedule.
- Configure process parameters if required.
- Start the scheduler to enable automatic execution.