How to Process a Bank/Cash Transfer in iDempiere
The Bank/Cash Transfer window records the movement of funds between an organization’s own bank and cash accounts, such as depositing cash or moving funds to a collection account.
Completing the transfer automatically creates two linked payment records, one outgoing and one incoming, giving a complete audit trail for reconciliation.
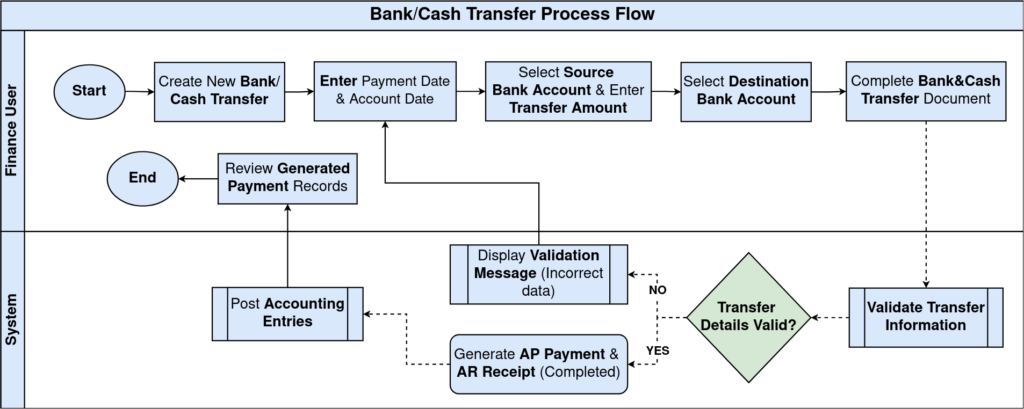
Process Flow
Business Rules
- The From Bank Account and To Bank Account must be different.
- The transfer amount must be entered before the document can be completed.
- Payment Date and Accounting Date are required.
- Source and destination account details must be completed before processing.
- Completing the document finalizes the transfer and marks it as Processed.
- Completed transfers become read-only.
- Two payment records (an AP Payment and an AR Receipt) are automatically created on completion.
- The Charge selected on each side determines the clearing account used when the payments are posted.
Configuration Steps
Step 1: Create the Bank/Cash Transfer
The header captures when the transfer happens and which organization it belongs to, before any account details are entered.
Create a new Bank/Cash Transfer and enter the Organization, Payment Date, and Accounting Date.
| Field | Sample Value | Description |
| Organization | CDC | Organization performing the transfer |
| Document No | 1000002 | Number assigned to this transfer |
| Payment Date | 07/09/2026 | Date the transfer takes place |
| Account Date | 07/09/2026 | Financial posting date |

Step 2: Enter the Source Account
The From Bank Account section identifies exactly which account funds are leaving, along with the amount and payment method.
Under From Bank Account, select the source account, business partner, charge, currency, amount, and tender type.
| Field | Sample Value | Description |
| From Bank Account | POS Cash Account_POS Cash_100001 | Account funds are transferred out of |
| From Organization | CDC | Organization owning the source account |
| From Business Partner | CHENNAI SUPPLIERS | Business Partner associated with the source side |
| From Charge | Bank Transfer Charge | Charge that determines the clearing account used for posting |
| From Bank Currency | INR | Currency of the source account |
| From Amount | 50,000.00 | Amount being transferred out |
| From Tender Type | Direct Deposit | Payment method used for the transfer |

Step 3: Enter the Destination Account
The To Bank Account section identifies where the funds land, mirroring the source details so both sides of the transfer are fully recorded.
Under To Bank Account, select the destination account, business partner, charge, currency, amount, and tender type.
| Field | Sample Value | Description |
| To Bank Account | POS UPI Collection_POS UPI_100002 | Account receiving the funds |
| To Organization | CDC | Organization owning the destination account |
| To Business Partner | CHENNAI SUPPLIERS | Business Partner associated with the destination side |
| To Charge | Bank Transfer Charge | Charge that determines the clearing account used for posting |
| To Bank Currency | INR | Currency of the destination account |
| To Amount | 50,000.00 | Amount received |
| To Tender Type | Direct Deposit | Payment method used for the transfer |
Note: From Amount and To Amount should match; a mismatch usually points to a currency or charge configuration issue rather than an intentional difference.

Step 4: Save the Transfer
Click Save. The document remains in Drafted status and is available for completion.
Step 5: Complete the Bank/Cash Transfer
Completing the document is what actually finalizes the fund movement and generates the accounting-ready payment records.
Select Document Action → Complete.
Expected Result
- Document Status changes to Completed.
- The Processed checkbox is selected.
- The document becomes read-only.
- Two payment records are automatically generated.

Step 6: Review the Generated Payments
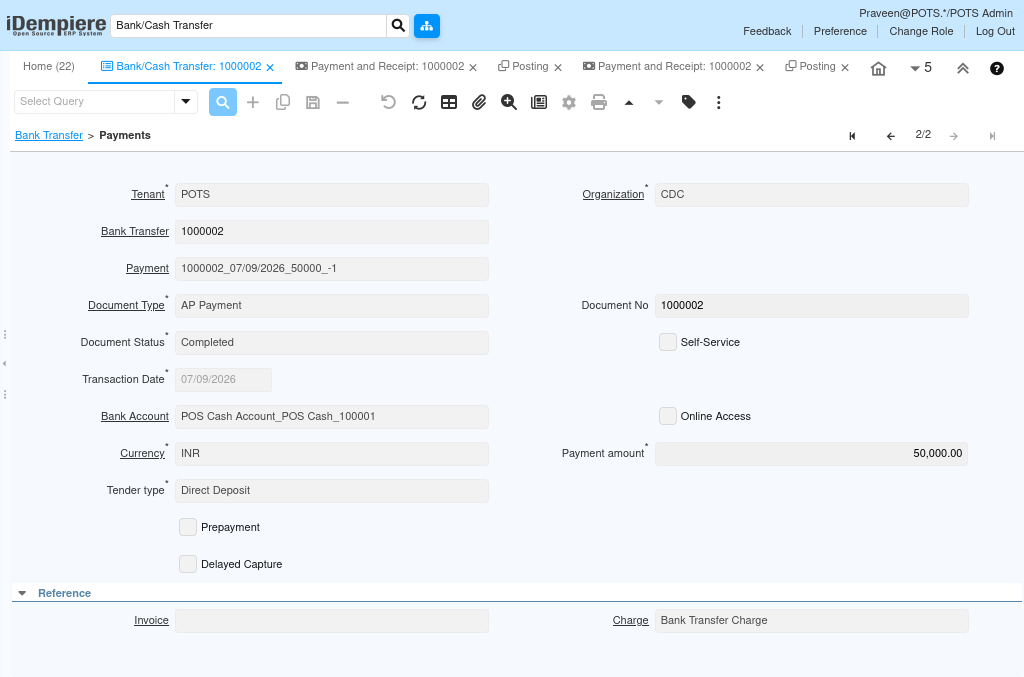
The Payments tab lists both records created by the transfer, so you can confirm the outgoing and incoming sides were generated correctly.
Open the Payments tab on the completed Bank/Cash Transfer and review both records.
| Field | Sample Value | Description |
| Payment | 1000002_07/09/2026_50000.00_-1 | Generated payment document, outgoing side |
| Document Type | AP Payment | Outgoing payment from the source account |
| Document Type | AR Receipt | Incoming receipt into the destination account |
| Document No | 1000002 | Shared document number for both generated payments |
| Document Status | Completed | Status of each generated payment |

Step 7: Review the Generated Payment Documents (Optional)
Opening each payment individually confirms the bank account, amount, and charge carried through correctly from the transfer.
Open each payment record from the Payments tab and verify the Bank Account, Payment Amount, Tender Type, and Charge.
Step 8: Review the Posted Accounting Entries (Optional)
Reviewing the posting confirms the transfer nets to zero through a clearing account rather than posting directly bank-to-bank.
Open Posting for each generated payment and verify the debit and credit lines against the clearing and charge accounts.
Common Issues and Resolutions
| Issue | Cause | Resolution |
| Source and destination accounts are the same | Same account selected for both fields | Select different bank or cash accounts for From and To |
| Mandatory fields remain highlighted | Required information is missing | Complete all mandatory fields before saving |
| Unable to complete the transfer | Required transfer information is incomplete | Review the header and account details before completing |
| Payments tab is empty | Document has not been completed | Complete the Bank/Cash Transfer to generate the payment records |
| From Amount and To Amount do not match | Currency mismatch or manual override | Confirm both accounts use the same currency, or review the entered amounts |
| Posting does not balance as expected | Charge not consistently selected on both sides | Select the same Charge on From and To so postings clear through the same account |
Next Steps
- Review the generated payment records.
- Verify the accounting entries, if financial posting is enabled.
- Perform bank or cash reconciliation.
- Continue with the organization’s regular financial closing activities.