How to Create and Configure an Import Template in iDempiere
An Import Template in iDempiere is used to define a standard format for importing data from a CSV file into a specific window and tab. It ensures that users upload data using the correct column structure, file format, and character set.
The template also controls which users can access it and whether they can insert new records, update existing records, or merge data, making the import process consistent and secure.
Business Rules
- Name is mandatory when creating an Import Template record.
- Window and Tab are mandatory — an Import Template applies to exactly one window/tab combination.
- CSV Header is mandatory and must exactly match the technical column names of the target tab, in the order they are expected.
- CSV Alias Header is optional and lets end users see a friendlier header row instead of raw technical column names.
- Character Set, Separator Character, and Quote Char must match the format of the file that will be uploaded.
- At least one Import Template Access record (Role) must be added and set Active before any user of that role can see or use the template.
- Allow Insert, Allow Merge, and Allow Update on the Template Access tab control which import modes that role may run with this template.
- An Import Template (and each Template Access row) must be Active to be available for use.
Process Work Flow

Prerequisites
- System Administrator role, to access the Import Template window.
- The target Window and Tab (e.g. Business Partner) already exist and are the ones you want to control CSV import.
- The Role(s) that should be allowed to use the template are already defined.
Navigation
Menu → System Admin → General Rules → System Rules → Import Template
The window opens to a list of existing Import Templates. An Import Template Access sub-tab is available to assign roles and permitted import modes to each template. Click New Record to define a new template.
Configuration Steps
Step 1: Create the Import Template Record
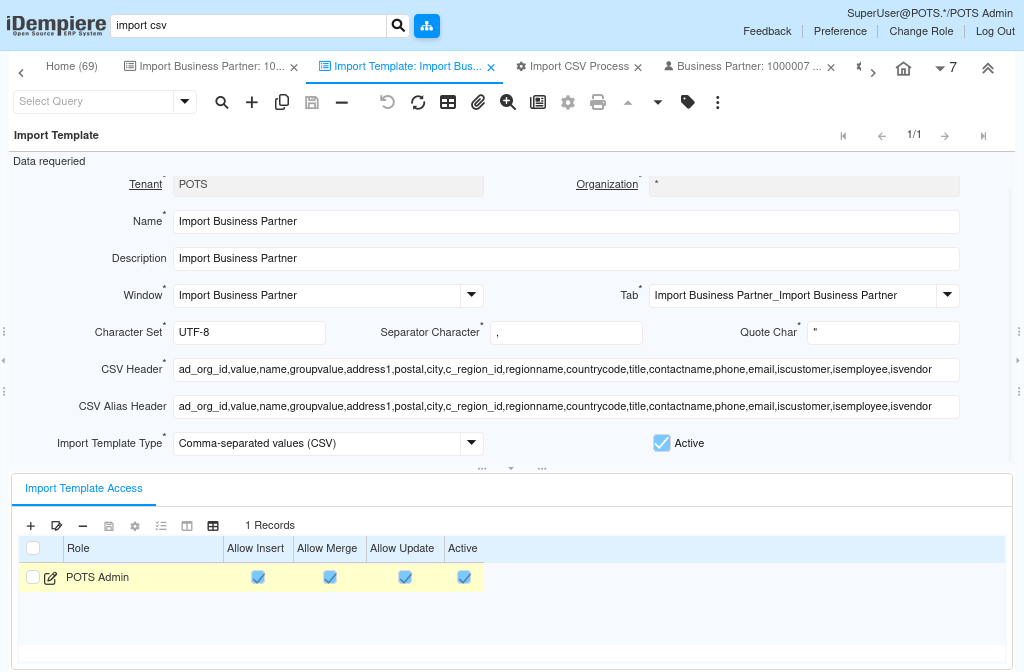
The Import Template defines the target window, target tab, file format, and CSV column layout. Once it is saved, the template becomes available in the Import button of the selected window, allowing users to import data using the predefined format.
Instructions
Open the Import Template window and click New Record.
Enter a Name and Description, select the target Window and Tab, set the Character Set, Separator Character, and Quote Char, enter the CSV Header (and optionally a CSV Alias Header), choose the Import Template Type, enable Active, and save.
Field Reference
| Field | Sample Value | Mandatory | Description |
| Tenant | POTS | Yes | The client/tenant this template belongs to. |
| Organization | * | Yes | Organization scope for the template; * makes it available across all organizations. |
| Name | Import Business Partner | Yes | Label shown to end users when choosing a template from the import dialog. |
| Description | Import Business Partner | No | Short description of what the template is used for. |
| Window | Import Business Partner | Yes | The window this template applies to. |
| Tab | Import Business Partner_Import Business Partner | Yes | The specific tab within the window this template applies to. |
| Character Set | UTF-8 | Yes | Text encoding the uploaded file must use. |
| Separator Character | , | Yes | Delimiter character used between CSV columns. |
| Quote Char | “ | Yes | Character used to quote CSV field values. |
| CSV Header | ad_org_id,value,name,groupvalue,address1,postal,city,c_region_id,regionname,countrycode,title,contactname,phone,email,iscustomer,isemployee,isvendor | Yes | The exact, allowed column header line — the contract the uploaded file must satisfy. |
| CSV Alias Header | ad_org_id,value,name,groupvalue,address1,postal,city,c_region_id,regionname,countrycode,title,contactname,phone,email,iscustomer,isemployee,isvendor | No | Friendlier/alternate header end users may use instead of raw technical column names. |
| Import Template Type | Comma-separated values (CSV) | Yes | File type this template accepts (CSV, or Excel XLS/XLSX where supported). |
| Active | Checked | Yes | Makes the template available for use. |
Step 2: Configure Import Template Access
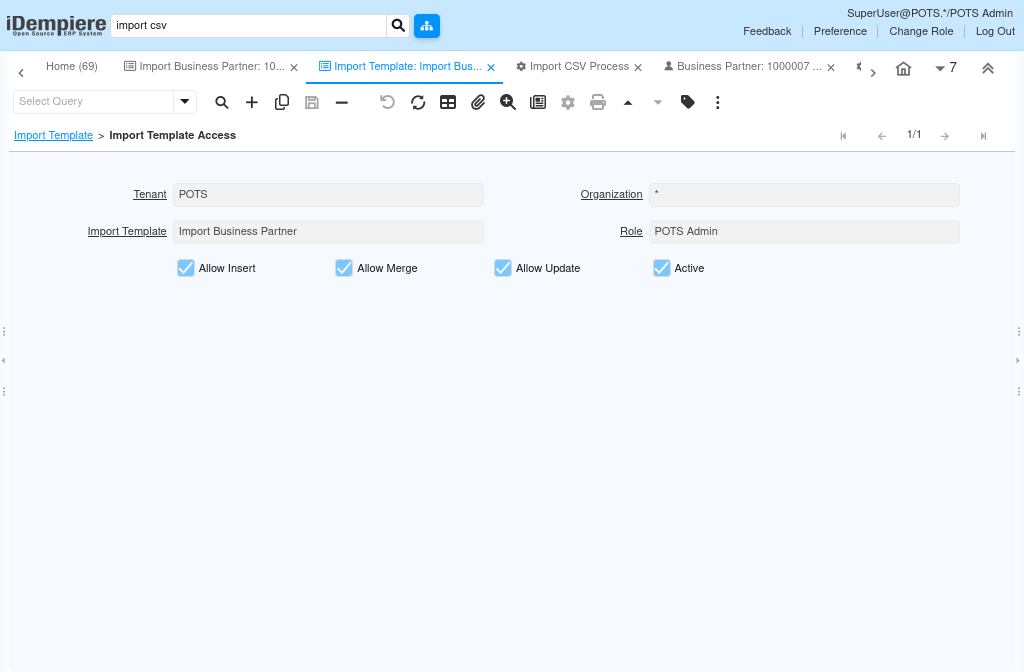
Granting access on the Import Template Access sub-tab is what determines which roles can see and use the template, and which import modes they are permitted to run.
Instructions
On the saved Import Template, open the Import Template Access sub-tab and click New Record.
Select the Role that should be allowed to use this template, enable the Import Modes to permit (Allow Insert, Allow Merge, Allow Update), enable Active, and save.
Field Reference
| Field | Sample Value | Mandatory | Description |
| Tenant | POTS | Yes | The client/tenant this access record belongs to. |
| Organization | * | Yes | Organization scope for the access record. |
| Import Template | Import Business Partner | Yes | The parent Import Template this access rule applies to. |
| Role | POTS Admin | Yes | The role permitted to use the template. |
| Allow Insert | Checked | No | Permits this role to run the template in Insert mode. |
| Allow Merge | Checked | No | Permits this role to run the template in Merge mode. |
| Allow Update | Checked | No | Permits this role to run the template in Update mode. |
| Active | Checked | Yes | Makes this access rule effective. |
Step 3: Use the Template to Import Data
After creating the Import Template, it is used in the Import CSV Process to upload the CSV file. Based on the selected Import Mode (Insert, Update, or Merge), the uploaded data is first loaded into the corresponding Import (staging) table.
The related Import process is then executed to validate the data and transfer the valid records from the staging table to the corresponding master window.
Common Issues and Resolutions
| Issue | Cause | Resolution |
| Import Template does not appear in the Import dialog | No active Import Template Access record for the user’s role | Add or activate a Template Access row for that role under the Import Template. |
| “Invalid header” error on import | Uploaded CSV header does not exactly match the template’s CSV Header | Re-export a fresh template CSV from the target tab, or correct the file’s header to match exactly, including column order. |
| Import Mode option is greyed out or unavailable | Allow Insert / Allow Merge / Allow Update not enabled for the role | Enable the required mode(s) on the Import Template Access record for that role. |
| File fails with character encoding errors | Character Set on the template does not match the actual file encoding | Save/export the CSV using the Character Set configured on the template (e.g. UTF-8). |
| Template not visible to any user | Import Template or its Template Access record is not Active | Enable Active on both the Import Template header and the relevant Template Access row. |
| Update/Merge mode fails with a key error | CSV file does not include a key column marked with /K | Add the required key column(s) to the CSV Header/file so existing records can be matched. |
Next Steps
- Use the same Import Template pattern to control CSV import for other sensitive windows (e.g. Product, Sales Order).
- Coordinate with business users on the approved CSV Alias Header so they can prepare files without needing technical column names.
- Periodically review Import Template Access to ensure only the intended roles retain Insert/Merge/Update permissions.
- Combine Import Template restrictions with Restrict Toolbar Buttons if the Import/Export buttons themselves should be hidden from other roles.